Thursday, October 24, 2013

Mysterious and Magical Week 4!

Are you enjoying being spooked, mystified and magically transported to the land of Halloween and holidays? The Dream Team train continues this week to journey through all things Mysterious and Magical for our October challenge. Our guest "engineer" is Miss Eerie herself, Alison Heikkila. October promises to be a very bumpy ride...
I made several of the little witch's hats that I showed you last week on the Retro standing cat stencil (LL3021), (click here if you missed it!), so this week I've put another hat to good use on this fun card!


LJ841 Fleur de lis  and LL3017 Cameo
Hat is LM173 Birdbath and LM183 Ice cream cones

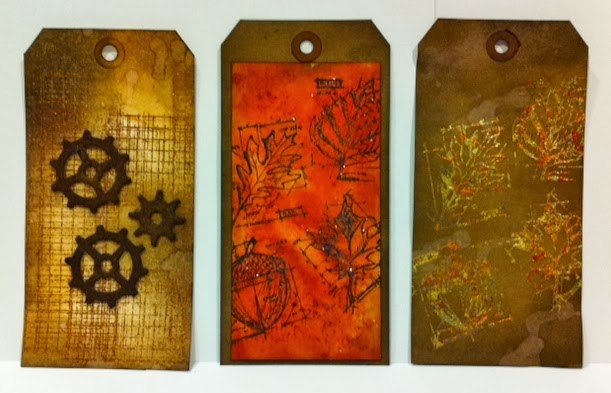
The beautiful background stencil is Dreamweaver Stencils Fleur de lis (LJ841),  and the "witch" is the Cameo stencil (LL3017). The stylish hat was created from the Birdbath (LM173) and Ice cream cones (LM183) stencils that I showed you last week. 
All images were pasted with Glossy Black Embossing Paste, then the background and Cameo were sprinkled with Metallic F/X Nouveau Orange powder while the paste was wet. Let the paste dry, and then assemble.
The "WICKED!" stamp is from A Muse Artstamps (now a muse studio), and the wonderful ribbons are May Arts. The background paper is an old BasicGrey Halloween paper (from 2009!, I hoard paper can you tell).
You won't want to miss the rest of the team blogs for more Mysterious and Magical creations!
Happy Creating,
Louise

Thursday, October 17, 2013

Mysterious and Magical Week 3!

OK, am I the only one that feels like time has sped up! I truly don't know how it got to be the middle of October already! I haven't even worked on my Halloween cards yet, much less Thanksgiving and Christmas! Mysteriously it all seems to get done eventually...maybe that's the Magical!
Are you ready to be spooked, mystified and magically transported to the land of Halloween and holidays? Hop on board the Dream Team train as we journey through all things Mysterious and Magical through the month of October. Our guest "engineer" is Miss Eerie herself, Alison Heikkila. October promises to be a very bumpy ride...
I really love witches' hats at Halloween, I always answer my door on Halloween night dressed all in black and wearing  a tall black witch hat. Alas, Dreamweaver Stencils does not have a witch hat stencil (I've talked to Lynell about that!) so I have gotten creative once more to make the perfect little hat for our wonderful Retro Standing Cat stencil (LL3021), my own version of "Cat in the Hat" so to speak! (If you missed my first hat creation, click here to see it) Here he is:


LL3021- Retro Standing Cat  - Glossy Black Embossing Paste
Black glitter from Art Glitter, and Green linen ribbon from May Arts
 Now, to create that cute little hat that is just the right size, I've combined parts of two other stencils, LM173 Birdbath, and  LM183 Ice Cream cones,  Paste with Glossy Black Embossing Paste, cut them out, layer them, add a little glitter pen to hide where they meet and create the look of a band around the hat, add it to the cat with foam mounting tape.

LM173 - Birdbath tape off just the bowl portion
LM183 Ice cream cones tape off the cone portion


Hope you like my Cat in the Hat, and will come up with some creative ways to use parts of your stencils to create magical designs!
Here are other team member links so you can look at their wonderful creations too!

Happy Creating,
Louise

Saturday, October 12, 2013

Creative Chemistry Day 5!

I know, technically it's Day 6, but I finally got a few minutes to upload the 3 tags I finished yesterday (3 to go, hopefully tomorrow!).
Creative Chemistry 102 with Tim Holtz has been a lot of fun, and has definitely kept us busy! Here are the 3 tags I have finished for Day 5.
Day 5 Tags


Rusting with Distress Powder

Sticky Powder with Glitter

Sticky Powder with Leafing

Happy Creating,
Louise

Thursday, October 10, 2013

Creative Chemistry Day 4!

Another fun day at Creative Chemistry 102 with Tim Holtz! Today was all about alcohol inks, which I absolutely LOVE working with on projects!
If you are looking for my weekly Dreamweaver Stencil post, click here.

Here are tags for Day 4:

Creative Chemistry 102 - Day 4 Tags
Faux Patina

Tinted Tinsel
Ombre
Monoprint
Faded Layers

Happy Creating,
Louise

Mystical and Magical Week 2!

We hope you enjoyed week one of our spooky, mystical and magical land of Halloween and holidays. This week the Dreamweaver design team has another set of great creations to share with you and we hope you will consider joining our challenge. Just link your creation with the linky tool over at the DREAM it UP! blog or email a photo of your work to lynell@dreamweaverstencils.com and she will post it for you. You could win a prize! 
The month of October we have as our guest designer, Alison Heikkila. October promises to be a very creative month, you won't want to miss any of it!
Here's my design for this week:
LJ816 - Spider web, LL531 - Jack o lanterns
LS28 - Spider, LG749 - Doggy words
Here's how it's done:
  • Paste emboss the Spider web stencil (LJ816) with Glossy White Embossing Paste (angle the stencil across the upper left corner of black cardstock)
  • Remove the stencil and place in water for cleaning, immediately sprinkle the wet paste with Crystal glitter
  • Let dry
  • Paste emboss the Jack o lanterns stencil (LL531) with Matte Yellow Embossing Paste in the lower right corner
  • Remove the stencil and place in water for cleaning
  • Let dry
  • Return the Jack o lanterns stencil over the dry paste and use small stencil brushes to apply ink over the paste (I used Splendor Ink - Circus ink pad)
  • Paste emboss the Spider stencil (LS28) on white cardstock with Glossy Black Embossing Paste
  • Remove the stencil and place in water for cleaning
  • Sprinkle Metallic F/X powder Nouveau Orange randomly over the wet paste
  • Let dry
  • Cut out the spider as close as possible to all the legs, use a Distress marker in antique linen to color the white edges throughout the design
  • Attach to the web with foam tape
  • Use the Dog words stencil (LG749), a small stencil brush and Memento Tuxedo Black to stencil the "happy" from the Happy HOWLoween part of the stencil
  • Line up the Happy underneath the first one and a little to the left, tape off only the "Ha" and stencil that, use the "pp" upside down to create the two l's (minus the round part of course!), then the "oween" next to that
  • Use a deckle scissors to cut around the words, and brush the background with the left over black ink from the brush, mount the words on a small orange mat with a deckled edge
  • Use foam tape to add the words to the card
Now check out the rest of the team blogs:


This week I have been taking Creative Chemistry 102 with Tim Holtz. Scroll down to see what we've been creating!

Happy Creating,
Louise

Wednesday, October 9, 2013

Creative Chemistry Day 3

The fun continues in day 3 of Creative Chemistry with Tim Holtz. He is keeping us very busy and I'm loving every minute of it! Today one tag needs drying time, so I will have to share that another day, but I have finished the other techniques!
Day 3 tags
UPDATED with Cracked Glass

Faux Cracked Glass

Day 3 Tags - Creative Chemistry 102

Distress Glittering
Distress Glitter Rock Candy

Brayer technique

Smudge stamping

Smudge stamping - first and second impressions

Happy Creating,
Louise

Tuesday, October 8, 2013

Creative Chemistry Day 2!

Updated with the rest of the tags!

Today's techniques in Creative Chemistry 102 with Tim Holtz were all about Distress products and stencils. Being on the Dreamweaver Stencils design team, I knew I was going to have a lot of fun today! I always love to learn how to apply other products to our stencils. There are several homework assignments today, so keep checking back for updates as I complete them!
Day 2 Tags:
First tag of Day2:


Mixed Media Layering
Mixed Media Layering 
Mixed Media Layering - the layers up close!


Embossing with Stencils

Embossing through Stencils
Stencil Stamping
 
Stencil Sketching

Ink Monoprint

Paint Monoprint

.

Happy Creating,
Louise