Showing posts with label Double glitter technique. Show all posts

Thursday, January 12, 2017

Chilly Days!

The weather has turned chilly here in the last few days, but we can't really complain, after all, it is January! 

The Stampendous Design Team members are sharing our "Snow Wonderful" creations this week.  Last week I shared an ATC (Artist Trading Card) I had made for the ATC group I belong to that had a "Tiles" theme.  This week I'm showing you an ATC I created for our December theme of "Glitter".  It features the the beautiful Snowflake Cascade (FMS4042) stencil with a sentiment from the Holiday Expressions (SSC1231) set.


"Chilly Days!"
Stampendous:
FMS4042 Snowflake Cascade Metal Stencil
SSC1231 Holiday Expressions 
MG09 China Blue Micro Glitter
MG01 Crystal Micro Glitter
MPW811 Mixed Media White Paper
Acrylic Handle
MEM01 Memento™ Tuxedo Black Ink by Tsukineko®

Plus:
Royal Blue Cardstock
VersaMark Ink
Double sided adhesive sheet
Soft brush
Foam Tape

Instructions:
Step 1:  Cut a 2 1/2" x 3 1/2" piece of royal blue cardstock, adhere a 2 1/4" x  3 1/4" piece of double sided adhesive to the blue paper
Step 2:  Place the snowflake stencil face down on a paper towel or craft mat and pat the back with VersaMark ink
Step 3: Remove the release paper from the blue paper and place the stencil ink side down on the sticky paper, use the release paper to press the stencil firmly to the sticky surface
Step 4:  Sprinkle China Blue micro glitter over the openings of the stencil and rub in with your finger or a piece of release paper, tap off all extra, brush off excess glitter with a soft brush
Step 5:  Turn the glittered piece face down on a paper towel and carefully pull the glittered image off the stencil, keeping the stencil flat on the table
Step 6:  Sprinkle the background with the Crystal micro glitter, rub gently, tap off extra
Step 7:  Stamp the sentiment, mount on a matching blue mat and add to the Snowflakes using foam tape
Step 8:  Adhere a piece of cardstock to the back with your ATC information!


Go to the Stampendous Blog for more samples.

Happy Creating,
Louise

Thursday, November 19, 2015

Believe!

"It's beginning to look a LOT like Christmas,
Everywhere I go..."

So, now that I've got that song stuck in your head for the day, let's see what the Stampendendous Design Team is sharing this week. Our weekly theme has been "The Big Fat Man with the Long White Beard!". Yup, he's checking to see who's been naughty and nice so you better watch out! But we've also been featuring Action Wobble on some posts this week. There's been a lot to see!


Today is Dreamweaver Thursday and what better stencil to match this week's theme than this fun Sleigh and Reindeer Stencil (DWLL556). It fits the theme perfectly and is done with the Double Glitter Technique which makes it sparkly and fun. The saying is "Spirit of Christmas" (CRH321) from Stampendous embossed with red embossing powder. No, it doesn't use an Action Wobble, but some of the other posts today do!


Supplies
Stampendous
MG11 Red Micro Glitter
MG01 Crystal Micro Glitter
EP524 Real Red Opaque Embossing Powder
CRH321 Cling Spirit of Christmas

Dreamweaver
DWLL556 Sleigh and Reindeer Stencil

Plus
Double-sided mounting paper
Handmade Hawaiian Soap
1/2" stencil brush
May Arts Ribbon
VersaMark
Bazzill Green Cardstock
Neenah Papers Classic Crest Cover Solar White 80#
Double-sided tape
Foam tape
Beacon Adhesive FabriTac

Instructions

Step 1:  Fold a 7" x 10" piece of green cardstock in half to form an A7 card

Step 2: Attach a 2 3/8" x 5 1/2" piece of Double-sided Mounting Paper to a green mat 2 5/8" x 5 3/4"

Step 3: Soap the back of the stencil and use a 1/2" stencil brush to clean any flakes of the surface and out of the openings

Step 4:  Remove the release paper from the mounting paper and place the stencil, soap side down, on the sticky surface, use a piece of release paper to press the stencil firmly to the mounting paper

Step 5:  Sprinkle the red micro glitter in all the openings and rub in gently, brush away all extra

Step 6:  Turn the image face down on a clean paper towel and carefully peel the paper off the stencil, making sure to keep the stencil flat on the table

Step 7:  Sprinkle the background with Crystal micro glitter and rub in, tap off excess

Step 8: Tape the Sleigh layer near the top of a piece of white cardstock 4" x 6"

Step 9:  Add a beautiful red ribbon from May Arts then attach to the front of the card

Step 10:  Stamp the Spirit of Christmas saying with VersaMark on white cardstock (1 3/4" x 2 1/2") and sprinkle with Real Red Embossing Powder, tap off excess, heat set

Step 11: Tape the saying to a green mat ( 2" x 2 3/4") and attach to the card with foam tape
Double

Head over to these blogs for more action:


Louise Healy 


Happy Creating,
Louise

Friday, May 8, 2015

Celebrate Freedom!

Welcome to the Stampendous - Dreamweaver Design Team final day of our theme "Patriotic Panache".  Yesterday, I shared a Red, White and Blue design featuring Dreamweaver products. Today I'm combining two great Dreamweaver stencils along with some of the fabulous Stampendous embossing powders in the Double Glitter technique (you can see a great video of this technique at the Dreamweaver Stencils by Stampendous youtube channel).

Here's what I created:
"Freedom, something to celebrate!"
There's nothing that says Patriotic like fireworks! I just love them, the closer the better! Here are some basic steps for this:
  • Soap the back of the Fireworks stencil (LJ886) 
  • Use a 1/2" or 3/4" stencil brush to brush away any extra flakes out the the openings and off the stencil
  • Place a piece of Double-sided mounting paper (the same size as the stencil) on a cardstock mat that is slightly larger than the mounting paper, burnish it well
  • Remove the release paper and place the stencil, soap side down, on the sticky paper
  • Use a piece of the release paper to press the stencil firmly to the adhesive
  • Starting with the largest firework in the upper left, I carefully sprinkled it with Stampendous Ruby Red embossing powder and tapped off the extra, making sure to tap off away from the other openings
  • Next I added Silver Tinsel embossing powder to the stars and tapped off extra
  • Then, Sky Blue embossing powder in the the next, Jeweled Gold embossing powder in the bottom left and more Ruby Red in the lower right
  • Gently brush away any powders still clinging to the stencil
  • Place the image face down on a clean paper towel or piece of paper and carefully lift the paper off the stencil, being sure to keep your stencil flat on the table
  • Heat set all the powders
  • Sprinkle the background with crystal glitter
  • The Celebrate stencil (LS90) was paste embossed on dark blue paper with Glossy White Embossing Paste, stencil removed, then the wet paste sprinkled with crystal glitter
  • The little bits of ribbon are from May Arts 
If you don't have the Fireworks stencil or embossing folder, look through your stencils and see what might work instead. Here's how I created fireworks before I had this wonderful stencil!

LJ892 Spider mums stencil
LJ 892 Spider mums
LJ892 Spider mums
I taped off the stems, paste embossed and added glitter while the paste was wet and let it dry. Then I reversed the stencil to add one more "firework"! Think outside the box, see how creative YOU can get with the stencils you have!

See more great Patriotic designs from these team members:


Happy Creating,
Louise

Thursday, March 26, 2015

Marching into Spring Week 4!

See the links below for the DW/Stampendous/Woodware hop!

Ready for fresh air, sunshine, new leaves, and flowers blooming? Well, the Dream Team is right there with you! Our challenge for the month of March is...coincidentally...Marching into Spring. Per usual, we'd love to have you play along with us, and link your own creations to theInlinkz tool on the Dream It Up! blog, or at the bottom of this post. Play as many times as you'd like. Those of you who work Dreamweaver and/or Stampendous products into your projects receive bonus points, but everyone has an opportunity to be the winner who receives the stencil of their choice.

A sure sign of Spring is Easter, and with Easter only a week away, I decided that a fun Easter card was the perfect way to end this month's challenge.

Here's my hint of Spring, Easter style:

Easter egg stencil - LG685
Double-glitter technique
You can't make an Easter card without glitter! The Dreamweaver Easter egg stencil (LG685) is perfect for the beautiful Double-glitter Technique. The stencil is actually egg-shaped, so you get a nice "frame" of glitter too. Here's how you do it:

  • Cut a piece of Dreamweaver Double-sided mounting paper (MPDS) a little larger than the stencil
  • Cut a piece of colorful cardstock an 1/8" each direction larger than the MPDS
  • Remove the release paper from one side of the MPDS and center it on the cardstock
  • Place the stencil face down on a paper towel and gently rub the back with Dreamweaver Handmade Hawaiian Soap (DHHS) making sure to go over all the back
  • Use a large stencil brush to brush away any flakes of soap from the openings
  • Remove the top piece of release paper from the MPDS and place the stencil, soap side down, on the sticky surface
  • Use a piece of release paper to press the stencil firmly on the sticky paper
  • I used Stampendous fran-tage micro glitters (Lavender, Orange, Pink and Teal) to "color" my egg
  • To remove the stencil, turn the glittered image face down on a clean surface and gently peel the paper off the stencil, making sure to keep the stencil flat on the surface
  • Sprinkle the exposed sticky paper with Crystal micro glitter to finish off the design
  • Mount on a cute paper, add a pretty bow, and you've got a great Easter card!
When I first finished the card it didn't have the bow and looked like this:


Pretty, but I felt like it needed a little something, hence, the bow. Which do you like?  Also, after I finished glittering, I decided to add a second layer to the flowers because I had gotten a little Teal glitter in the pink flowers. I like the dimension the additional layer gives.  Here's a close up:


The links for DW/Stampendous/Woodware
Happy Creating,
Louise

Thursday, September 18, 2014

Week 3 Most Wonderful Time of the Year!

How can it be the third week of September already???? The weather has definitely turned into fall weather, cool sunny days, chilly, chilly nights. I love it! 

It certainly puts me in the mood for starting all my holiday cards. I love Halloween, so I try to do a card for that (I'll share that with you in early October!). Of course, I can't let Thanksgiving slip by without sending cards for that, though I only send about 30-35 of those. 

Then comes Christmas, THE MOST WONDERFUL TIME OF THE YEAR! Especially this year because we will be welcoming our second grandchild Christmas week we hope. I send around 100 or so cards at Christmas time, so I like to get an early start making them and do a couple of different designs.

Here are three cards I designed for my recent class at Memories and Beyond in Downers Grove:
LL3046 Tall Poinsettia Metallic Silver Embossing Paste
with Blue Leafing 

LL3046 Tall Poinsettia and LX7026 Chevron Bkgd
Glossy White Embossing Paste with Crystal glitter sprinkled on the wet paste

LL3046 Tall Poinsettia Double glitter technique using
Art Glitter True Red, Vine, Fool's Gold, and Crystal
This new Poinsettia stencil (LL3046) is so beautiful and looks great in any technique! The new Chevron Bkgd (LX7026)  is such fun to use, notice how the bottom front of the card is trimmed to follow the pattern.

Don't forget to visit the rest of the team blogs for more great holiday inspiration!


Happy Creating,
Louise

InLinkz script -->

Thursday, January 16, 2014

Clean and Simple Cards

During the month of January, the Dreamweaver Stencils design team was given the challenge "Lose Some Weight!" (AKA Clean and Simple). Clean and Simple is one of my favorite ways to create because it allows you to say "no, it doesn't need that, it's pretty just how it is!". Sometimes when we get new toys to play with, that is hard to remember! The team has been creating with the beautiful new stencils just released this last weekend at CHA, and today in the mail I got my box of the new die cuts! I can hardly wait to play with those! If you haven't seen the new products yet, here's a peek at them.


Like I said, it has been fun, fun, fun, with new fun just beginning!
It's hard to choose which to share with you and still follow our theme, so I decided to share multiple images of one design to show the versatility of these wonderful stencils.
Here is the card I created for Lynell using the beautiful new Swirly Hearts stencil (LJ928):
LJ928 - Swirly Hearts Letterpress Technique

And here are the cards for my upcoming class at Memories and Beyond in Downers Grove using the same stencil:
LJ928 Swirly Hearts - Sludge Paste Technique

LJ928 Swirly Hearts - Double Glitter Technique

LJ928 Swirly Hearts - Dry Embossed with the Strie Technique applied
The class is on Tuesday, January 28th at 1:00 pm and repeated at 6:00 pm. Give Memories and  Beyond a call to reserve you place!
The other team members have more great samples for you too!


Happy Creating,
Louise

Thursday, September 12, 2013

Awesome in Autumn Week 2!


Ready to be sparkly? This month is the annual collaboration between Dreamweaver Stencils and Art Glitter, and it promises to have double the glitter and double the fun! Follow the trail of bling all of this month on the Art Glitter blog, and the Dream It Up! blog. Play along with the monthly challenge of "Awesome in Autumn" and link your creations to the linkytool on the Dream It Up! Thursday posts for a chance to win some stupendous stencils and glamorous glitter! As if that wasn't cool enough, Art Glitter is offering a 20% discount this month if you use the code DW20 and...

Stencil with Style is also offering a 20% discount this month if you use the code SWS20!

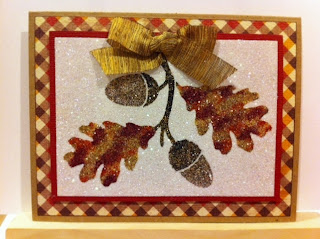
It's hard to get in the Autumn mood during these 95 degree days we are having right now, but it is my favorite time of year, so that makes it easier. Here's what I created this week:
LG754 - Lg Oak Leaves

Art Glitter - Black, Pumpkin, True Red, Fool's Gold, Orange Crush , Fauna, & Crystal
LG754 - Lg Oak Leaves
I used the double glitter technique with several beautiful Art Glitter colors. I didn't have a dark brown for the stem and acorn tops, so I mixed a little Fool's Gold and Black on a coffee filer and put that in the areas I wanted. For the bottom of the acorn, I added a little Fauna (very pale gold) to the gold/black mix to lighten it up just a little. The leaves were sprinkled randomly with True Red, Pumpkin, Fools' Gold, Orange Crush and the rest of the gold/black mixture. Use your finger to rub the glitter around to blend the colors a little, tap off the extra glitter (i save that mix for another day!), turn it over and peel off the paper, sprinkle the background with Crystal glitter. Mount into a beautiful fall card. The beautiful ribbon I used is one of my favorites from May Arts, it is a gold black weave perfect for my design.

Check out this week's awesomeness which includes our super sparkly guest designer and previous Dream Team member...