Showing posts with label Molten Magic technique. Show all posts

Thursday, January 15, 2015

Happy Birthday Week 3!

Welcome to our Birthday celebration for the year 2015! In honor of that, we've decided that our monthly challenge for January will be Birthday Wishes. We'd love for you to play along with us, and link your creations to the Inlinkz tool at the bottom of this post, or on the Dream It Up! blog, for a chance to win the stencil of your choice...and remember, using Dreamweaver products gets you bonus points towards an extra stencil!

My creation this week didn't turn out how I had first envisioned it, but I really like it. I meant for it to have a more Spring-time feel, because we could use a little Spring here in northern IL! Here's my birthday wish for this week:

LX7014 Daisy background - dry embossed on glossy cardstock, colored with Color Solutions Alcohol Inks
LL548 Daisies - paste embossed with Glossy Black, FX Powders sprinkled on then heated, outlined with a fine tip Sharpie

LG704 Birthday words stenciled with black ink
Of course, more birthday inspirations coming your way from our "A" team:


Happy Creating,
Louise

Thursday, October 2, 2014

Happy HallowThanksMas!

Can you tell that sometimes Dream Team's "Fearless Leader", Pam Hornschu, has a hard time deciding on monthly challenges? Since the team will be taking turns all month with the Smeared and Smudged 31 Days of Halloween (see the DREAM it UP! blog for details), and we are doing a Christmas collaboration with Stampendous and Core'dinations the 13th - 17th, the confusion should be understandable. Therefore...happy HallowThanksMas! As usual, we'd love for you to play along with the challenge and link your creations to the Inlinkz tool on the Dream It Up! blog. Just in case you are wondering...NO, YOU DO NOT NEED TO POST SOMETHING WITH ALL THREE HOLIDAYS ON IT! However, you get bonus points for actually using Dreamweaver stencils and product on your creations! And bonus points might actually earn you an extra stencil as our monthly winner...just sayin'!

Here's my creation for today:

LL3043 Oak leaf done in the Molten Magic Technique
DX7020 Leafless tree die
I just love the new oak and maple leaf stencils that were just released! They are perfect for a variety of techniques and make fabulous fall cards. To recreate this, follow these simple steps:

  • Tape the oak leaf stencil (LL3043) to cream colored cardstock with removable tape
  • Use a palette knife and paste spreader to apply a coat of Metallic Copper Embossing Paste
  • Remove the stencil and place in water for later cleaning
  • Sprinkle a variety of Metallic F/X Powders over the wet paste
  • Tap off excess powder and heat the image with a heat tool until the paste is bubbly all over
  • Let image cool before using a Swiffer cloth to buff off excess powders
  • Rouge the edges with Distress Inks in fall colors
  • Rouge the edges of a 5 1/2" x 5 1/2" card front with the same colors
  • Mount a piece of wood grain paper on the card front
  • Die cut some branches out of black cardstock using DX7020 Leafless tree die
  • Arrange them coming out from the left side of the card front and adhere in place leaving most of the branches loose
  • Use foam mounting tape to add the Oak Leaf image over the branches
  • Add a little jute string bow (May Arts) as a finishing touch
A great card for an Autumn birthday, anniversary, really, any occasion, or Thanksgiving! 


I hope you've enjoyed my creation today. Remember to visit the rest of the team, as confusion takes rein...could be interesting!

Louise Healy


Happy Creating,
Louise

Thursday, June 5, 2014

Old, New, Borrowed, Blue

At Dreamweaver Stencils, we love to make our monthly challenges something for everyone, and not so strict that no one wants to play along. This month our challenge is, "Old, New, Borrowed, Blue", with the obvious thought being a wedding theme...but not necessarily. Add an old embellishment or picture. Use a new stencil design or technique. Borrow, or CASE (copy and say everything) another designers project, and obviously, blue...is blue. Where will YOUR creative process take you for this month? We'd love to see! And remember, linking your creations with the Inklinkz tool at the end of the team posts, provides you with the opportunity to win the stencil of your choice!
For this first week of our new challenge, I have gone with the Old/New theme.  Ever since the Stylized Dahlia stencil (LG743) was released in 2012, it has been one of my favorite stencils (I know, I say that about all of them!). It is so versatile and looks wonderful in a large variety of techniques. Here are some samples of a class I taught in June of 2012 with this fabulous stencil (for the "Old" part of the challenge):
LG743 - Red Glossy Embossing Paste with Crackle Paste over, let dry, then
stencil with Brilliance inks from Tsukineko
LG743 - Double Glitter Technique, but with Ranger Distress Embossing Powders
instead of glitter (heat set after powders are all in place)
LG743 - Molten Magic Technique, Pearlescent Embossing Paste with
Metallic F/X powders sprinkled over wet paste, heat until bubbly
When Dreamweaver announced last month that one of the four new die cuts being released in June was the matching die for this wonderful stencil, I was thrilled! For the "New" part of the challenge here's what I created:
DG743 - Stylized Dahlia die, cut out of plain white cardstock and the negative image mounted over
patterned cardstock. Notice how you can leave the "petals" loose for more dimension (save the
other pieces for another card)
LG743 - Pasted embossed with Glossy Red Embossing Paste, let dry
DG743 - place double sided mounting paper on the back of some pink and green papers,
die cut images and peel off release paper to stick the pieces where you want them
*Note* - While Glossy Red Embossing Paste is no longer available, it is easy to make your own using Translucent Embossing Paste (about 1 Tbsp), and red acrylic paint (tube not bottle) mixed in (start with about 1/4 tsp, then adjust)

Next week the Dream Team will be doing a collaborative Blog Hop with Imagine Crafts. Each day various team members will be posting ideas using Dreamweaver stencils and various products from Imagine Crafts. The fun starts Monday, and the grand finale will be Friday. Be sure to stop by each day, I'm sure there will be prizes involved!

Here's what our "A" team has been working on this week:

Louise Healy

Happy Creating,
Louise


Saturday, August 17, 2013

Dreamweaver and Woodware Day 6!

WOW! What a great week filled with so many beautiful ideas for the upcoming holidays! We hope you've all enjoyed the week as much as we have!
If you missed day 1 click here to check it out
If you missed day 2 click here to be inspired.
If you missed day 3 Click here to see it
If you missed day 4 click here for more great ideas
If you missed day 5 click here for even more!

The annual Dreamweaver and Woodware Christmas in August extravaganza week is wrapping up! We have had a Monday through Saturday of knock your Christmas stockings off  fun and inspirational ideas for the upcoming holidays. All that you need to do is hop back and forth across the "pond" on each day, oohing and aaahhhing as you go, and leaving us plenty of holiday love. In return, you'll be entered to randomly win one prize package for a UK commenter, and a second prize package for a US commenter, featuring products distributed in the UK by Woodware...including Dreamweaver and Stampendous!

Prize includes four stencils, one die, and two stamps, selection may vary.

For my grand finale I have chosen the beautiful Pine cones (LG675) stencil from Dreamweaver Stencils. I'm sure you will agree that it is a fabulous stencil. Today I am showing you the same technique on two different papers to demonstrate how you can change the look of the image dramatically depending on the paper you choose. Here they are:

LG675 - Pine cones on smooth cream cardstock
Metallic Gold Embossing Paste and
Metallic F/X powders - Kiwi, Forestry, Cocoa and Amber Glow

LG675 - Pine cones on black linen cardstock
Metallic Gold Embossing Paste and
Metallic F/X powders - Kiwi, Forestry, Cocoa and Amber Glow
They were both done in the Molten Magic technique (can you tell I LOVE this technique!) using the exact same products following these simple steps:

  • Tape the stencil to cardstock with removable tape
  • Use a palette knife and paste spreader to apply Metallic Gold Embossing Paste over the design
  • Remove stencil and place in water for cleaning later
  • Use a soft paint brush to sprinkle the F/X powders over the design (remember, it will look messy)
  • Lift the paper and tap from underneath to further spread the powders
  • Tap off extra powders into a trash can
  • Heat with a embossing gun until the whole design is bubbly
  • Let cool completely
  • Use a Swiffer cloth to gently wipe off any excess powders from the paper and paste
  • Mount into a beautiful card, adding some fabulous May Arts ribbon and a 3" embellishment pin from Dreamweaver Stencils (I used white pins and colored them with a gold Krylon pen)
Here are the close ups of the pine cones:


The extra dimension this technique gives the design is amazing! The gold paste shines through anywhere there was no powder, adding a beautiful metallic shine!

I hope you've enjoyed all the beautiful cards you seen this week and will contemplate joining our monthly Dreamweaver challenges. We love to see what you create too!

Remember, the products featured here can be purchased in the UK from stores listed on the Woodware UK site!

Now it's time for you to leave a comment and move on to the next designer for today:

Friday, August 2, 2013

Day 5 Dreamweaver and Stampendous

Here we are at the final day of the Dreamweaver Stencils and Stampendous Blog Hop. It has been a wonderful week filled with so many creative and beautiful designs from the members of the two design teams! It really helps to keep your creative juices flowing when you see how other people use the same products. I hope you have had the time to visit all the blogs this week, if not, take some time this weekend to go back and be inspired!

It's fun in the sun time again with another collaboration between Stampendous and Dreamweaver Stencils! We played together all of this week, with a fabulous hop today, Friday, August 2nd, featuring a slew of amazing talent from both teams, and of course...prizes!!!

Two prize packages will be given away for the comments left on posts Monday-Thursday, July 29th - August 1st, and one prize will be given away for comments left on the hop day, Friday, August 2nd. Winners will be selected randomly and announced Thursday, August 8th. (Note: USA addresses only, please, due to shipping costs.) Here's what you could win:

Stampendous Surfer and Sandcastle Kiddos • Dreamweaver Hot Air Balloon, Ice Cream Cones, Summer, Mosaic Swirls, Bird Words, and Sandcastle stencils


For my final design, I used Dreamweaver Stencils beautiful LL543 - Sm fuchsia stencil along with the equally beautiful CRR166 Cling Fuchsia from Stampendous, and one of the sayings from SSC1158 Thoughtful Wishes stamp set.
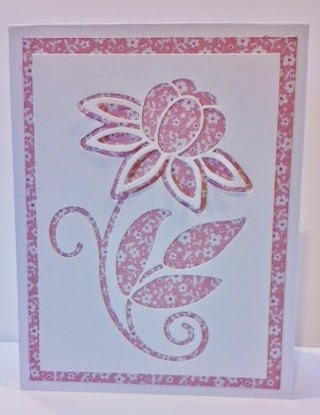
Dreamweaver Stencils LL543 - Sm Fuchsia
Stampendous CRR166 Cling Fuchsia and SSC1158 Thoughtful Wishes
Steps:
  • Stamp the Cling Fuchsia two or three times with Archival Jet Black ink on white cardstock
  • Use Distress Markers and a water brush to color the flowers and leaves (I used scattered straw and barn door for the flowers, old paper for the leaves and stems)
  • Let dry or dry with a heat tool
  • Stamp the saying with Archival Jet Black
  • Use a foam applicator and Distress Inks old paper to rouge some color around the edges
  • Mount onto a small black mat, then onto the front of a card made of Distress cardstock old paper
  • For the stencil I did the Molten Magic technique
  • Tape the stencil to black cardstock with removable tape
  • Use a palette knife and paste spreader to apply a coat of Pearlescent Embossing Paste over the design
  • Remove the stencil and place in water for cleaning later
  • Use a soft brush to pick up various colors of Dreamweaver's Metallic F/X powders and sprinkle them over the wet paste (Gold Dust-01, Pink Poppy-03, Kimono Red-15 on the flowers, Kiwi-10, Ivy Garden-11 on the leaves and stems)
  • Carefully lift the image and tap from underneath to "jump" the powders around a little, it will look quite messy at this point, but don't panic, it will clean up later
  • Over a trash can or paper towel, flip the image to the back and tap off excess powders
  • Turn back over and heat with a heat tool until you see bubbles form them move the tool to the next area until it is all bubbled
  • Let it cool then wipe off any extra powder residue with a Swiffer cloth (you know, the ones you are supposed to be dusting with!)
  • Mount on a mat of Distress old paper cardstock, then a small black mat
  • Use foam tape to apply the stenciled image over the stamped image
  • Add a beautiful bow and embellishment pin (I used a black COPIC marker to make mine black)
I hope you have enjoyed all my creations this week, I know I had a ball making them to share with you!
Now, hop on over to the next in line. Don't forget to leave some love for a chance to win, and just 'cuz it's nice!

Thanks for hopping with us this week!
Happy Creating,
Louise