Showing posts with label Zentangle. Show all posts

Friday, June 5, 2015

Doodlie Doo Finale!

Our week of Doodlie Doo is wrapping up today. We have a great line up of ideas for you,
Today I'm sharing a multi-layered piece I created from the Rolling Hills stencil (LJ910):


The Rolling Hills stencil was outlined 3 times on white cardstock. with a Sakura Black Micron pen. On the first layer, I created a sunrise and "sky area, along with a couple of rolling hills. One the second layer I just did a couple more hills, and on the third, just the bottom few hills.

I used Prismacolor pencils to color the image and a black marker and filled in between the hills. The first layer was left whole, the second lay was cut off four rows up from the bottom, and the third layer was cut two rows up and the "clouds" were cut from this also. Each layer was popped up with foam tape.

Here's our list of participants today:
Kristine Reynolds (Thursday Post)
Louise Healy (Thursday Post)
Wendy Price (Thursday Post)

Exciting news! Next week we will be hopping with the team from Faber-Castell.
Faber-Castell is one of the oldest corporations in the world. They created the very first lead pencil with wood around the lead in the 1600's. We are thrilled to be working with this amazing company and using their fun products. Different team members will be posting throughout the week, with the main Blog Hop being on Friday, June 12th. You won't want to miss a day of it!


Happy Creating,
Louise

Thursday, June 4, 2015

Dreamweaver Thursday Sten-tangle

It's Dreamweaver Thursday at Stampendous and our team is excited to share our ideas with you today. We've been working all week with a Doodlie Doo theme, and I'm incorporating that today with more Sten-tangling.
LG751 Owl with Black Matte Paste, Metallic FX powders, let dry, then tangled on the paste
LG751 Owl
Here's who's playing today:

Happy Creating,
Louise

Wednesday, June 3, 2015

More Sten-tangling Fun!

Our Doodlie Doo fun continues today. Do you like to doodle or Zentangle? The Stampendous Dreamweaver Design Team is having a great time creating wonderful projects for you.
Here are mine for today:
LG740 Open Butterfly

LL3037 Zen Butterfly with LX7025 Crusade bkgd overlay
The Open Butterfly was done on yellow cardstock and filled with various Zentangle patterns. If you love the look of patterned designs but don't know any patterns yet, no problem, on the second card I took a background stencil, placed it over the first stencil and outlined the design of the background stencil. Both were done with Sakura Black Micron pens 01 and 005.

Stop over at the other team members to see what they've come up with today.

Happy Creating,
Louise

Monday, June 1, 2015

Doodlie Doo!

Welcome to the Stampendous Dreamweaver Design Team weekly challenge. This week our theme is "Doodlie Doo!". That can mean official Zentangle patterns, or just your own doodling (you know, when you're in a meeting or talking on the phone, and you start drawing little patterns all along the edges of the agenda or list in front of you!), yeah, that kind of doodling

I have always been a doodler, but  I really got into it a couple of years ago when the Dreamweaver Design Team was invited to create some Zentangle images using stencils as our jumping off point. It was so much fun! Be sure to see Zentangle 6 for our creations (I have two cards in there!). I took a class from a ZCT and the rest is history, I have been combining Tangles and stencils ever since. Stencils and open stamps are perfect for adding beautiful patterns.

Today I'm sharing a card I created a while back using stencils and Tangles as the focal point and some of Dreamweaver's great background patters behind it.
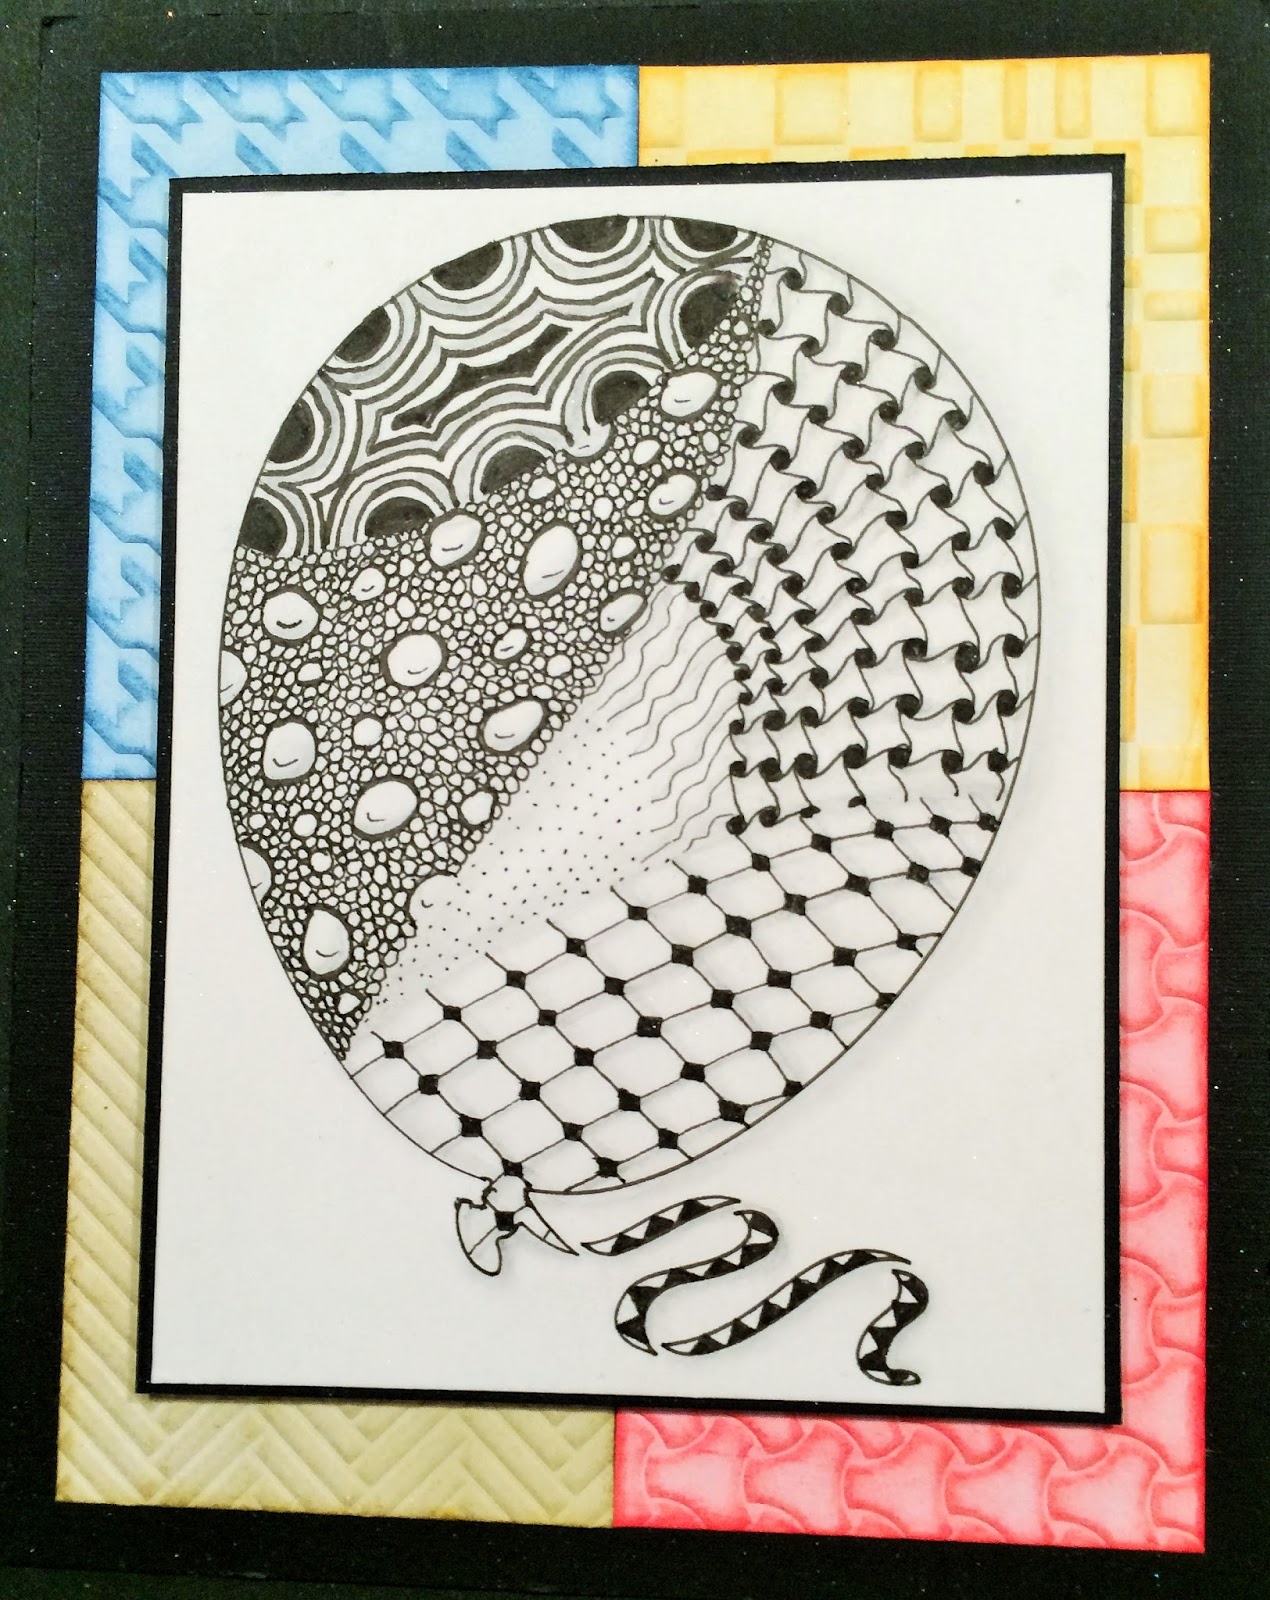
Zen Balloon
The Balloon stencil (LG669) was layed on white cardstock and traced with a Sakura Micron 01 black pen. After removing the stencil, I created my "string" with a pencil to give me several areas for patterns. Because this is such a large open stencil, I was able to use that same 01 pen for my tangles. Normally I would switch to an 005 pen which is a much finer tip and easier to use in small openings.

The great background pieces are, from the upper left going clockwise, LJ913 Houndstooth, LJ915 Opto Checkerboard, LJ912 Triangle weave, and LJ914 Herringbone.  Those were dry embossed through a machine using white cardstock and a rubber embossing mat. The stencils are the perfect size for a 4 1/4" x 5 1/2" piece of paper, so I always do a whole piece, brush color on using an ink pad  (I used Distress inks on these) and 1/2" stencil brush, then cut it to the size I need, then touch up the edges again. That way I can use the scraps for another project!

I LOVE, LOVE, LOVE to doodle so I had to (yes, HAD TO, I couldn't help myself!) create a piece using a stamp from Stampdendous too.
Jumbo Leaves CRS5052 - used the Maple leaf from the set

Here's a close up!
Here's the set I used:

For this, I inked the stamp with Memento Tuxedo Black, stamped it on cream cardstock, and did my Tangles using a Micron 005 black pen.  

To finish it off, I colored the leaf with PITT Pastel Pencils from Faber-Castell, and used a paper blending stump to blend the colors. I used the red/yellow set for the leaf and corners, and the gray from the neutrals set to shade a little on the edges of the leaf. Just using my finger, I could move a little of the color off to the background to soften the look. If you haven't tried these pencils yet, they are awesome!  The three Candis were originally white, so I colored them with a Journaling PITT Artist Pen in Sanguine (a gorgeous color), also from Faber-Castell.

After matting the leaf on black, then a rust cardstock, I sprinkled one corner with Fran-tage aged copper embossing enamel and Bronze glass glitter (both from Stampendous), and heated it from below. Attached the leaf to a black card base. The saying is from the Life Words set (SSC1213).

Even if you aren't a doodler, but like to color, we have the solution for you! Our great Cling Pen Pattern Leaves already have the patterns and you just have to color! And even better, there's a matching die set.


Well, that's it for today. I'll be posting more Doodlie Doos on Wednesday, Thursday, and Friday.

Stop over at the Stampendous blog for some Doodlie Doo goodness, and check back all week from more fun creations from our team!


Happy Creating,
Louise

Thursday, October 9, 2014

Happy HallowThanksMas Week 2!

Can you tell that sometimes Dream Team's "Fearless Leader", Pam Hornschu, has a hard time deciding on monthly challenges? Since the team will be taking turns all month with the Smeared and Smudged 31 Days of Halloween, and we are doing a Christmas collaboration with Stampendous and Core'dinations the 13th - 17th, the confusion should be understandable. Therefore...happy HallowThanksMas! As usual, we'd love for you to play along with the challenge and link your creations to the Inlinkz tool on the Dream It Up! blog. Just in case you are wondering...NO, YOU DO NOT NEED TO POST SOMETHING WITH ALL THREE HOLIDAYS ON IT! However, you get bonus points for actually using Dreamweaver stencils and product on your creations! And bonus points might actually earn you an extra stencil as our monthly winner...just sayin'!

Today I'm sharing the Sten-tangle card we are making in my class at Memories and Beyond in Downers Grove IL. Lynell shared her and Wayne's beautiful creation a couple of weeks ago on the Dream It UP! blog, (click here if you missed it) using both the new leaf stencils. Here's my creation for today featuring the new Maple Leaf stencil (LL3044):
LL3044 Maple Leaf stencil Sten-tangle
I will be teaching the students 3 simple Zentangle patterns, then we'll trace the Maple Leaf several times, apply the patterns as they wish, and finish off by coloring with PrismaColor pencils. If you look closely you will see that after I traced the leave on the main image and tangled it, I added a second "outline" to give the leaf more depth. Again, another great all-occasion card for Fall. Of course, the great little ribbon is from May Arts!

Remember to visit the rest of the team, as confusion takes rein...could be interesting!


Happy Creating,
Louise

Thursday, July 24, 2014

July...a month to DIE for Week 4!

Welcome to week four of our Dreamweaver Stencils July Challenge!  All of this month the Dream Team are featuring our newest toys...our DIES! You'd be surprised at how many we have, and what fun things you can do with them...especially when used in conjunction with many of their matching stencils. They are such a simple way to create an effective card.

I'm in beautiful northern Wisconsin today, heading over to Minnesota for "Christmas in July" with my husband's family. On the way, I thought I would visit some stores in WI that sell Dreamweaver Stencils products. Yesterday I taught this fun class at Stampin' N Scrapin' Fun in Marshfield, WI:
Open Owl, Nesting Owls die, and Leafless tree die

I have taught Zentangle with this Open Owl stencil (LG751) in the past, but now it is really fun because after you finish tangling it you can cut out the shape with the matching die from our Nesting Owls die set (DG751)!  This size just cuts the outline of the owl and cuts it just a little larger so it leaves an nice mat all the way around. I cut another one out of black paper to create a shadow. The branches under his claws are from the Leafless tree die (DX7020), I just cut off some branches and taped them under the owl. Easy and fun!

I'm sure that our "B" team is just DIE-ing to show you their creations, as well as our Guest Designer for the month of July...


Happy Creating,
Louise
An InLinkz Link-up

Thursday, January 30, 2014

Clean and Simple!

Well, we have almost made it through January! I will be so happy to have some days with above zero temperatures!
The Dreamweaver Stencils design team has an extra week this month to share more great samples from the new release of stencils. This week I'm sharing a fun card that could be used for a boy or man's birthday, or for someone you know who loves elephants!

This is very easy, here's how it's done:

  • Tape the Pop Rectangles stencil (LJ929) along the left side of an A6 (4 5/8" x 6") piece of  green cardstock with removable tape
  • Use a palette knife and paste spreader to apply Glossy White Embossing Paste over the design
  • Remove and clean the stencil, let the paste dry
  • While that is drying, tape the Open Elephant stencil (LG756) to white cardstock with removable tape
  • On a piece of freezer paper place a small dollop of Glossy White Embossing Paste and about 1/4" tsp of Pewter Metallic F/X Powder, mix them together using a palette knife
  • Apply the colored paste to the Elephant stencil 
  • Remove and clean the stencil, let the paste dry
  • Cut a small green mat (1/4" larger than the elephant layer) for behind the elephant and a white layer for behind that (1/8" larger than the green layer)
  • Cut a white card A6 size (6" x 9 1/4")  and fold in half
  • Round the corners of all the layers
  • Mount the Pop Rectangles layer on the card front
  • Mount the elephant on the small green and white layers
  • Use foam tape to adhere the elephant to the card front
The Open Elephant is also great for Zentangle. I will be teaching a Zentangle class featuring this great stencil at Memories and Beyond on Tuesday, February 4th. Call the store to sign up! Here's what we will be creating:

Now hop on over to these other team member blogs for other samples.

Louise Healy

Happy Creating,
Louise

Thursday, January 23, 2014

Lose Some Weight!

That's right, that's the theme of this month's Dreamweaver Stencils challenge! Of course, we mean it in conjunction with card making!  The team is still sharing the new designs recently released at CHA. There are TEN new stencils and SIX new die cuts! They are available and shipping so be sure to tell your local store to hurry up and get them ordered!
This week I am featuring the new Open Fish (LL3038) and Large Scales (LX7023) stencils on a Zentangled card. Here it is:

I just love how the Large Scales make the perfect bubbly waves when they are turned upside down! The great thing about both stencils is they already have nice "sections" to do your tangles in so you really don't need strings (a technical term used by Zentanglers!)

  • I started by using my Black Micron 01 pen to outline the Open Fish stencil on white cardstock
  • The tangles were added with a Black Micron 005 pen, and shading with a pencil and blending stump
  • Copic markers were used to ad a little color 
  • I trimmed close to the design and edged with a black marker, mounted it on a blue mat edged with black, and added foam tape to the back 
  • The "bottom of the sea" was created by outlining three rows of the Large Scales stencil with the Black Micron 01 on blue paper (matches the mat on the fish layer)
  • Add some seaweedy-looking tangles, color them, edge the layer with black
  • Mount the scales on the front of your card, add the fish, and there you have it, a fun, colorful card perfect for birthdays, graduations, "have a Fin-tastic day!", you'll think of something!
The B team has more great creations to share with you this week. Check it out!


Happy Creating,
Louise

Thursday, April 18, 2013

Rain, Rain Go Away!

I know that's not really our challenge theme this month, but that's how I feel right now. I need sunshine soon! I am grateful that it's not snow, but enough already! It seems that our Dreamweaver Stencils April challenge of Mists, Drizzles and Showers has been an accurate forecast of our weather.
To go along with the rainy weather, I am showing yet another idea for the the Umbrella stencil (LG737), this time using Zentangle. Enjoy!


If you haven't tried using your stencils with this fun technique, you don't know what you're missing! Stencils are the perfect starting point because they provide natural divisions for your various Zentangle patterns. Check for classes in your area, you'll have fun, I promise! I use Sakura Micron pens to do mine.

Be sure to stop by the rest of the teams' blogs for more inspiration.


Happy Creating,
Louise

Thursday, August 30, 2012

Christmas in August

Well, our last post for Christmas in August already! Where has the month gone??? I know one thing that made August 29th a day our family will never forget...we welcomed our beautiful new granddaughter, Elinor Jane, into our family. She is just adorable and I can hardly wait to hold her on Friday! Here she is:

Puts everything in perspective doesn't it. We worry about things we think are important, and then we meet something that actually IS important!

It's pretty hot here again in IL, so keeping to the Christmas theme this week was OK by me! Here's three cards using the Antler snowflake stencil (LL399) for my upcoming class at Hannah's Home Accents in Antioch, IL on October 13th.


We'll also be doing a Zentangle class that day featuring the Umbrella (LG737) stencil. If you're in the area, give them a call to register for both classes!  Hope to see you there.

Umbrella - LG737
Rain - LJ905
Check out the rest of team for even more great Christmas ideas:
Happy Creating,
Louise

Thursday, March 1, 2012

Spring Clean (and simple)

The "extra" day of February didn't seem to help me catch up with everything I wanted to accomplish last month! But here we go with March and a new challenge from Dreamweaver Stencils. Thank you to everyone who play along with us last month, it definitely was challenging to come up with multiple creations using the "Green" theme! During the month of March our theme will be Spring Clean (and simple), meaning keep your design simple with clean lines (well, that's how I'm interpreting it at least).
Spring is one of my favorite times of year (fall's my other). I love the longer days, the warmth from the sun, the bulbs starting to grow, new life everywhere. Spring also brings the Easter season, and the beautiful new Open cross (LJ918) from Dreamweaver is the perfect design for your Easter cards. Its clean, simple lines fit the challenge theme perfectly. Here's  what I created with it:


With a little touch of Zentangle added to the open design, this cross suits the clean and simple theme of this month's challenge. Here are the steps:
  • Tape the Open cross stencil to white cardstock
  • Use an 01 or 02 black Micron pen to outline the design
  • Remove the stencil
  • Use a pencil to lightly form the curves of the vine
  • Use the Micron to create your vine and add leaves all along it
  • Add some scrolls to each section of the cross
  • Color with COPIC markers
  • Mount on a small black mat, then onto a green card
  • Simple but beautiful, the perfect Easter card
I hope you will take the time to play along with us this month. Don't forget, you have all month to add a link to your creation or email Lynell a photo and she will post it for you. And, of course, you won't want to miss the other designers' blogs to see what Spring Clean(ing) they have created today. Just click on their names below to "spring" over to their sites (sorry, I just had to say it!).

My upcoming classes are at The Cottage Stamper in St. Charles, IL on Tuesday, March 13th, and at Stampology Chicago on Saturday, March 17th. Both classes are featuring Zentangle with Dreamweaver Stencils. Check out their websites for samples.
Happy Creating,
Louise