Thursday, September 27, 2012

Get Inky with Stencils

It's hard to believe that it's the last week of September already! Our month of getting inky with stencils is coming to an end already but, of course, we'll continue having fun with ink and stencils long beyond this month!
I have been spending the week with my daughter-in-law and granddaughter so it has been such a fun week! It is amazing to me that she is already 1 month old! Here's a shot I got yesterday of her while she was napping:

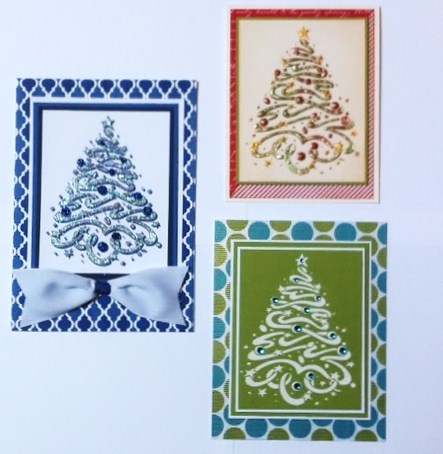
So needless to say I haven't been doing a lot of creating this week. I hope you will enjoy these cards that I recently created for my upcoming class at Memories and Beyond in Downers Grove IL.

We will be getting inky doing the shadow technique on the blue card, the red card features the Molten magic technique, and the third card shows how stunning just plain white glossy paste can be. I'll be teaching this at Memories and Beyond on October 23 at 12:30pm and 6:30pm, hope to see you there.
Be sure to check out the rest of the team blogs for more great inky ideas, just click on their links on the side of my blog.
  Happy Creating, Louise

Thursday, September 20, 2012

Get Inky with Stencils!

Welcome to week three of "Get Inky with Stencils". This is our challenge this month for the Dreamweaver Stencils Design Team and it has been a lot of fun!
This week I want to share a card that has been in my photo albums on the right side, but you may have missed the instructions for it.  It is a favorite of mine so I hope you enjoy it!

Here are the simple steps to creating this:
  • Use Cut 'n' Dry foam to rouge Distress Inks (Scattered Straw, Tumbled Glass, Stormy Sky) on a piece of 90 lb. watercolor paper (I love the texture of watercolor paper)
  • Place the Branch with berries stencil (LJ900) coming in at an angle from one bottom corner, tape in place with removable tape
  • Use a small stencil brush to color the berries with Distress Ink Chipped Sapphire.
  • Turn the stencil over and bring it in from the other bottom corner, and add color to that side of the card
  • Clean and dry the stencil
  • Lay the stencil across the center of the colored image and tape in place with removable tape
  • Use a paste spreader to apply a coat of Glossy White Embossing Paste across the stencil
  • Remove the stencil and immediately sprinkle the wet paste with crystal glitter
  • Clean and dry the stencil
  • Once the paste is dry, you can add a little Chipped Sapphire around the design
  • Use a COPIC marker to color a white 3" embellishment pin (also from Dreamweaver) a matching blue shade
  • Mount into a beautiful card! The background paper was just a piece I had in my stash, but it worked perfectly for this card
Be sure to stop over at the other team member blogs, and remember, if you submit your own creation on the DREAM it UP! blog you might win a great prize! If you don't have a way to link your creation, just send a picture of it to lynell@dreamweaverstencils.com and she will post it for you! Good luck!
 
 Happy Creating,
Louise

Thursday, September 13, 2012

Get Inky with Stencils

It has been perfect fall weather here for the past week, sunny and warm (not hot) during the day, cool at night, just right for sleeping. Fall is my absolute favorite time of the year!
This month the Dreamweaver Stencils challenge is to "get inky with stencils", which is another of my favorite things so it worked out great! Here's my creation for this week:


These darling little owls are LL3013, Owl pair.  Don't they just make you smile. Don't miss the beautiful Gingko bough stencil (LJ893) in the background too. It's like they were made for each other.Here are the simple steps to create this card:
  • Tape the owl stencil to white cardstock with removable tape
  • Use small stencil brushes and ink pads to color the image
  • Remove and clean the stencil
  • Retape the clean stencil over the design and apply Translucent Embossing Paste
  • Remove and clean the stencil, let the paste dry
  • Use a larger brush or a foam blender to add some color around the edge
  • Tape the Gingko bough stencil to the front of your card with removable tape
  • Use small stencil brushes to apply color
  • Use a larger brush or foam blender to add brown around the edges
  • Mount the owls on a small mat of brown cardstock
  • Adhere a strip of brown paper along the left side of the card
  • Add some green ric rak along the brown strip
  • Add the owls using foam mounting tape
There you have it, another inky creation using stencils. I was a little late posting last week, so if you didn't get the chance to see last week's card, be sure to scroll down to check out my first inky creation. And as always, hop on over to the other team members blogs for more great ideas.


Happy creating,
Louise

Thursday, September 6, 2012

Get Inky with Stencils!

Sorry for the late posting! I think becoming a Grandma has frazzled my brain!  This month our challenge for the Dreamweaver Stencils design challenge is "Getting Inky with Stencils". Here's what I came up with for this week:
LX7018 -Steampunk clock

I just love this new stencil and this is a pretty easy technique:
  • lay the stencil face down on a piece of cardstock
  • spray with various Memories Mists spray inks (I used Bright Gold, Copper Shimmer and Amaretto) with a heavy coat of the colors
  • carefully lift the stencil, ink side up onto the platform of your die cut machine
  • place a clean piece of cardstock over the stencil
  • add the rubber embossing mat and two plates and put thru the machine to emboss the image and transfer the ink to the background
  • remove the embossed image and let dry a few minutes
  • return the cleaned stencil over the embossed image and use a small stencil brush to add black ink to the embossed areas (I used Distress Ink Black Soot).
  • Add a spinner for the "clock hand"
  • Mount on a small black mat and add a ribbon and gear charm
  • Mount on the front of a copper colored card
Inky and fun!
Check out the rest of team blogs by clicking on their names along the side.

Happy Creating,
Louise