Thursday, September 29, 2011

Thursday Dream Scheme

Welcome to this week's Dreamweaver Stencils Thursday Dream Scheme.  This week we have been given a sketch challenge to create our designs. Here's what the sketch looks like:

And here's what I created from it:

October is right around the corner and Halloween will be here before we know it, so I chose to create a "Fall-o-ween" card.  The colors of Halloween, but more of a fall theme for the image rather than a jack-o-lantern. The dotted paper is from my left over collection of A Muse papers. I edge the pieces with black COPIC marker to make them stand out from the card front better. The pumpkin is from LL515 Pumpkins stencils. There are three pumpkins on the stencil, so I just taped off the other two pumpkins and paste embossed the single small pumpkin with Matte Black Embossing Paste. After I removed the stencil, I sprinkled the image with fine black glitter. The pumpkin is matted on a black layer then adhered to the front of the card with foam mounting tape. A little black ric rak down the side finished it off! Simple and fun!
Hope you've enjoyed today's challenge. Look for more great ideas on the other team members blogs by clicking on their names on the left side of my blog, but first check out the DREAM it UP! blog to see what Lynell  has come up with for the challenge.

Happy Creating,
Louise

Thursday, September 22, 2011

Fall is in the air!

There is defiantly a chill in the evening now, but I love this time of year! Bright, sunny days and crisp, clear nights, fall is a beautiful season! The trees here in northern IL have started to turn colors and the days are getting shorter and shorter (it's the one part of fall that I don't like). Fall is all about colors. The beautiful shades of reds, oranges, golds, browns and greens, with a little purple here and there, blend together into a gorgeous collage everywhere you look!

This week's Dreamweaver Stencils Thursday Dream Scheme is a designer's choice week, so I just had to use some of those great fall colors when I created this week.  Here's what I came up with for you:


I know you don't normally associate a fern with fall, but this beautiful Sm fern frond (LM2006) stencil just seemed perfect for the serene feel I was going for on this project. The backgrounds were done with alcohol inks on glossy cardstock, the fern was paste embossed with Glossy Black Embossing Paste, edged with a black marker and it was all layered onto a black card. VERY easy!

Check out more great ideas on the Dream Team blogs, just click on their names on the left side of my blog,  Click here for the DREAM it UP! blog.

If you are in the Chicagoland area here's my upcoming schedule:
  • Saturday, Sept. 24, 2011 - 10am - 12n Dreamweaver Demo and Trunk Show at Stampology Chicago
  • Saturday, Sept 24, 2011 - 1pm - 3pm Zentangle Class at Stampology Chicago
  • Tuesday, Sept. 27, 2011 - 12:30pm - 3:00 pm Dreamweaver Mirror Class at The Cottage Stamper
  • Tuesday, Sept. 27, 2011 - 6:30pm - 9:00pm Dreamweaver Mirror Class at The Cottage Stamper
  • Thursday, Sept 29, 2011 - 6:30 pm - 8:30pm Dreamweaver Demo and Trunk Show at Stampology Chicago
  • and if you're feeling adventurous, Saturday, Oct. 1, 2011 - 12n - 3pm Dreamweaver Demo at Artist and Display in Milwaukee for National Card Making Day.
Hope to see some of you there!
Happy Creating,
Louise

Thursday, September 15, 2011

Thursday Dream Scheme

Well, we definitely are having fall weather here now. The trees aren't changing yet, but I know they will be soon. I was in northern Minnesota this weekend and it was absolutely gorgeous weather, high 80's during the day, 60's at night. We were southwest of the boundary waters fire, so we didn't get the smoke, that headed east.
This week's Dreamweaver Stencils Thursday Dream Scheme is a colorway challenge given to us by fellow team member Lee Kellogg. We had to use gray and lime green in our creation this week. I chose the Ginger Jar (LG626) stencil with the Fan Pattern (LJ813) as the overlay. Here's what I came up with:


Instructions:
  • Dry emboss the jar on white linen cardstock, by hand or with a machine
  • With the stencil still over the embossed jar, use a 3/4" brush to add gray around the edges and top of the jar (I used Versafine Smokey Gray)
  • Leave the jar stencil in place and tape off the cover of the jar with removable tape
  • Put the Fan Pattern stencil on top of the jar stencil and tape in place
  • Mix  a small amount of Kiwi Metallic F/X (FX10) in a small amount of Glossy White Embossing Paste and apply over the jar using the new Paste Spreader (LM2010)
  • Remove and clean both stencils
  • When the paste has dried for 10 or 15 minutes, use a soft paint brush to apply more of the Kiwi Metallic F/X powder on the Fan pattern, this gives it a much shinier finish
  • Place the Fan Pattern stencil on a piece of gray cardstock and stencil with the large brush and Versafine Smokey Gray all around the edges of the card (it's easy to move the stencil and line back up the pattern as you go around the card)
  • Cut three 1/4" x 4 3/4" strips of lime green paper, and adhere them near the bottom of the card
  • Layer the Ginger jar on a piece of gray cardstock, then on lime green
  • Adhere to the background layer and you're finished!
Hope this inspires you to create  your own lime green/gray card this week! Check out all the other great ideas on the team's blogs, and don't miss the DREAM it UP! blog too!

Happy Creating,
Louise

Thursday, September 8, 2011

Dream Scheme Thursday

We had a great time last week hopping with our friends from the UK. If you missed the fun, you can still go back and look at all the great creations. Lynell posted a complete list of links on her blog at the beginning of the fun.  Click here to go back and check them all out! If you joined in the fun, be sure to check the list of winners posted on Lynell's blog too, just click here.
Now on to this week's Dreamweaver Stencils Thursday Dream Scheme challenge.  This is a designers choice week so we got to choose whatever we wanted to share with you.  This gives us a chance to share some creations that don't fit into a specific challenge. Lynell came out with some great stencils this summer at CHA, and the new Stockings by the fire (LG739) stencil really bursts with Christmas spirit! Here's one of my cards using it:

There are a few steps involved, but none of them are difficult, and it turns out sooooo sweet! Here we go:
  • Use removable tape to tape the stencil to white cardstock
  • Apply Glossy Red Embossing Paste (DGRP) using the new Paste Spreader (LM2010)
  • Remove the stencil and let the red paste dry
  • Clean and dry your stencil
  • Use removable tape to mask off the bottom of the stockings and the two side "irons"
  • Tape the stencil back over the dry red paste and use a regular palette knife to apply Glossy White Embossing Paste (DGWP) to the top of the stockings, then use the knife to tap on the paste and give it a little texture (like you would to frosting)
  • Clean your palette knife and apply Crackle Embossing Paste (CEP) to the fire and logs area
  • Remove the stencil, remove all tape from it before washing and drying it
  • When those pastes are dry, put the clean, dry stencil back over the design and use small stencil brushes to add color to the fire and logs and the side irons
  • Carefully sprinkle the side irons with embossing powder while the ink is still wet, then heat set the embossing powder.
  • If you got white paste on the little stocking hangers, you can use an X-acto knife to scrape the white off so they are red again
  • Mount on decorative paper for a great holiday card.
Hope you've enjoyed this week's creation. Don't forget to stop over at the DREAM it UP! blog for more great ideas, and then hop over to the other designer's blogs too.  Have a great week.

Happy Creating,
Louise

Sunday, September 4, 2011

Winner of Blog Hop goodies!

SherylH was kind enough to relinquish one of her prizes, so I redid Fridays selection and came up with:
scrappybetty said...
I have this stencil and never thought to use it like you did. Thanks for showing 3 ways to use the same stencil. Wonderful ideas.
September 2, 2011 9:37 AM

 
So scrappybetty congratulations! Just send your address information to Lynell at the email listed below to receive your prize.
We all used http://www.random.org/ to select the winners for each day's post based on the number of comments we received. I'm happy to announce that my new best friend must be SherylH because she came up BOTH times on my postings!!! Congratulations SherylH!! Just send your address to Lynell at Dreamweaver Stencils and she will send your winnings! Her email address is: lynell@dreamweaverstencils.com

Friday, September 2, 2011

Day 5 of the HOP!

WE HAVE A WINNER FOR TODAY's POST!! it is SherylH  AGAIN!! who wrote:
SherylH said...

I enjoyed all three of your projects but the framed picture is gorgeous. The use of the Jungle leaves and flourish make a fantastic mat for the eye-popping lotus.
September 2, 2011 2:27 PM
Thanks Sheryl for your kind words, I gave the framed art to my son and his wife this weekend and they just loved it!!
Email Lynell  your snail mail address to: lynell@dreamweaverstencils.com and she will send your your blog winnings.

Boy this week is flying by. Hope you've enjoyed our first Dreamweaver Stencils/Woodware Craft combination blog hop. We have had a wonderful time sharing our ideas for additional ways to create with your stencils. But we're not finished yet! Keep hopping today and tomorrow for even more creative ideas to add to your list! Today's hop started with Francoise at: http://www.francoisecollection.blogspot.com/  If you missed her's, hop back there so you don't miss any of the fun!

When I teach a Dreamweaver class, I usually use one stencil and teach three different techniques to use with that stencil. It helps to see a stencil used several ways so you don't get in a rut and keep using it the same way all the time.  So I thought I would use the same approach for today's post. The focal point of my three designs uses LG720 - Lotus flower.

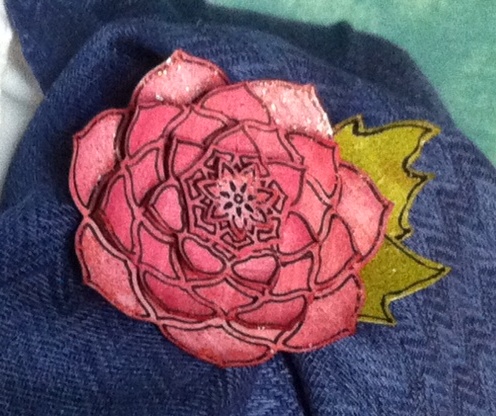
First as a piece of jewelry:


This was so much fun. I used Grungepaper and put a light coat of white acrylic paint on it. Then I stained it with Distress Stains Spun Sugar and Fired Brick and let it dry. Place the stencil on the colored surface and use a Black Micron pen to outline the petals. I did five different sizes. The largest layer uses all the petals except the very outside row, I thought it might seem too big if I started with that row. The next layer starts one row in from the previous size, then two rows in,then one, and the smallest layer is the center.  Cut them all out, ink the edges a little and assemble using hot glue. I used my finger to wipe on some Worn Lipstick Distress Stickles on the outside layer and a little in the middle, just to give it a little sparkle.  The leaves are from LG625 - Flower and leaves stencil and are also on grungepaper that I stained with Peeled Paint Distress Stain.. They are attached with hot glue.  Add a pin back, and voila a beautiful pin to adorn a blouse, scarf or purse (or really anything!).

Second as a piece of art:


Here's how I did it. Tape the stencil to a square of white cardstock and apply Matte Yellow Embossing Paste, remove and clean the stencil and let the paste dry.  Place the clean, dry stencil back over the dry yellow paste and use small stencil brushes to apply inks (I used Brilliance Orange and Rocket Red). Remove the stencil and sprinkle with clear embossing powder, tap off all excess powder and heat set. Return the stencil to the design and apply a second coat of ink on top of the first. Remove stencil, and sprinkle with embossing powder again and heat set.  The mat came with the frame and had a 3 1/2" x 3 1/2" opening. I stenciled LJ825 - Jungle leaves all around the edge using a 1/2" brush and Brilliance Thyme ink, but I kept it on the light side. After that I decided the the corner swirls we've been seeing all week are so beautiful that I would add one as an accent in one corner, so I chose LJ896 - Flourish and embossed it with Matte Black Embossing Paste.  I trimmed the Lotus flower layer to 3 1/4" x 3 1/4" and mounted it onto a 5" x 5" square of black cardstock, this gave me some "wiggle" room when I centered it in the opening of the decorated mat. I think the black frame really sets off the design and now I have a beautiful piece of art hanging in my craft room!

Last but not least, the third design is a greeting card, because that is what we "normally" do with our stencils right?

For this I used 1/2" stencil brushes, this not only puts the color down a little faster when you don't have to be really precise, it also keeps the color a little lighter. I stenciled on the front of a 5 1/2" x 5 1/2" square card using Brilliance Sunflower Yellow, Coral, and Lime. You can see I only used the Lime to add a few "leaves" here and there. I put the stencil and a square of white cardstock through my Big Shot to emboss the image.  Leaving the stencil over the image, I used the large stencil brush to add color to the flower. After removing the stencil, I brushed a little color in along each edge, sweeping in from the edge to the center. That was adhered to a 3 3/4" x 3 3/4" piece of lime green cardstock, and then mounted with foam mounting tape to the front of the card.

Well now you have it, three very different ways to use one stencil. Hope you've enjoyed today's post. I had so much fun creating these projects for this hop.  Leave me a comment for a chance to win a stencil then hop on over to the next stop
Lynell's blog at DREAM it UP! to continue your Hop Across the Pond!
Happy Creating,
Louise

Thursday, September 1, 2011

Day 4 of Dreamweaver Stencils Hop Across the Pond!

WE HAVE A WINNER FOR TODAY's POST!! it is SherylH who wrote:

SherylH said...

Very nice -- love all the new background stencils.
September 1, 2011 7:13 PM

Thanks Sheryl for your kind words, it is always fun and rewarding to receive all the comments about our work!
Email Lynell your snail mail address to: lynell@dreamweaverstencils.com and she will send your your blog winnings.


Woodware Craft Collection design team to bring you innovative ways to use our wonderful Dreamweaver stencils and supplies all week long! Woodware is Dreamweaver Stencils' exclusive distributor in the UK. By the end of the week, you'll have seen stencils used in inspirational ways you just couldn't have imagined, and you'll see that, although our stencils are wonderful for paper crafting, they have SO MANY other uses too! We'll have several posts a day for you, from Monday August 29th to Saturday September 3rd. At the end of our celebration, each designer will randomly select a winner from all blog comments to receive a free Dreamweaver stencil. We are looking forward to sweet comments from you and we will send blog candy your direction. We look forward to you partying along with us! Go to the DREAM it UP! blog if you get lost, the whole schedule is listed there.

You should have hopped here from Laura at: http://www.rememberinglifesmoments.blogspot.com/, if not, "hop" back over there for more inspiration.
Today's project was inspired by all the new background stencils that Dreamweaver recently released at Summer 2011 CHA. I fell in love with them all, so how could I choose just one to work with!! I wanted to come up with a project that would show off several of the new designs, plus incorporate some embossed metal to promote the MercArt Metal that Dreamweaver now supplies. Here's what I did:

Though it is a little time consuming, it's really the original concept that takes the time, once you know what you want to do it comes together pretty fast.  Here are some close ups of the squares and embellishments:


The basic steps are:
  • Emboss each of the four background stencils on a piece of white cardstock (emboss 2 of each design in order to get the 8 squares of each that you need)
  • Use a 1/2" or 3/4" stencil brush to color each pattern whatever colors you want, any inks will work, I used Ranger Distress Inks . By using a larger brush the color goes on pretty fast. Remember to start off the edge and sweep the color in towards the center
  • Trim around the edge of the design, then cut four 1 1/2" squares out of each piece of colored paper
  • Adhere the embossed patterns to piece of 1 1/2" chipboard, then use a piece of foam to add more color around the edges
  • You should have 8 squares of each pattern with each pattern being a different color
  • Adhere them to a 10" x 10" black mirror (I got it at IKEA) in a pretty pattern.  The black between the squares really makes them stand out
  • The butterflies were done with Dreamweaver stencils Heliconia Butterfly stencil (LM257) and small piece of colored aluminum. I used a Big Shot to run the metal and stencil through to emboss it, sanded the raised aluminum then colored them with alcohol inks.
  • The butterflies were cut out then mounted using foam mounting tape
  • The Tall Vase stencil (LM196) was first paste embossed with Glossy Blue Embossing Paste
  • After the blue paste was dry, I put the stencil back over the paste and applied Dreamweaver's Crackle Embossing Paste
  • If you've never used the Crackle Paste, you are in for a treat. It crackles on its own as it dries and is white so any color you want can be applied with stencil brushes after it dries.  Sometimes I hurry the process a little by heating towards the end, but you won't get as small of cracks if you do that
  • I cut out the crackled and colored vase, adhered it to black cardstock and cut that out leaving a small black edge around the whole vase
  • Use a guillotine cutter to cut some black strips and tape some to the back of the vase
  • Mount the vase onto the squares at the lower left using foam mounting tape
These make great gifts for any occasion and you can customize the colors and embellishments to your own home decor. I'll be teaching this in a class at The Cottage Stamper in St. Charles IL on September 27th, and at Checkered Cottage in Kirkwood MO on October 22nd.  Call either store to sign up.
Here's a list of the supplies used:
Stencils:
LJ912 - Triangle Weave
LJ913 - Houndstooth
LJ914 - Herringbone
LJ915 - Opto Checkerboard
LM257 - Heliconia Butterfly
LM196 - Tall Vase
Embossing Paste:
Glossy Blue - DGBP
Crackle - CEP
Tools:
1/2" natural handle brush - NHB-1/2"
Palette Knife - DPK
Wide Palette Knife - WDPK

All this, and LOTS more can be found HERE and in the UK HERE.

Don't forget to leave a comment for a chance to win a free stencil. Then hop on over to the final stop of the day at Wendy's blog. Just click on the link below:
                Wendy at: http://www.papertherapy-wendy.blogspot.com/

Thanks for hopping with us today, I hope you've enjoyed everything so far, but don't forget we have two more days to go full of great ideas and prizes!
Happy Creating,
Louise