Wednesday, February 28, 2018

Laurel Burch Friendship


I'm very excited to share some of my Laurel Burch creations this week! Our team has been lucky enough to receive several of these gorgeous stamps from Stampendous to create colorful samples for you! Laurel Burch designs are all about color.


Stampendous:
LBCR012 Cling LB Friendship
MPW811 Mixed Media White Paper
Acrylic Handle
MEM01 Memento™ Tuxedo Black Ink by Tsukineko®

Plus:
My Color Cardstock - Madras Blue, Banana Pepper
Bazzill Bright Orange, Brick
Copic Markers - R22, R29, RV06, Y17, YR09, YG07, YG17, B02, B04, B06, E21, E31, E35, E39, E51, E53, 100

Instructions:
Step 1:  Fold a 6 3/4" x 10" piece of Madras Blue cardstock in half to form a card
Step 2: Use the Tuxedo Black ink to stamp the image on a 4" x 5 1/4" piece of white, color with Copic Markers
Step 3:  Cut out the image along the edge of the image frame, edge with 100 (black marker)
Step 4:  Mat image on a 4 1/4" x 5 1/2" piece of Brick cardstock
Step 5:  Cut a 4 1/4" x 5 1/2" piece of Banana Pepper and Bright Orange cardstock, cut each piece on the diagonal, adhere an orange triangle behind the left side of the Friendship image, then add a yellow triangle behind that
Step 6:  Adhere the matted image to the card front

You'll find more great samples at the Stampendous Blog!

Happy Creating,
Louise

Monday, February 26, 2018

Laurel Burch Flower Bouquet


I'm very excited to share some of my Laurel Burch creations this week! Our team has been lucky enough to receive several of these gorgeous stamps from Stampendous to create colorful samples for you! Laurel Burch designs are all about color.


Stampendous:
LBCR007 Laurel Burch Cling Flower Bouquet
SSCL103 Floral Greeti
ngs PCS
DP102 Detail Embossing Powder Gold
MPW811 Mixed Media White Paper
Acrylic Handle
MEM01 Memento™ Tuxedo Black Ink by Tsukineko®

Plus:
My Color Cardstock Wildflower
Black Linen Cardstock
Copic Sketch Markers - B02, B06, G17, YG07, Y17, Y32, YR18, FV2, R29, RV19, V15
VersaMark
Black Foam Tape
Heat Tool

Instructions:
Step 1:  Fold a 7" x 10" piece of Wildflower cardstock in half to form an A7 card
Step 2:  Stamp the Flower Bouquet on a 4" x 5 1/4" piece of white cardstock with Tuxedo Black ink, color with Copic markers
Step 3: Stamp the Congratulations from the Floral Greetings set on a 1 1/2" x 4" piece of black cardstock using VersaMark ink, sprinkle with the Gold Embossing Powder, tap off extra, heat set, tear edges
Step 4: Cut a 5" x 6" piece of black, tear edges, adhere to the card front
Step 5:  Adhere the Flower Bouquet to the black mat
Step 6:  Use black foam tape to add the Congratulations along the bottom of the image

For more colorful creations, go to the Stampendous Blog!

Happy Creating,
Louise

Wednesday, February 21, 2018

Great Big Happy!

The Stampendous Design Team is sharing samples featuring our Brushed and Great Big Greetings stamps. If you haven't noticed these yet, you are in for a treat this week!


The new Great Big Happy (W199) stamp helps you create a fun, quick birthday card!


Stampendous:
CRW199 Cling Great Big Happy
MPW811 Mixed Media White Paper
Acrylic Handle
MEM01 Memento™ Tuxedo Black Ink by Tsukineko®

Plus:
Cardstock - Yellow, Pink, Purple, Turquoise
BoBunny Orange Vintage
Copic Markers - YG07, BG13, V17, Y08, YR07, RV06
Foam Tape
Fine Line Black Pen

Instructions:
Step 1:  Fold a 6" x 10" piece of yellow cardstock in half to form a card
Step 2: Use the Tuxedo Black ink to stamp the Great Big Happy image on a 3 7/8" x 3 7/8" piece of white paper,  color with Copic Markers
Step 3:  Adhere a 4 3/4" x 4 3/4" piece of white cardstock to the card front
Step 4:   Adhere the Great Big Happy to a 4" x 4" turquoise mat
Step 5:   Cut 1/2" strips of  yellow, pink, orange, purple and turquoise paper, create 4 small "flags" of each color, adhere alternating colors around the four sides of the colored image
Step 6: Use foam tape to apply the Great Big Happy to the white mat on the card front

More samples can be found over at the Stampendous Blog!

Happy Creating,
Louise

Wednesday, February 14, 2018

Sitting Pretty!


HAPPY VALENTINE'S DAY!!
Love is in the air this week for the Stampendous Design Team too! We are sharing some of the multitude of Stampendous products that make wonderful Valentine's for that special someone in your life, or family and friends.

This sweet little mouse is sending hugs and special thoughts on this Valentine's Day!


Stampendous:
HMD01 House Mouse Sitting Pretty
CRE284 Cling Scrolled Thinking
FMS4074 Batik Metal Stencil
DCP1005 Fitted Frames Set A
MPW811 Mixed Media White Paper
Acrylic Handle
MEM01 Memento™ Tuxedo Black Ink by Tsukineko®

Dreamweaver:
DWNHB12 1/2" Brush #12 Natural Handle

Plus:
My Color Cardstock - Sweetie Pie
Memento Ink - Angel Pink, Rose Bud
Copic Markers - E51, E53, E33, E93, R81, R85, R89, W2
Creative Impressions 70141 3/4" Mauve Crepe Ribbon
Foam Tape
Die Cut Machine

Instructions:
Step 1:  Fold a 4 1/4" x 11" piece of Sweetie Pie cardstock in half to form an A2 top fold card
Step 2: Use the Tuxedo Black ink to stamp the Sitting Pretty and Thinking of You images on pieces of white cardstock, color Sitting Pretty with Copic Markers
Step 3:  Use the Fitted Frames Set A to cut out the images, cut matching layers from Sweetie Pie cardstock, adhere the layers of each together
Step 4:   Tape the Batik stencil to a 4 1/4" x 5 1/2" piece of white cardstock with removable tape
Step 5:   Use a 1/2" stencil brush to apply Angel Pink ink all over the image, then apply Rose Bud ink over that, remove the stencil and trim close to the design
Step 6: Wrap the ribbon around the stenciled layer and tie a bow near the left edge, adhere to the card front
Step 7:  Adhere the mouse image to the upper left of the stenciled background, then use foam tape to add the sentiment over the ribbon area

For more love go to the Stampendous Blog!

Happy Creating,
Louise

Monday, February 12, 2018

Great Big Love


Love is in the air this week and this Great Big Love (P317) stamp from Stampendous makes a perfect Valentine's card! Have a wonderful, love filled week!


Stampendous:
CRP317 Cling Great Big Love
MG02 Gold Micro Glitter
MPW811 Mixed Media White Paper
Acrylic Handle
MEM01 Memento™ Tuxedo Black Ink by Tsukineko®

Plus:
Cardstock - Yellow, Red
Copic Sketch Markers -  Y00, Y15, Y17, Y21, Y26, YR24, R24, R27, R59, B0000, B34, B37, B39
Blender Solution
Terrycloth
Glue Pen
Zutter 1/2" corner rounder
Foam Tape

Instructions:
Step 1:  Fold a 4 1/4" x 11" piece of yellow cardstock in half to form an A2 card, round corners
Step 2:  Stamp the Great Big Love on a 3 1/4" x 4 1/2" piece of white cardstock with Tuxedo Black ink, color the background area first with B0000, B34, B37, B39
Step 3: Lightly moisten a small part of the terrycloth rag with Blender Solution, press the moist portion of the rag randomly over the background to give it texture
Step 4: Finish coloring the image, round all corners
Step 5: Cut a 3 3/8" x 4 5/8" piece or red cardstock, round all corners, adhere the Great Big Love image to the red mat
Step 6:  Cut 2 pieces of red 3/8" x 6", angle them across the card front, adhere, trim at edges
Step 7: Use foam tape to add the image to the card front
Step 8:  Apply Glue Pen to each star, sprinkle glue with Gold Micro Glitter, tap of extra, let dry

See the Stampendous Blog for more samples!

Happy Creating,
Louise

Wednesday, February 7, 2018

Curio Dog!

This week the Stampendous Design Team is playing with the wonderful new Curio stamps that were featured in the January catalog. They are the perfect addition to your craft room decor when you finish your project!


Each lucky member of the Stampendous Design Team was sent two Curio stamps to create beautiful samples for you!  I received these amazing stamps:


 Then the fun began! Stamping and coloring (my favorite step):


Cut him out, or use the matching die from the Laurel Burch Dog Park Die Set (LBDCS04) to die cut the image. Edge with the 100 marker for a crisp edge.


Hmmm...picking papers and layouts:


Still needs a little something...


Some gold metallic thread criss-crossed on the top layer adds some interest!

Finished product! (The Curio LB Cat seems to like photo bombing! LOL)


Stampendous:
LBCUR04 Curio LB Dog
MPW811 Mixed Media White Paper
Acrylic Handle
MEM01 Memento™ Tuxedo Black Ink by Tsukineko®

Plus:
Cardstock - Green
BoBunny  Kiwi Vintage, Grape Stripe
Copic Markers - Y17, YR04, BG01, BG13, FV2, V15, RV19, YG07, YG67, 100
Gold Metallic Thread
Black Foam Tape

Instructions:
Step 1:  Fold a 5 1/2" x 8 1/2" piece of green cardstock in half to form an A2 card
Step 2: Use the Tuxedo Black ink to stamp the LB Curio Dog image on white, color with Copic Markers
Step 3: Trim close to the image or use the matching die to cut out the dog
Step 4:  Decide on your layout of papers to create a background, tear edges on the layers, adhere to the card front, except the final Kiwi layer
Step 5:  Wrap the top Kiwi layer with gold metallic thread before adhering to the card front
Step 6:  Add the LB Dog to the layers, using foam tape

See the Stampendous Blog for more samples of these sweet Curio stamps! Mine bring a smile to my face every time I look up and see them perched on the shelf in my craft room!


Happy Creating,
Louise

Monday, February 5, 2018

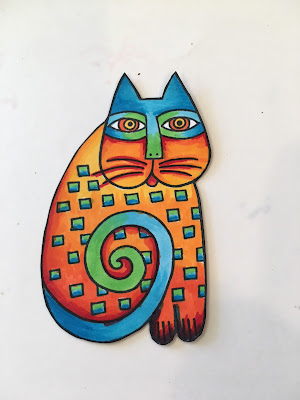
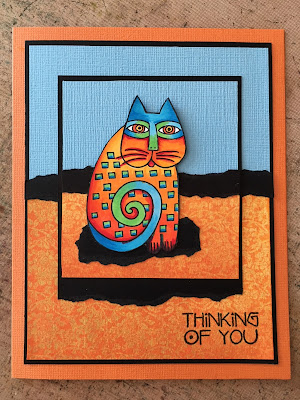
Curio Cat!

What's a Curio Cat you ask? Just the cutest chunky stamp you've ever seen!  This adorable stamp from the Laurel Burch line at Stampendous was part of the January 2018 catalog release and Curios are the perfect addition to your craft room decor when you finish your project!


Each lucky member of the Stampendous Design Team was sent two Curio stamps to create beautiful samples for you!  I received these amazing stamps:


 Then the fun began! Stamping and coloring (my favorite step):


Cut out by hand or use the matching die from LBDCS02 LB Indigo Cats Die Set
Next you need to pick out some great papers. I know a lot of people pick their paper first, then color their image to match, but I find the image seems to tell me what colors to use, then I figure out the matching papers!


Before you know it, you have a fun, colorful card!


Stampendous:
LBCUR02 Curio LB Cat
SSCL103 LB Floral Greetings PCS
MPW811 Mixed Media White Paper
Acrylic Handle
MEM01 Memento™ Tuxedo Black Ink by Tsukineko®

Plus:
Cardstock - Orange, Blue Black
BoBunny  Orange Citrus Vintage 
Copic Markers - Y17, YR04, YR09, R29, B02, B04, B06, YG07, 100
Black Foam Tape
Misti Stamp Tool

Instructions:
Step 1:  Fold a 6" x 9 1/2" piece of orange cardstock in half to form an A6 card
Step 2: Use the Tuxedo Black ink to stamp the LB Curio Cat image on white, color with Copic Markers
Step 3: Trim close to the image or use the matching die to cut out the cat
Step 4:  Layer papers  to create a background
Step 5:  Add the LB Cat to the layers, using foam tape under the head area and regular adhesive at the bottom of the cat
Step 6:  Use the Misti Stamp Tool to stamp the sentiment in the lower right corner


See the Stampendous Blog for today's samples. Then stop back on Wednesday to see my creation using the LB Curio Dog!


Happy Creating,
Louise

Friday, February 2, 2018

Carnation Blooms

How did it get to be February already! I know, we say that every month but time really does fly by. Hopefully you are surviving the winter (or summer depending on where you are). Spring is not too far off and to help remind you of that the Stampendous Design Team is sharing samples using the wonderful Spring Borders Die Set (DCP1009)


Today I have created a Get Well Soon card using the beautiful Carnations Blooms Stamp (P312) and a "get well soon" wish from Brushed Wishes PCS (SSC1272), but any sentiment could be used for any occasion.  The border is one of my favorites in the Spring Borders set, and, I think, is especially lovely in white or cream. It makes the card a little "fancier" and more delicate.


Stampendous:
CRP312 Cling Carnation Blooms
SSC1272 Brushed Wishes PCS
DCP1009 Spring Borders Die Set
MPW811 Mixed Media White Paper
Acrylic Handle
MEM01 Memento™ Tuxedo Black Ink by Tsukineko®

Plus:
Light Green textured cardstock 
Copic Markers - B00, R00, R02, R05, R08, G20, G82, G85
Copic Blending Solution
Foam Tape
Die Cut Machine

Instructions:
Step 1:  Fold a 6" x 9" piece of light green cardstock in half to form a card
Step 2: Use the Tuxedo Black ink to stamp the Carnation Blooms on white paper,  color with Copic Markers
Step 3:  Use the pierced scallop edge die cut one long edge of a 4 1/4" x 5 1/2" piece of white cardstock, adhere to the card front
Step 4:   Adhere the colored image to a 3 1/2" x 5" piece of light green, use foam tape to add to the card front
Step 5:   Adhere the Pink Carnation circle to the large yellow scalloped circle and adhere to the card front
Step 6: Stamp the sentiment from the Brushed Wishes set on white, trim to fit a 1" x 1 3/8" piece of light green, adhere to near the upper left corner of the image

Go to the Stampendous Blog for more samples featuring the Spring Borders Die Set.

Happy Creating,
Louise