Friday, March 31, 2017

Whale of a Time!

Stampendous is excited about the release of their new April 2017 Catalog products for Summer! There are terrific new stamp images from Fran Seiford, Laurel Burch, Pink Your Life's Nicoletta Zanella, and House-Mouse Designs' Ellen Jareckie! These stamps are now shipping to wholesale customers who are busily stocking their stores for you. Friday, April 1st you can order these images on the Stampendous website. Remember that Stampendous website orders are shipped to you from a local, independent retailer when they have them in stock.

Here's a sneak peak of the gorgeous new Stylized Whale stamp, P302, paired with the perfect new sentiment Whale of a Time, L270. Of course, the Waves Stencil, DWLJ838, gives a great finishing touch to them!


Stampendous:
CRP302 Cling Stylized Whale
CRL270 Cling Whale of a Time
MPW811 Mixed Media White Paper
Acrylic Handle
MEM01 Memento™ Tuxedo Black Ink by Tsukineko®
GL220U Crystal Multi Glitter

Dreamweaver:
DWLJ838 Waves Stencil
DWDEP Regular Embossing Paste
DWDPK Dreamweaver Palette Knife
DWLM2010 Paste Spreader

Plus:
My Color Cardstock - Seafoam, Plum
Copic Markers - BG10, BG13, BG18, BV00, BV02, BV04, R30, R32, R35, T0, T2, T4
Removable Tape
Foam Tape

Instructions:
Step 1:  Fold a 6" x 9 1/2" piece of Plum cardstock in half to form an A6 card
Step 2: Tape the Waves stencil to a 4 1/4" x 5 1/2" piece of Seafoam cardstock with removable tape
Step 3: Use a palette knife and paste spreader to apply Regular Embossing Paste to the Waves design, remove stencil and place in water, sprinkle the wet paste with Crystal glitter, tap off extra, let paste dry, clean the stencil
Step 4:  Stamp the Stylized Whale on white cardstock, color with Copic Markers, trim close to the design on all four sides, mat on Seafoam and Plum cardstocks
Step 5:   Stamp the sentiment on white cardstock and trim close to the design, mat on Seafoam and Plum cardstocks
Step 6: When the pasted image is dry, adhere the Waves to the card front
Step 7:  Adhere the Stylized Whale on the Waves
Step 8:  Use foam tape to apply the sentiment to the card front

Stop over at the Stampendous Blog for a list today's designers.

Stampendous Blog

Happy Creating,
Louise

Friday, March 24, 2017

Follow Your Dreams!

Follow Your Dreams no matter where in the world they take you! This would be a wonderful Graduation card for either high school or college for all those graduations parties that will be coming up soon!

The Stampendous Design Team has been sharing ideas with a theme of "On The Road" this week. This card stretches that road pretty far, but still works I think!

"DREAM"
Supplies:

Dreamweaver:
DWLM289 Globe Stencil
DWLS1003 Dream Stencil
DWLJ817 Leopard Skin Stencil
DWDMBP Matte Black Embossing Paste
DWDPK Dreamweaver Palette Knife
DWLM2010 Paste Spreader
DWNHB-12 ½” Natural Handled Brush

Plus: 
My Color Cardstock – Madras Blue, Winter Lake, Grasshopper
Brilliance Ink – P. Thyme
Foam Tape

Instructions:

  1. Fold a 5 1/2" x 8 1/2" piece of Madras Blue cardstock in half to form an A2 card
  2. Tape the Globe stencil to a 2 1/4” x 3 1/4” piece of Madras Blue cardstock with removable tape
  3. Use a palette knife and paste spreader to apply Matte Black Embossing Paste over the Globe, remove stencil and place in water for cleaning, let paste dry
  4. Tape the Dream stencil to a 1” x 2 1/4” piece of Madras Blue cardstock with removable tape
  5. Use a palette knife and paste spreader to apply Matte Black Embossing Paste over the Dream, remove stencil and place in water for cleaning, let paste dry
  6. Place the Leopard Skin stencil on a 1 1/2” x 5 1/2” piece of Grasshopper cardstock and use a 1/2” stencil brush to apply the Thyme ink, move the stencil around the paper to fill the background
  7. Adhere the Leopard Skin strip to a 1 ¾” x 5 ½” piece of Winter Lake, then adhere to the left side of the card front
  8. When the paste is dry, adhere the Globe to a 2 ½” x 3 ½” piece of Winter Lake, and the Dream to a 1 ¼” x 2 ½” piece of Winter Lake
  9. Adhere the Globe towards the upper left side of the card, overlapping it onto the Leopard Skin pattern
  10. Use foam tape to add the dream to the lower right
For a complete list of today's designers, go to the 

Stampendous Blog

Happy Creating,
Louise

Wednesday, March 22, 2017

Travel Home!

We're back "On The Road" again on the Stampendous Design Team.  Sharing samples using some of our great stamps and stencils that fit the theme perfectly!

Today's card features two of our newer stencils and another great sentiment from the Travel Home Set (SSC1254).


Supplies:

Stampendous:
FMS4062 Giraffe Metal Stencil
FMS4066 Thicket Metal Stencil
SSC1254 Travel Home Stamp Set
MPW811 Multi Media White Paper
MEM01 Memento™ Tuxedo Black Ink by Tsukineko®

Dreamweaver:
DWDMBP Matte Black Embossing Paste
DWDPK Dreamweaver Palette Knife
DWLM2010 Paste Spreader
DWNHB-12 ½” Natural Handled Brush

Plus: 
My Color Cardstock – Fireflies
Black Cardstock
Brilliance Ink – P. Thyme, P. Ivy
Foam Tape

Instructions:

  1. Fold a 7" x 10" piece of Fireflies cardstock in half to form an A7 card
  2. Tape the Giraffe stencil to a 3 ½” x 5 ¼” piece of Fireflies cardstock with removable tape
  3. Use a palette knife and paste spreader to apply Matte Black Embossing Paste over the Giraffe, remove stencil and place in water for cleaning, let paste dry
  4. Place the Thicket stencil on a 4 ¾” x 6 ¾” piece of white cardstock and use a 1/2” stencil brush to apply the Thyme ink, move the stencil around the paper to fill the background
  5. Repeat with the Ivy ink offsetting the stencil so both colors show
  6. Run the Ivy ink pad around the edge and adhere to the card front
  7. Stamp the saying on a 1 5/8” x 1 3/4” piece of white, stencil some leaves around the edges, edge with green
  8. Mount the saying on a 1 7/8” x 2” piece of Fireflies and a 2” x 2 1/8” piece of black
  9. When the black paste is dry, adhere the Giraffe image to a 3 5/8” x 5 3/8” piece of black cardstock
  10. Adhere the Giraffe to the lower right corner of the background
  11. Use foam tape to add the saying
For more "On The Road" samples, head over to the 

Stampendous Blog


Happy Creating,
Louise

Monday, March 20, 2017

Road Trip!

"On the road again...", can't you just hear Willie Nelson singing those words! Of course, now it will be running over and over in your mind for the rest of the day!  The Stampendous Design Team is working with a theme of "On The Road" this week. We will be featuring some of our wonderful stamps and stencils that fit this theme.

Today I'm sharing a fun card using some stencils and a great sentiment from the Campground set (SSC1253). I think it would work for a graduation card or inspiration card.

"Road Trip"
Supplies:

Stampendous:
FMS4061 Tortoise Metal Stencil
SSC1253 Campground Stamp Set
Frantage Color Fragments – Taupe, Chiffon, Ochre
MPW811 Multi Media White Paper
MEM01 Memento™ Tuxedo Black Ink by Tsukineko®

Dreamweaver:
DWLG656 Plantain Leaves Stencil
DWLL332 Picasso Stencil
DWDMBP Matte Black Embossing Paste
DWDEP Regular Embossing Paste
DWDPK Dreamweaver Palette Knife
DWLM2010 Paste Spreader
DWGHB-6 ¼” Gold Handled Brush
DWNHB-12 ½” Natural Handled Brush

Plus: 
My Color Cardstock – Grasshopper
Brilliance Ink – P. Thyme, P. Ivy
Memento Bahama Blue Ink
Copic Markers – R08, YG03, B02
Dries Clear Glue
Foam Tape

Instructions:
  1. Fold a 7" x 10" piece of Grasshopper cardstock in half to form an A7 card
  2. Tape the Plantain Leaves stencil to white cardstock with removable tape
  3. Use the 1/4” stencil brush to apply green inks through the stencil, remove the stencil and let ink dry, clean stencil
  4. Tape the Tortoise stencil over the inked leaves with removable tape
  5. Use a palette knife and paste spreader to apply Matte Black Embossing Paste over the Tortoise, remove stencil and place in water for cleaning, let paste dry
  6. Tape the clean, dry Plantain Leaves stencil to white cardstock with removable tape
  7. Use a palette knife and paste spreader to apply Regular Embossing Paste over the image, remove stencil and place in water for cleaning, let paste dry
  8. On a 4 ½” x 6 ½” piece of white cardstock, stencil the Plantain Leaves several times along the bottom edge and up the left side using the green inks
  9. Use the Picasso stencil to create “clouds” in the “sky” area using a ½” stencil brush and the blue ink
  10. Adhere to the card front
  11. Place the clean, dry Plantain Leaves stencil back over the dry paste and use the green ink to stencil with color, cut out leaving a small white edge all the way around
  12. Cut out the dry Tortoise image
  13. Stamp the saying on a 1 ¼” x 2” piece of white cardstock, color with markers and mount on a 1 ½” x 2 ¼” piece of Grasshopper
  14. Adhere the Tortoise to lower right area of the background
  15. Use foam tape to add the Plantain Leaves to the lower left corner and the saying to the “sky” area
  16. Apply the Color Fragments across the bottom area using a Dries Clear Glue
Head over to the  Stampendous Blog  for a complete list of today's designers.

Happy Creating,
Louise

Friday, March 17, 2017

Soaring Heart!

WOW! We have had a fun week! Stampendous is working with the wonderful products provided to us by DecoArt for our projects. Our two teams have been sharing ideas all week with our grand finale today! Thanks for all the great comments, they mean the world to me!


Of course there are Prizes!!!!! 
Comment to win one of three HUGE prize packages that includes Andy Skinner stamps and DecoArt Media™ Paint plus more!  US winners only, see Stampendous Official Contest Rules here for more details.
Want to see all that’s in each prize package? Take a look below:
Stampendous:
  • ASCRS07 Cling Handle with Care
  • ASCRS08 Cling Skuldoggery
  • ASCRS09 Cling Unexplained
DecoArt:
  • Quinacridone Magenta
  • Cobalt Turquoise Hue
  • Cobalt Teal Hue
  • Primary Magenta
  • Transparent Yellow Iron Oxide
  • Paynes Gray
  • Carbon Black
  • Titanium White
  • Prussian Blue Hue
  • Phthalo Blue
  • Quinacridone Gold
  • Diarylide Yellow
  • Pyrrole Red
  • Green Gold
  • Primary Yellow Media Mister
  • Titanium White Antiquing Cream
  • Patina Antiquing Cream
  • 8oz Bottle Lamp Black Americana Acrylic Pain
Today I've created a little canvas that combines stamps from Stampendous' Andy Skinner collection, along with paints and other products from DecoArt.
"Soaring Heart!"
Stampendous:

ASCRS07 AS Cling Handle With Card Set
ASCRS03 AS Cling Industrial Set
FREG023 Frantage aged silver embossing enamel

Plus:
4" x 4" x 1" Canvas
Chipboard
DecoArt White Gesso
DecoArt media Fluid Acrylics - Transparent Yellow Iron Oxide, Quinacridone Gold, Green Gold, Pyrride Red, Paynes Grey, Titan Buff
DecoArt media Antiquing Cream
DecoArt media Liquid Glass
Archival Ink - Jet Black
VersaMark 
ZipDry
Black Foam Tape
Fine Point Black Pen
Heat Tool

Instructions:
Step 1:  Paint a coat of DecoArt White Gesso over the canvas, and a piece of chipboard let dry
Step 2:  Paint the canvas and chipboard with the fluid acrylics and let dry thoroughly (or use a heat tool)
Step 3: Stamp the Peeled Paint image from the Andy Skinner Industrial set randomly on the canvas with Archival Jet Black ink, use a block behind the open part to get a better impression, heat set
Step 4:  Stamp the flying heart image on the chipboard piece with Archival Jet Black ink, heat set, cut out the image
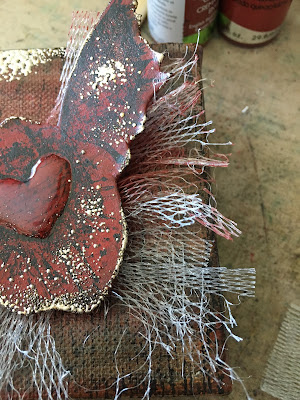
Step 5: Cut some netting or mesh to fit behind the soaring heart image, it was too white, so I used some of the same paints to distress it a little, let dry

Some bottles I ordered one time came with this around them to prevent them from hitting together

I cut it open and stretched it out, fraying the edges a little, then painted it
Step 6:  Pat the upper left corner of the canvas with VersaMark, sprinkle with the aged silver embossing enamel, heat set
Step 7:  Pat around the edges of the soaring heart with VersaMark, sprinkle with the aged silver embossing enamel, heat set
Step 8:  Apply Liquid Glass to the heart area, let dry thoroughly, outline the heart with a fine line black pen
Notice that the heart isn't quite dry yet, but it was dry enough to work with it you are careful
Step 9: Determine the placement of the netting and soaring heart, use ZipDry to hold the netting in place, add a layer of foam tape to the back of the heart for more dimension, use more ZipDry to help hold the heart to the netting

Two of this week's canvases:


For a complete list of today's designers, see these blogs:

Stampendous Blog

Happy Creating,
Louise

Thursday, March 16, 2017

Greatest Treasures!

WOW! We are having a fun week! Stampendous is working with the wonderful products provided to us by DecoArt for our projects. Our two teams have been sharing ideas all week with a grand finale hop on Friday!


Of course there are Prizes!!!!! 
Comment to win one of three HUGE prize packages that includes Andy Skinner stamps and DecoArt Media™ Paint plus more!  US winners only, see Stampendous Official Contest Rules here for more details.
Want to see all that’s in each prize package? Take a look below:

Stampendous:
  • ASCRS07 Cling Handle with Care
  • ASCRS08 Cling Skuldoggery
  • ASCRS09 Cling Unexplained
DecoArt:
  • Quinacridone Magenta
  • Cobalt Turquoise Hue
  • Cobalt Teal Hue
  • Primary Magenta
  • Transparent Yellow Iron Oxide
  • Paynes Gray
  • Carbon Black
  • Titanium White
  • Prussian Blue Hue
  • Phthalo Blue
  • Quinacridone Gold
  • Diarylide Yellow
  • Pyrrole Red
  • Green Gold
  • Primary Yellow Media Mister
  • Titanium White Antiquing Cream
  • Patina Antiquing Cream
  • 8oz Bottle Lamp Black Americana Acrylic Pain
SNEAK PEEK!!!   Today I've created a little canvas that combines one of our new stamp sets from the Stampendous April release with paints and other products from DecoArt.

Greatest Treasures
Stampendous:
SSC1262 Nautical Treasures PCS
Frantage Color Fragments - Ochre, Taupe, Chiffon
MPW811 Multi Media White Paper

MEM01 Memento™ Tuxedo Black Ink by Tsukineko®
DWDPK Palette Knife

Plus:
4" x 4" x 1" Canvas
DecoArt White Gesso
DecoArt media Fluid Acrylics - Transparent Yellow Iron Oxide, Green Gold, Cobalt Turquoise Hue, Titan Buff, Burnt Umber
DecoArt media Crackle Paste
DecoArt Decou-Page matte
Copic Sketch Markers - Y15, YR000, YR21, YR24, R32, R35, E31, E33, E53, E93, BG10, BG13, BG18, G12, G17, YG93, YG95, T1, T3, 100
Archival Ink - Jet Black
Dries Clear Glue
ZipDry Adhesive
Foam Tape
Heat Tool
Ephemera - shells, grass, feathers

Instructions:
Step 1: Paint the canvas with a coat of White Gesso, let dry (or use a heat tool)
Step 2:  Paint the canvas with the fluid acrylics, let dry
Step 3: Use Archival Jet Black ink to randomly stamp the greatest Treasures saying around the canvas
Step 4:  Use the palette knife to apply a thin coat of Crackle paste near the bottom edge of the canvas, let dry thorougly until well crackled
Step 5:  Stamp the treasure chest image on white cardstock with Memento Tuxedo Black, color with Copic Markers
Step 6:  Cut out the colored image dividing it into three sections, edge with a black marker, wipe a very thin coat of decou-Page on both sides of each piece, let dry
Step 7: When the Crackle Paste is dry, paint with a wash of Titan Buff and Burnt Umber, let dry
Step 8: Use foam tape to add the treasure chest pieces (one in the front, one on each side)


Step 9: Use ZipDry to apply the ephemera around the canvas, use dries clear glue to add the Color Fragments


For today's list of designers, see these blogs:

Stampendous Blog

Happy Creating,
Louise

Wednesday, March 15, 2017

Dragonfly Zen

WOW! We have a fun week planned for you! Stampendous is working with the wonderful products provided to us by DecoArt for our projects. Our two teams will share ideas all week with a grand finale hop on Friday!


Of course there are Prizes!!!!! 
Comment to win one of three HUGE prize packages that includes Andy Skinner stamps and DecoArt Media™ Paint plus more!  US winners only, see Stampendous Official Contest Rules here for more details.
Want to see all that’s in each prize package? Take a look below:

Stampendous:
  • ASCRS07 Cling Handle with Care
  • ASCRS08 Cling Skuldoggery
  • ASCRS09 Cling Unexplained
DecoArt:
  • Quinacridone Magenta
  • Cobalt Turquoise Hue
  • Cobalt Teal Hue
  • Primary Magenta
  • Transparent Yellow Iron Oxide
  • Paynes Gray
  • Carbon Black
  • Titanium White
  • Prussian Blue Hue
  • Phthalo Blue
  • Quinacridone Gold
  • Diarylide Yellow
  • Pyrrole Red
  • Green Gold
  • Primary Yellow Media Mister
  • Titanium White Antiquing Cream
  • Patina Antiquing Cream
  • 8oz Bottle Lamp Black Americana Acrylic Pain
My creation today was inspired by the beautiful ceramic tiles of Sid Dickens. If you've never seen them, I can tell you, they are amazing!  They also are a little pricey, so I decided to create my own version with Stampendous and DecoArt products!

Dragonfly Zen
Stampendous:
FREG036 Aged Teal Embossing Enamel

Dreamweaver:
DWLM193 Dragonfly Stencil
DWLX7024 Zen Flower Stencil
DWDEP Regular Embossing Paste
DWDMBP Matte Black Embossing Paste
DWDPK Palette Knife
DWLM2010 Paste Spreader

Plus:
5" x 7" Canvas
DecoArt White Gesso
Foam brush
DecoArt Prussian Blue, Titan Bluff
DecoArt DuraClear Ultra Matte
DecoArt Metallic Lustre Iced Espresso
VersaMark Ink
Copic Black 100
Removable Tape

Instructions:
Step 1:  Tape the Zen Flower stencil to the canvas and apply Regular Embossing Paste over the stencil, remove the stencil and place in water for cleaning, let paste dry thoroughly
Step 2:  Use a foam brush to apply a coat of Gesso over the whole canvas, let dry
Step 3: Mix Prussian Blue, Titan Buff and Ultra Matte together and streak over the entire canvas including the sides, wipe off a little if it gets on too heavy, dry well
Step 4:  Mix a little Iced Espresso Metallic Lustre with water on a craft mat and streak over the design and sides, let dry
Step 5:  Tape the dragonfly stencil to the middle of the flower with removable tape
Step 6:  Use a palette knife and paste spreader to apply a coat of Matte Black Embossing Paste over the dragonfly, remove stencil and place in water for cleaning,  immediately sprinkle the wet paste with aged teal embossing enamel, tap off extra, heat set, let paste dry well
Step 7: Pat VersaMark around one corner, sprinkle with aged teal, heat set, repeat on the other three corners and along the sides
Step 8: Use a black Copic marker to edge the dragonfly image
Step 9: If background is too dark, moisten a paper towel and dip it in Titan Buff, dab it off and rub the flower area to lighten the background, dry well

For a complete list of today's designers, see these blogs:

Stampendous Blog


Happy Creating,
Louise