Monday, July 31, 2017

Whisper Sunflower

"One Last Summer Vacation" is this week's theme for the Stampendous Design Team. August is a day away and soon school will begin again. Everyone is busy cramming all the fun they can into these last wonderful days of summer! 

But take time to relax a little too! This sweet little Whisper Sunflower stamp (PLW04) is the perfect image to help you relax! 


Stampendous:
PLCW04 Cling Whisper Sunflower
MG06 Lavender Micro Glitter
MPW811 Mixed Media White Paper
Acrylic Handle
MEM01 Memento™ Tuxedo Black Ink by Tsukineko®

Plus:
My Color Cardstock Gold Zinnia, Beach Grass
Copic Sketch Markers - G20, G24,G29, E51, E53, E93, C1, T9, BV0000, BV02, BV04, 100, Y00, Y02, Y08, Y38, Y23
Foam tape
Scrapbook Adhesive White Foam Squares

Instructions:
Step 1:  Fold a 6" X 9 1/2" piece of Gold Zinnia cardstock in half to form an A6 card
Step 2:  Stamp the Whisper Sunflower image on a 3 7/8" x 4" piece of white cardstock with Tuxedo Black ink, color with Copic markers, edge with the black marker
Step 3: Cut a 4 1/4" x 5 1/2" piece of Beach Grass cardstock, edge with the black marker, adhere to the card front
Step 4: Use foam tape to add the Whisper Sunflower image
Step 5: Cut off 3 white foam squares, remove the release paper from the top of each square, cover with the Lavender micro glitter and rub glitter on well, tap off extra, attach the glittered squares to the lower right area of the card front

Relax and take some time to check out more summertime samples at the Stampendous Blog!

Happy Creating,
Louise

Friday, July 28, 2017

Teacher Time!

Happy end of July! I'm on vacation this week in northern MN celebrating "Christmas in July" with my husband's family. We do this every year because it's not fun to travel in December!

The Stampendous Design team is getting ready for Back to School with our "Teacher Time" theme this week. I'm sharing an oldie but goodie  with you, well because it's cute, and like I said, I'm on vacation!


Enjoy. If you'd like to see the original post with instructions, click here. The links won't work any more, but the instructions are still good!


The perfect birthday card for your favorite teacher!

See the Stampendous Blog for more ideas.

Happy Creating,
Louise

Friday, July 21, 2017

Pinecone Decoration

It's "Christmas in July" for the Stampendous Design Team this week and we are so excited to share some of their great products with you! Lucky for me, Stampendous supplies team members with those great products so we can create inspirational samples for you and them! For the July 2017 catalog we also received some fabulous papers from BoBunny. Thanks BoBunny, I LOVE your paper!

Today I'm sharing my favorite image (ok, ONE of my favorite images!) from the BRAND NEW images from our July 2017 release called Pinecone Decoration, P310. It is such a classic representation of the holidays!  I paired it here with BoBunny's beautiful Wild Berry Vintage paper.


Stampendous:
CRP310 Cling Pinecone Decoration
SSC1266 Snowman Wishes PCS
AC672HSG Holo Gold Dot Sparklers
MPW811 Mixed Media White Paper
Acrylic Handle
MEM01 Memento™ Tuxedo Black Ink by Tsukineko®

Plus:
My Color Cardstock - Goldenrod
BoBunny Wild Berry Vintage 12WBV999
Copic Sketch Markers - E35, E42, E44, E47, E49, R01, R24, R27, R29, R39, R59, R89, R81, Y15, YR24, YG63, YG67, G99
Foam Tape

Instructions:
Step 1:  Fold a 6" x 9 1/2" piece of Goldenrod cardstock in half to form an A6 card
Step 2:  Stamp the Pinecone Decoration on a 3" x 4 1/2" piece of white cardstock with Tuxedo Black ink, color with Copic markers
Step 3: Stamp Merry Christmas from the Snowman Wishes set on a 1/2" x 2 1/2" piece of white
Step 4: Adhere the Pinecone Decorations to a 3 1/8" x 4 5/8" piece of Goldenrod, adhere the sentiment to a 5/8" x 2 5/8" piece of Goldenrod
Step 5:  Cut a 4 1/2" x 5 3/4" piece of the Wild Berry, edge with R89, adhere to the card front
Step 6:  Adhere the Pinecone Decoration layer toward the lower right part of the card
Step 7:  Use foam tape to add the sentiment
Step 8:  Place a Dot Sparkler at the top of the cord on the Pinecone Decoration

See the Stampendous Blog for more Christmas in July!

Happy Creating,
Louise

Wednesday, July 19, 2017

Winter Home

It's "Christmas in July" for the Stampendous Design Team this week and we are so excited to share some of their great products with you! Lucky for me, Stampendous supplies team members with those great products so we can create inspirational samples for you and them! For the July 2017 catalog we also received some fabulous papers from BoBunny. Thanks BoBunny, I LOVE your paper!

Today I'm sharing a quick and easy card that features one of the BRAND NEW images from our July 2017 release called Winter Home, W189. This serene image colors up quickly and looks beautiful on a variety of papers. I paired it here with BoBunny's beautiful Wild Berry Vintage paper.


Stampendous:
CRW189 Cling Winter Home
MG01 Crystal Micro Glitter
MPW811 Mixed Media White Paper
Acrylic Handle
MEM01 Memento™ Tuxedo Black Ink by Tsukineko®

Plus:
My Color Cardstock - Evergreen
BoBunny Wild Berry Vintage 12WBV999
Copic Sketch Markers - BG0000, BG000, B0000, B00, BV20, YG0000, YG01, YG03, YG17, YG63, YG67, Y13, Y17, Y21, Y26, YR30, R22, R24, R29, R59, C1, C5, E23, E27, E29, 0, 100
Creative Impressions 3/4" Antique Gold Crepe Ribbon 70128
Foam Tape
Quickie Glue Pen
Ruler, Pencil, white eraser

Instructions:
Step 1:  Fold a 5" x 10" piece of Evergreen cardstock in half to form a square card
Step 2:  Stamp the Winter Home on a 4 1/4" x 4 1/2" piece of white cardstock with Tuxedo Black ink, color with Copic markers
Step 3: Use the ruler and pencil to draw a light line along the left and right sides of the image using the width of the frame to line it up (it should end up 3 3/4" wide), trim up the bottom edge close to the lowest holly leaf
Step 4: Cut in from one edge at the base of the oval frame and cut around the frame to the other side, coming back out to the edge across from the first cut (you should have a white section around the holly that is 2" x 3 3/4")
Step 5:  Use the 100 marker to edge the frame, mount the lower portion on a 2 1/4" x 4" piece of the Wild Berry Vintage paper (you can edge this paper with the R59)
Step 6:  Adhere 4 1/4" x 4 3/8" piece of Evergreen to a 4 1/2" x 4 5/8" piece of Wild Berry Vintage, wrap a piece of the ribbon around the two and adhere in the back, adhere to the card front
Step 7:  Use the glue pen and Crystal Micro Glitter to add some glitter to the snow area of the scene, the cabin roof, and the tops of the berries, let dry
Step 8: Use foam tape to add the Winter Home to the card front

See the Stampendous Blog for more great samples!

Happy Creating,
Louise

Monday, July 17, 2017

Angel Blessing

It's "Christmas in July" for the Stampendous Design Team this week and we are so excited to share some of their great products with you! Lucky for me, Stampendous supplies team members with those great products so we can create inspirational samples for you and them! For the July 2017 catalog we also received some fabulous papers from BoBunny. Thanks BoBunny, I LOVE your paper!

Today I'm sharing a quick and easy card that features one of the BRAND NEW images from our July 2017 release called Angel Blessing, R298. This beautiful little angel can be colored up in any color you wish and placed on coordinating backgrounds. The sentiment is part of the stamp so that is even better!


Stampendous:
CRR298 Cling Angel Blessing
DCR102 DECOR Snowflakes
MG01 Crystal Micro Glitter
EJS02 Spoonful of Snow
MPW811 Mixed Media White Paper
Acrylic Handle
SSH88 DECOR Handle
MEM01 Memento™ Tuxedo Black Ink by Tsukineko®

Plus:
My Color Cardstock - Deep Indigo
BoBunny Powder Blue Vintage 12PBV968
Copic Sketch Markers - B32, B34, B37, B60, BG90, BG93, BG96, E01, E35, E37, E51, E53, R39, R59, R85, W0, W4, W6, W8, Y00, Y26
Memento Danube Blue Ink
Zutter 1/2" Corner Rounder
Foam Tape
Dries Clear Craft Glue
Ruler, Pencil, white eraser
Heat tool

Instructions:
Step 1:  Fold a 6" x 9 1/2" piece of Deep Indigo cardstock in half to form an A6 card, round the top two corners
Step 2:  Stamp the Angel Blessing on a 4 1/4" x 5 1/2" piece of white cardstock with Tuxedo Black ink, color with Copic markers
Step 3: Use the ruler and pencil to draw a light line from the edges to the ribbon tail on the right and to the top of the ribbon on the left, trim away the paper around the ribbon
Step 4: Trim the top edge and the two sides to be an 1/8" away from the dotted edge of the scalloped frame, round the corners
Step 5:  Stamp the Snowflakes on a 4 1/4" x 5 1/2" piece of the Powder Blue Vintage paper using Memento Danube Blue, round the top two corners and edge the piece with the blue ink
Step 6: Cut a 4 3/8" x 5 5/8" piece of white, round top two corners, adhere to the card front, then adhere the Snowflake layer to it
Step 7:  Use glue with a fine tip to apply glue to the fur areas of the Angel's cape and hat, add Crystal Micro Glitter, add to the tops of the berries too, let dry
Step 8: Place some Spoonful of Snow on the snowdrift areas of the image, heat from underneath to melt and set
Step 9: Use foam tape to add the Angel Blessing to the card front

For more Christmas in July ideas, go to the Stampendous Blog.

Happy Creating,
Louise

Friday, July 14, 2017

Gift of Friendship!

It's "Birthday Bonanza" week for the Stampendous Design Team! We are so lucky to receive great products from Stampendous to create LOTS of samples to inspire your creative juices!

This is one of my favorite House Mouse images! They are just so busy and intense getting the perfect gifts ready for some lucky friends!


Stampendous
SSCM5003 Friend Wishes PCS
HMR86 Cheese Wrappers 
Acrylic Handle
MPW811 Mixed Media White Paper
MEM01 Memento™ Tuxedo Black Ink by Tsukineko®

Plus
Patterned Cardstock  - Fireflies
Rose Cardstock
Copic Markers - B0000, BG90, BG93, E51, E53, E33, R81, R85, R89, Y00, Y02, Y21, YR000, YR21, YR24, T0, T2, T3, W0, W2, W4, W6, 0, 100
Foam tape
Creative Impressions 70913 1/4" Pink with Red Stitch Ribbon
Fabri-Tac
Removable Tape

Instructions

Step 1:  Fold a 7" x 10" piece of Fireflies cardstock in half to form an A7 card
Step 2:  Stamp the Cheese Wrappers image on a 4" 5 1/4" piece of Mixed Media paper with Memento Tuxedo Black ink, color with Copic Markers, edge with the 100 marker
Step 3: Stamp the sentiment on a 1 1/8" x 1 1/4" piece of white
Step 4:  Cut a 4 3/4" x 6" piece of Rose cardstock and adhere near the left edge of the card front
Step 5:  Wrap a piece of ribbon around the card and adhere under where the image will be
Step 6:  Cut a 2 1/2" x 2 1/2" and a 7/8" x 7/8" piece of Fireflies cardstock, cut each of them on the diagonal to form two triangles from each
Step 7:  Adhere the two larger triangles on the upper left and lower right corners of the mouse image, then use foam tape to add to the card front
Step 8:  Adhere the two smaller triangles to the upper right and lower left corners of the sentiment, then to a 1 1/2" x 1 5/8" piece of Rose cardstock, use foam tape to add it to the right side of the card
Step 9:  Tie a small matching bow, adhere to the card with Fabri-Tac

Stop over at the Stampendous Blog for more samples!

Happy Creating,
Louise

Wednesday, July 12, 2017

Birthday Joy!

It's "Birthday Bonanza" week for the Stampendous Design Team! We are so lucky to receive great products from Stampendous to create LOTS of samples to inspire your creative juices!

These three little mice are "hurrying" by to wish someone special a Happy Day!


Stampendous
SSCM5003 Friend Wishes PCS
HMR88 Slow Riders 
Acrylic Handle
MPW811 Mixed Media White Paper
MEM01 Memento™ Tuxedo Black Ink by Tsukineko®

Plus
Cardstock  - Light Green, Purple
Graphic45 cardstock 4500920 Cosmopolitan
Copic Markers - BV0000, BV00, BV02, BV04, E37, E51, E53, E93, BG90, YG93, 0, E33, RV000, RV11, RV13, RV14, T1, T2, T3, T7, Y00, Y02, Y06, W2, W4, W6, 100, B0000
Foam tape

Instructions

Step 1:  Fold a 7 1/4" x 12" piece of Light Green cardstock in half to form a card
Step 2:  Stamp the Slow Riders image on a 4" 5 1/4" piece of Mixed Media paper with Memento Tuxedo Black ink, color with Copic Markers, edge with the 100 marker
Step 3: Stamp the sentiment on a 1" x 1 1/2" piece of white, edge with the 100 marker
Step 4:  Cut a 2" x 6" piece of Purple cardstock and adhere near the left edge of the card front
Step 5:  Cut a 5" x 6 1/4" piece of the Graphic45 paper, edge with the 100 marker, adhere to the card front
Step 6:  Cut a 4 1/4" x 5 1/2" and a 1 1/8" x 1 5/8" piece of Purple cardstock, adhere the Slow Riders and sentiment to the purple mats
Step 7: Use foam tape to add the Slow Movers to the card front
Step 8:  Adhere the sentiment to the upper right corner of colored image


See the Stampendous Blog for more great ideas!

Happy Creating,
Louise

Monday, July 10, 2017

Garden Gift!

It's "Birthday Bonanza" week for the Stampendous Design Team! We are so lucky to be getting great products from Stampendous to create LOTS of samples to inspire your creative juices!

Today I am sharing a very simple, but colorful card featuring the Garden Gift Stamp (CRQ24) and a sentiment from the Friendship Assortment PCS (SSC1116).


Stampendous:
CRQ24 Cling Garden Gift Stamp
SSC1116 Friendship Assortment Perfectly Clear Set
MPW811 Mixed Media White Paper
Acrylic Handle
MEM01 Memento™ Tuxedo Black Ink by Tsukineko®

Dreamweaver:
DWNHB-12 1/2" Brush #12 Natural Handle


Plus:
My Colors Cardstock - Mandarin
Canvas Corp Orange and Ivory Mini Dot CCP2764
Copic Sketch Markers - W2, BG10, BG32, YG03, YG45, BG18, E93, E95, E04, R32, R35, R39, YR15, YR18
Radiant Neon Electric Orange
May Arts Ribbon
Craft Glue Dots
Foam tape

Instructions:
Step 1:  Fold a 5 1/2" x 8 1/2" piece of orange cardstock in half to form a top fold card
Step 2:  Edge a 4" x 5 1/4" piece of patterned cardstock with Neon Orange ink using a 1/2" stencil brush
Step 3: Stamp the sayings from the Friendship Assortment set with Memento Tuxedo Black ink near the upper left side of the patterned paper
Step 4:  Stamp the Garden Gift on a 2 3/4" x 2 3/4" piece of white with the black ink, color with Copic markers
Step 5:  Cut a piece of orange cardstock 3" x 3" and adhere the Garden Gift image to it
Step 6:  Wrap a piece of May Arts green ribbon around the edges of the patterned paper and attach on the back with Craft Glue Dots, adhere the paper to the card front
Step 7:  Use foam tape to add the Garden Gift image to the card

Stop over at the Stampendous Blog for more ideas!

Happy Creating,
Louise

Friday, July 7, 2017

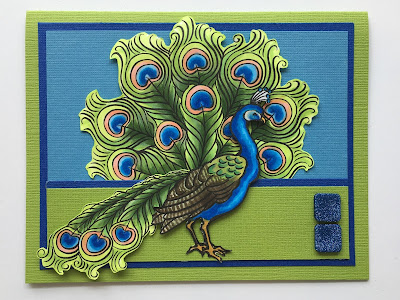
Peacock Beauty!

It's hard to believe that it's July already! The summer heat and humidity are here in full force, which means I stay indoors most days! Last week the Stampendous Design Team shared sneak peeks of some of the fun new fall and holiday designs from our July Release. Be sure to go back and look at them if you missed the fun!

This week we have a "Peacock and Paisley Palooza" week! Stampendous has several wonderful stamps and stencils for this theme. Today I am using the gorgeous Poised Peacock Stamp Set (CRS5099) to create a birthday card.


I hand cut out the images, but there is a matching Poised Peacock Die Set, DCS5099 (which I will be getting!)

Stampendous:
CRS5099 Cling Poised Peacock 
SSC1115 Birthday Wish PCS
MG09 China Blue Micro Glitter
MPW811 Mixed Media White Paper
Acrylic Handle
MEM01 Memento™ Tuxedo Black Ink by Tsukineko®

Plus:
My Color Cardstock - Mint Julep, Comodore Blue, Winter Lake
Copic Markers - YG01, YG23, YG63, YG67, E93, E95, B12, B16, B18, E81, E84, E89, Y17
Scrapbook Adhesive White Foam Squares
Black Foam Tape

Instructions:
Step 1:  Fold a 6" x 9 1/2" piece of Mint Julep cardstock in half to form an A6 card
Step 2: Use the Tuxedo Black ink to stamp the Poised Peacock stamps on a piece of white cardstock, color with Copic Markers, cut out the images (or use the matching die set)
Step 3: Adhere a 4" x 5 1/4" piece of Winter Lake to a 4 1/4" x 5 1/2" piece of Comodore Blue, then adhere both to the card front
Step 4:   Adhere the fanned tail feather to the top center of the card, use foam tape to lift up the top feathers, adhere the bottom ones flat
Step 5:   Adhere a 1/2" x 5 1/4" piece of Comodore Blue to the back of one long edge of a 1 1/4" x 5 1/4" piece of Mint Julep leaving a small edge of the blue showing, adhere to the bottom edge of the Winter Lake layer
Step 6: Use foam tape to add the small set of tail feathers and the peacock

Step 7:  Sprinkle two white foam squares with China Blue Micro Glitter, color the edge with the B18 marker, add to the lower right corner of the card

Step 8: Adhere a 4 1/4" x 5 1/2" piece of Comodore Blue to the inside of the card, then adhere the single feather in the lower left corner

Step 9:   Stamp the sentiment on a 1 1/4" x 2 1/4" piece of white, adhere to a 1 1/2" x 2 1/2" piece of Mint Julep then to the center of the inside of the card

See more ideas at: Stampendous Blog

Happy Creating,
Louise

Monday, July 3, 2017

Happy 4th of July!

 HAPPY 4th of JULY to all our followers in the USA!


"Oh say can you see..."
These are the cute Patriotic Painters (HMCR33), and the Cling Free and Brave (CRF234) from Stampendous. I colored them with a combination of Copic markers and Chameleon pens. The beautiful red, white, and blue ribbon is, of course, from May Arts. To create the rosette, I simply basted along the edge of the red stripe, pulled it from both ends to form the rosette, and knotted it. I closed the edge with just a little Fabri-Tac from Beacon Adhesives, then added a silver star brad to the center.

Wishing you a safe and happy 4th of July!

Happy Creating,
Louise