Well, the countdown to Christmas officially starts today! Only 23 shopping days left to find all the right things that you know they'll love. I love giving presents to family and friends, I even love giving presents to people I barely know, it just makes me happy to make someones day. Needless to say, I tend to go a little overboard at Christmas, but someone has to keep the economy moving!
This week the Dreamweaver Stencil design team was given a colorway challenge for our Dream Scheme Thursday. We had to use silver and turquoise with the stencils and supplies of our choice. With Christmas right around the corner, I decided to make a quick and easy card that would be easy to make in larger quantities.. Here's what I created for this week's challenge:
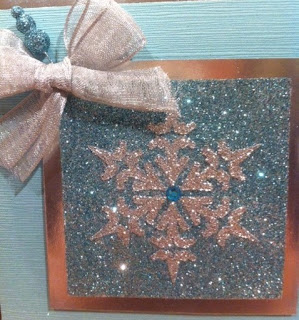
This was created using the Gothic snowflake stencil (LL396) and the double glitter technique. The simple version is: soap the back of the stencil brushing away any flakes of soap in the openings; apply a square of double sided mounting paper to a larger square of silver mirror paper; remove the release paper from the mounting paper and place the stencil soap side down onto the sticky surface; tap the stencil in place especially along all of the small bridges; apply ultrafine opaque silver glitter, pressing it down with a piece of the release paper; tap off the excess glitter then use a brush to clean any glitter on the stencil; turn the stencil face down on a clean paper towel and gently pull the paper off the stencil (be sure to hold the stencil flat with your free hand); apply ultrafine opaque Ice glitter to the background, pressing down firmly with release paper; tap off all excess. The image is very pretty at this point, and you could stop there and mount it onto a card, but it wasn't popping as much as I wanted, so I place the stencil back over the glittered image, taped the edges, and applied Dreamweaver Metallic Silver Embossing Paste over the snowflake, removed the stencil and sprinkled the wet paste with the silver glitter again. This gave it a little more dimension. Here's a close up of the finished image:
Glitter is hard to photograph, but I hope you can see what I'm talking about! While the silver paste was drying, I put glue on a white 3" embellishment pin from Dreamweaver and sprinkled it with the same Ice glitter that is in the background of the snowflake. You only need a thin coat of glue to hold the glitter and it dries in just a couple of minutes. I made a square card from silver mirror cardstock, added a layer of beautiful Hanko washi cardstock (Seafoam, but I think it is pretty "turquoisy"!). When the snowflake was dry, I mounted it to the front of the card with foam tape, added a silver bow and the glittered pin for a beautiful holiday card, or even a winter birthday card. One last thing, I put a turquoise gem in the center of the snowflake as a finishing touch.
Hope you've enjoyed this week's design. For more great Silver and Turquoise creations, stop over at the DREAM it UP! blog and the rest of the team blogs listed at the side.
Happy Creating (and shopping!),
Louise


7 comments:
Hmmm...I don't know whether this is a case of great minds think alike, or that the snowflakes with the color scheme was a no-brainer! Lol! Love the double-glitter on this, and the gorgeous color of cardstock. Don't you love coloring those pins with other stuff?
I love that I can always bet money that your cards will be crip, clean and elegant...I WIN!! Beautiful card. Had someone from a stamp forum I am on that takes classes from you and just raved...I said "of course..she is fab!" Great Job
Love the snowflake(s) on today's posts and they are especially lovely and delicate with the double glitter technique. I'm all for the great minds theory!
BeeYOUteeful!!!
Yes, Louise...definitely kindred spirits...and now Pam too...LOL!!! Am in Marietta GA at RS Fantasy teaching and thinking of the design team.
L
Simply perfect Louise!!! Love this snowflake!!! I hope your having a great week!!
Oh, look at that! We both used Double Glitter and snowflakes! Great work on this.
Post a Comment