Showing posts with label Thursday Dream Scheme. Show all posts

Thursday, February 23, 2012

Dreamweaver Thursday Dream Scheme

February is flying by and we still have had only dustings of snow. Not that I'm complaining, but it makes we wonder what March and April will bring!
Our February challenge for Dreamweaver Stencils continues and we would really love it if you would play along with our Green Theme. Be sure to check out this beautiful design from Sue Petersen that she sent Lynell to post for her, click here to see it. Thanks, Sue, for joining our fun!
My take on the "green" theme this week revolves around another kind of green, a golf green. In two weeks I'll be heading to FL to watch my daughter's college team play in several tournaments over their spring break, so I have golf on the brain right now. This card would be ideal for any golfers in your life, male or female, and is easy to reproduce.

Here are the steps:
  • Lay the golf ball stencil (LS35) on white cardstock that is larger than the stencil (I'm sorry to say this stencil is retired, but maybe you can find one)
  • Mist with Memories Mist Wheatgrass
  • Remove and clean the stencil, let image dry
  • Round corners and brush Distress Inks Frayed Burlap around the edges and lightly through the center
  • Run the Triangle weave stencil (LJ912) and white cardstock through a die cut machine to emboss the background (I like to think of them as woven tees!)
  • Use a foam applicator and Distress Inks Peeled Paint over the embossed image
  • Edge with Frayed Burlap and mount to the front of a card
  • Run the Houndstooth stencil (LJ913) and white cardstock through a die cut machine to emboss (this reminds me of divot tools)
  • Use a foam applicator and Distress Inks Frayed Burlap to color
  • Cut a 1" strip of the pattern and edge with more color
  • Add small brown brads near the top and bottom of the strip
  • Adhere it towards the left side of the card
  • Type "fore you!" on the computer and print on white cardstock
  • Apply Peeled Paint and Frayed Burlap to match the card
  • Use foam tape to add the golf ball and saying to the card
Can you tell I've been around golf courses a lot! This card will be perfect for several golfers I know.
But the fun doesn't stop here, be sure to check out the rest of the team blogs, just click on the names below.
Happy Creating,
Louise

Thursday, February 9, 2012

February Dreamweaver Challenge

Welcome to this week's Dreamweaver Stencil Thursday Challenge. The Dream Team has been given the challenge this month to create either St. Patrick's Day cards or "green themed" cards. You are always welcome to play along with us as many times as you would like during the month. Last month EVERYONE won a prize because we only had a few people join our challenge. Here are the two stencils that will be given away at the end of the February challenge.


Both the  Cherry Blossom Crest (LL490) and the Long Lilies (LL542) are so beautiful! Just go to Lynell's blog, DREAM it UP!, and add your link in Mr. Linky, then leave a comment.
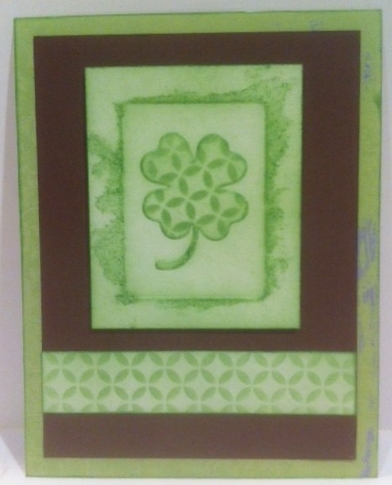
Last week I shared a "green" card with you using recycled materials, so this week I decided to switch to the St. Patrick's Day  theme of the challenge. Here's what I created:


It is very easy, which is good because I usually make about 30 cards (I come from a very large family!). I started by taping the Clover stencil (LS58) to white cardstock with painters tape. Turn it over to the back and dry emboss it using a stylus, I did the edge of the stencil as well. Turn it back over and remove the stencil from the paper. When I did this the tape stuck a little and pulled up some of my paper, but I decided to go ahead and color it anyway. I used a 1/2" stencil brush and Brilliance Thyme ink to sweep color over the design from all four sides (Striae technique). I really liked how the torn part of the paper came out, it looks like there is mulberry paper behind the image! I put the Clover back on then added the  Cathederal Windows small stencil over that and used the brush to add more ink to create a design on the clover.  The strip at the bottom was just white cardstock colored with the Thyme ink through the Cathederal Windows stencil.

Now check out the rest of team blogs to see what they created this week!


Happy Creating,
Louise 

Thursday, January 19, 2012

Love is in the air

Here we are at week three of the Dreamweaver Stencils January Valentine challenge and the Dream Team is excited to bring you more great ideas for Valentine's Day cards. Don't forget you have a little more time to enter your creations in this month's contest at the DREAM it UP! blog to win a great prize.
Starting next week our team will be sharing some sneak peeks of the beautiful new stencil designs that will be released at CHA at the end of January. They are fabulous and you'll love what the team has created with them.
Here's what I created for this week, I hope you enjoy it.


This is one of my favorite techniques, it is easy and gives a beautiful pastel look to your design. I started by taping the Heart whimsy stencil (LL599) on white cardstock, then used small stencil brushes to color the image using Brilliance Rocket Red ink and Brilliance Thyme ink. After coloring, I gently wiped off the stencil before applying the Regular Embossing Paste (matte white) over the image. After removing the stencil, I sprinkled the whole thing with Crystal glitter. When the paste was dry, I mounted it on a green mat and mounted it with foam tape to the front of matching card.

Be sure to check out the other team member blogs for more great creations. Just click on their names below.

Happy Creating,
Louise

Thursday, January 5, 2012

New Year, New Challenges....

Welcome to the first posting of the Dreamweaver Stencils' Dream Team 2012 ! We're changing things up a bit for this year, and YOU can help. The first Thursday of every month will feature our new challenge and will extend through the entire month. This means that YOU have ALL month to play along with the one challenge, as many times as you want. Sometimes it will be a color challenge, sometimes a theme, and sometimes a technique. We are hoping that an entire month will give you plenty of time to be inspired, create, and link to the Dream It Up! blog . Each month we are offering TWO prizes...one for the most creative version of the challenge (does not have to be Dreamweaver Stencils ' product, but we sure are happy when it is!), and the second for the best use of Dreamweaver Stencils ' product in the challenge. This could be stencils (of course), Embossing Pastes , Metallic F/X , the new Color Solutions , etc., anything you find on the Dreamweaver Stencils' web site , or in your local store. Don't know where your local store is? The list can be found on the web site . Not near any of the stores listed? There is also an online site to purchase from, Stencil with Style !
For the month of January, we challenge you to create something for Valentine's Day! You have until January 31st, 11:59 PM EST, to post and link your creation(s) to the
Dream It Up! Blog Mr. Linky. The winners will be announced February 2nd, along with the February challenge.
Here is my first creation for this month's challenge:
This simple technique is very versatile and looks great with any stencil.  I started by taping the Swooshy Heart stencil (LL3010) to white cardstock. Put a small amount of Pearlescent Embossing Paste in a container and mix in a little Pixie Blush F/X powder (FX09). Apply the pink paste to the heart stencil, remove and clean the stencil. When the paste is dry, layer it on coordinating cardstock. But don't forget the inside of the card, that needs to look beautiful too!  Here's what I did to create a Valentine's card, but by changing the inside, this could easily be made into a wedding, anniversary or birthday card.

The Large flourish stencil (LJ896) was stenciled in the corner with a 1/4" stencil brush and Brilliance Coral ink. The You & Me stencil (LS1004) was also stenciled with the Coral ink, and a little Brilliance Coffee Bean at the edges. Layer the saying to match the outside layers.

SUPPLIES: LL3010, Pearlescent Embossing Paste, Metallic F/X powder Pixie Blush, , LJ896, LS1004, Brilliance Inks Coral and Coffee Bean, 1/4" stencil brushes, White, pink, dark brown, and patterned cardstock, foam mounting tape.

We'll post new ideas each week based on the monthly challenge, so be sure to check back regularly to see what else we've created, but for now please visit the rest of our fabulous team listed here:


We hope you'll enjoy our new format and will be inspired to play along each month.  Don't forget that Dreamweaver Stencils will be releasing some great new stencils at CHA at the end of January, we can hardly wait to share them with you!

Please notice my new Class Schedule listing on the top right side of my blog. It will list all my upcoming classes with links to the store websites.
Happy Creating,

Louise

Thursday, December 29, 2011

Ringing in the New Year!

Christmas is over, the cookies are almost gone, the kids have headed home, mountains of towels and sheets have been washed, the house is almost back to normal, wow how I miss it all!   I just love having my family home for the holidays.  But now it's time to ring in the New Year, so that's the theme I used to create this week's design for the Thursday Dream Scheme free challenge from Dreamweaver Stencils.
Enjoy:
I started by taping the Vertical Bells (LL497) to blue cardstock and applying Metallic Silver Embossing Paste (DSP). After removing the stencil, sprinkle the wet paste with Crystal glitter. While the paste is drying, emboss another piece of blue cardstock with Swirls (LJ863) through a die cut machine. Remove the cardstock and gently sand the design so the image shows. Layer the dark blue pieces on metallic silver pieces and mount them on a dark blue card.
Wishing everyone a Happy New Year in 2012! Thank you for your support this past year. I can't tell you how much it means to me to read your supportive comments. Keep watching for some changes coming in the new year. I'll be adding Twitter and Facebook links to make it easier to follow our great team whenever you have a minute. We've also welcomed our new team members, so be sure to stop at their blogs for even more great ideas.
Here's our new list of members, just click on their names to hop to their blogs:

Watch the DREAM it UP! blog for monthly opportunities to win some great prizes too!
Happy Creating,
Louise

Thursday, December 22, 2011

Merry Christmas!

It's hard to believe that Christmas is only 3 days away! It has been a wonderful week with all of my kids home for the holidays. With them spread all over the country, it is fabulous to have everyone together for 10 days. However, it definitely means that I don't get quite as much time in my craft room.
This week's Dreamweaver Stencils Thursday Dream Scheme was a burgundy and gold challenge. I took a little liberty with this one and used one of my favorite cards from a Christmas past. I hope you enjoy it.

This was very simple.  Apply black matte paste on a metallic shimmer cardstock over the Partridge in a Pear Tree stencil (LG695). Let it dry about 10 minutes then brush with metallic FX powders to color the image. Mount on decorative papers, and tada! a beautiful card in no time at all. Can you see my burgundy and gold? The pot is burgundy and the background is gold, that counts, doesn't it!
Be sure to stop over at the DREAM it UP! blog to see another great creation, then to the other designer blogs for even more. Stay tuned for the announcement of our new team members starting in January.
I hope you have a wonder Christmas with family and friends.
Happy Creating,
Louise

Thursday, December 15, 2011

Vintage Christmas

Welcome to this week's Dream Scheme Thursday sponsored by Dreamweaver Stencils. This week we were given the challenge of using a specific sketch with a Vintage Christmas theme. Sounded easy enough right? Ha, there's a reason they call them challenges! Although I had several ideas for Vintage Christmas, they did not fit the sketch challenge very well. But I have to say, I'm pretty happy with what I finally designed.
The sketch looked like this:

Here's my version of Vintage Christmas using the sketch (well, all the elements of the sketch anyway!):

I started by taping the vertical ornament stencil (LL468) to white cardstock and applying Glossy Red Embossing Paste. After removing the stencil I sprinkled Crystal glitter on three ornaments, and Metallic FX Kimono Red on three, then set those aside to dry.
The Long Merry Christmas (LL557) stencil was paste embossed using Metallic Gold Embossing Paste and set aside to dry.
I wanted to have some small holly leaves at the tops of the ornaments so I used the new Color Solution Alcohol Inks (Pine Bough, Citron, Gold Star) on a piece of felt along with a few drops of cleaning solution and pounced it over vellum. It dries pretty fast so I was able to keep creating by laying the 3 Xmas icons stencil (LL469) on the now green vellum and use an Extra Fine Black Sharpie to trace the small holly leaves several times. Cut them all apart, but put them in a little container until you're ready for them or they magically disappear!
By this point my pasted images were dry and ready to assemble. Buff the ornaments that had the FX powder on them to get the excess off, then cut the ornaments out to get three sets. I used a gold Krylon pen on the edges and the "caps" of the ornaments. The gold stripe paper behind the ornaments was left over from a previous project using Memories Mist Gold on the Plaid maker stencil (LX 7002).
To assemble, cut three pieces of striped paper and three black mats for behind them. Attach two ornaments to each striped piece using foam mounting tape behind the ornaments. Place another piece of foam mounting tape at the top and apply a group of holly leaves in a cluster (you may need to use some additional adhesive once the foam is covered. Attach a small red bow to each as a finishing touch. Mount the three sets of ornaments toward the left side of the card (5" x 7") staggering them slightly. Cut apart the Merry Christmas leaving the holly attached to each piece. Use a COPIC marker to color the holly and berries. Mount the words on black cardstock with foam mounting tape, and trim around the image leaving a small black border all the way around. Add additional holly leaves between the words to cover the black. Use red stickles for berries. Adhere it on the right side of the card. There you have it -- Vintage Christmas.
I hope you have time to check out all the team blogs for more beautiful samples of Vintage Christmas using Dreamweaver Stencils great products. Be sure to check out the DREAM it UP! blog too, and play along with the fun if you can.
Happy Creating,
Louise

Thursday, December 8, 2011

Dream Scheme Thursday

It's beginning to look at lot like Christmas...no snow yet, but decorations are up, presents are almost all purchased, parties have begun...I just love the Christmas season, it is so inspiring.
Today's Dreamweaver Stencils Dream Scheme Thursday challenge is designer's choice (a free week). Like almost everyone in the crafting industry, I love to follow Tim Holtz's 12 Tags of Christmas blogs, and yesterday's tag (Day 7 click here to see it) was my inspiration for my post today. Sharing concepts is what blogging is all about, and then creating your interpretation of the concept. Sounds complicated, but it really isn't!
Today's post isn't for the faint hearted, this one was a little work, but I love how it turned out.

Supplies: Dreamweaver Glossy Black Embossing Paste, Dreamweaver Glossy Green Embossing Paste, Dreamweaver Stencils LJ863 & LM254, LJ896 & LM134, LL3005, Stampers Anonymous TH Joyful Song CMS119, Dreamweaver Metallic F/X Gold Dust, Palette Stamp & Stick, Xmas Red Stickles, VersaFine Onyx Black ink, Distress Ink Tea Dye, Vintage Photo, 1/2" stencil brushes, cream cardstock, dark green cardstock, blending foam, finger dauber

Here we go:
  • Cut a piece of cream cardstock 5" x 7"
  • Lay the Swirls stencil (LJ863) along two edges, and use a 1/2" stencil brush and Tea dye ink to color the image
  • Move the stencil, matching up the design, and continue adding color until the swirls fill the card
  • Clean and dry the swirls stencil
  • Randomly stamp the music image from the Joyful Song set using Versafine Onyx Black ink
  • Tape the angel with dove stencil (LM254) in the upper right corner and emboss using Glossy Black Embossing Paste (tape off the dove so it does not get pasted)
  • Remove and clean the angel stencil, and let the angel dry
  • Power paste the Holly and swirls stencil (LL3005) on dark green cardstock with Glossy Green Embossing Paste three times so you'll end up with nine holly leaves
  • Remove and clean the holly stencil after the last pasting
  • Set the holly aside to dry
  • Tape the Large flourish stencil (LJ896) to a 4 1/4" x 5 1/2" piece of cream cardstock and stencil with a 1/2" brush using the black ink
  • Remove and clean the flourish stencil
  • Tape the Merry Christmas stencil (LM134) toward the lower right side of the flourish
  • Apply Glossy Black Embossing Paste to the Merry Christmas
  • Remove and clean the stencil, let image dry well
  • When the angel is dry, use blending foam and Distress Ink vintage photo to rouge deeper color around the edge of the card
  • Apply Stamp and Stick to the angel using a finger dauber
  • Let the glue sit for a minute to get tacky, then use your finger to rub a little Gold Dust FX powder on the angel
  • Add a star charm in the upper left corner
  • When the holly are all dry, cut out all the leaves so you have nine individual holly leaves
  • Apply Stamp and Stick to each leaf and let sit until tacky
  • Apply Gold Dust FX powder to each leaf using your finger to spread it around
  • Cut around the flourish and Merry Christmas to form an interesting shape, making sure it will fit the card front
  • Use the blending foam and Distress Ink vintage photo to add color around the edge of the design
  • Determine the placement of the saying and holly leaves before attaching them
  • Use foam mounting tape behind the Merry Christmas to add some dimension
  • Adhere the holly leaves around, using double sided tape, or tacky glue
  • Adhere the design to the front of an A7 card
  • Apply your "berries" using the Xmas Red Stickles, let dry well
I hope you enjoyed my interpretation of Tim's Day 7 tag and that it will inspire you to apply any techniques you learn to your stencils.  They truly are so versatile.
Don't forget to check out the DREAM it UP! blog to see what Lynell has dreamed up this week, and the rest of the team too!
Happy Creating,
Louise

Thursday, December 1, 2011

Dream Scheme Thursday

Well, the countdown to Christmas officially starts today! Only 23 shopping days left to find all the right things that you know they'll love. I love giving presents to family and friends, I even love giving presents to people I barely know, it just makes me happy to make someones day.  Needless to say, I tend to go a little overboard at Christmas, but someone has to keep the economy moving!
This week the Dreamweaver Stencil design team was given a colorway challenge for our Dream Scheme Thursday. We had to use silver and turquoise with the stencils and supplies of our choice. With Christmas right around the corner, I decided to make a quick and easy card that would be easy to make in larger quantities.. Here's what I created for this week's challenge:

This was created using the Gothic snowflake stencil (LL396) and the double glitter technique. The simple version is: soap the back of the stencil brushing away any flakes of soap in the openings; apply a square of double sided mounting paper to a larger square of silver mirror paper; remove the release paper from the mounting paper and place the stencil soap side down onto the sticky surface; tap the stencil in place especially along all of the small bridges; apply ultrafine opaque silver glitter, pressing it down with a piece of the release paper; tap off the excess glitter then use a brush to clean any glitter on the stencil; turn the stencil face down on a clean paper towel and gently pull the paper off the stencil (be sure to hold the stencil flat with your free hand); apply ultrafine opaque Ice glitter to the background, pressing down firmly with release paper; tap off all excess. The image is very pretty at this point, and you could stop there and mount it onto a card, but it wasn't popping as much as I wanted, so I place the stencil back over the glittered image, taped the edges, and applied Dreamweaver Metallic Silver Embossing Paste over the snowflake, removed the stencil and sprinkled the wet paste with the silver glitter again. This gave it a little more dimension. Here's a close up of the finished image:

Glitter is hard to photograph, but I hope you can see what I'm talking about! While the silver paste was drying, I put glue on a white 3" embellishment pin from Dreamweaver and sprinkled it with the same Ice glitter that is in the background of the snowflake. You only need a thin coat of glue to hold the glitter and it dries in just a couple of minutes. I made a square card from silver mirror cardstock, added a layer of beautiful Hanko washi cardstock (Seafoam, but I think it is pretty "turquoisy"!). When the snowflake was dry, I mounted it to the front of the card with foam tape, added a silver bow and the glittered pin for a beautiful holiday card, or even a winter birthday card. One last thing, I put a turquoise gem in the center of the snowflake as a finishing touch.
Hope you've enjoyed this week's design. For more great Silver and Turquoise creations, stop over at the DREAM it UP! blog and the rest of the team blogs listed at the side.
Happy Creating (and shopping!),
Louise

Thursday, November 24, 2011

Happy Thanksgiving!

Wishing everyone a Happy Thanksgiving! I know that I have a lot to be thankful for this year. My kids, my wonderfully supportive husband, family and great friends to name just a few. Every day I remind myself not to complain because I don't have anything to complain about when I hear and see what others around me are going through. Today I am with family and friends enjoying good company and good food, I hope you have a wonderful Thanksgiving, relax and enjoy it because Friday starts the mad rush to Christmas!
This week's Dream Scheme Thursday, sponsored by Dreamweaver Stencils, has a "Thanksgiving Day" theme (no big surprise there!). Here is the card I sent to family and friends this year:


Luckily, I still had a couple of jars of Dreamweaver Matte Orange Embossing Paste left in my stash, but even if you don't, it is simple to mix the yellow and a little red embossing paste to make a lovely shade of orange. The stencil is LJ832 Cornucopia from Dreamweaver Stencils.  To create the pasted image, use removable tape to tape the stencil to cream colored cardstock, then use the new paste spreader (LM2010) to apply the orange paste. Remove and clean the stencil. Let the paste dry for about 10 minutes before using a small, soft brush to apply Metallic FX powders to parts of the design.They give a little shimmer to the image and just a soft touch of color to set off the pumpkins. The cornucopia is layered on two pieces of kraft cardstock that were sprayed with Memories Mist Iridescent Spray (MM28) to give it a matching shimmer. Layer the image onto an orange cardstock embellished with some green ribbon, attach it all to a 5" x 7" base card that has a nice saying stamped inside and it's complete!
If you love working with stencils too, or have always wanted to work more with them, think about joining our Dreamweaver Stencils design team. It is challenging and fun, and you get to work with all the great Dreamweaver products! If you'd like to know the details about joining our team click HERE. It is a wonderful, supportive group who love sharing ideas with whoever will listen! Good luck.
I hope you have time to hop over to the DREAM it UP! blog for more inspiration, then on to all the other designer's blogs too.
Happy Thanksgiving!
Louise

Thursday, November 17, 2011

Thursday Dream Scheme

The air was crisp and cold today, winter is defiantly creeping up on us. But the sun was bright and still warm, trying to hold winter at bay just a little bit longer! Thanksgiving is only a week away, then before we know it Christmas is here! So much to do, so little time...but somehow it all works out.
This week's Dreamweaver Stencils Thursday Dream Scheme is a sketch challenge created by fellow team member Wendy Jordan. Here's what she came up with for us:


This is what I created from the sketch:


The small fern frond stencil (LM2006) is so beautiful and creates a peaceful focal point for your card. For this one I used Glossy Green Embossing Paste on kraft cardstock. When it was almost dry, I gently brushed Metallic F/X Amber Glow (FX02) over the frond. When completely dry, I tore the edges around the design. The other two layers of kraft cardstock were sprayed with Memories Mist Iridescent spray to create a shimmer to match the shimmer of the FX powder. The three brads are antique paper fasteners I found on one of my journeys, I only found three boxes so I rarely use them because I really like them! Do you have things like that, you buy them because you like them, but then you can't make yourself use them because you don't want them to be gone! I have a whole room full of things like that!

Be sure to check out the creations at the other designer's blogs, as well as the DREAM it UP! blog for more inspiration.
Happy Creating,
Louise

Thursday, November 10, 2011

Thursday Dream Scheme

Welcome to another Dreamweaver Stencils Thursday Dream Scheme! If this is your first visit, thanks for joining us! Every Thursday the Dreamweaver Design Team posts creations using the beautiful products from Dreamweaver Stencils. Sometimes we are given a challenge (usually either sketch challenges or color challenges), and sometimes we are free to create whatever we choose. This week is a free design week, so be sure to check out all the wonderful ideas from the whole team.
Lynell recently released some beautiful new stencils that are 6" x 6" and were inspired by Hawaiian quilt patterns. Check them all out by clicking on this link. Aren't they fabulous! This week I am sharing with you a piece of framed art that I created using the Torch Ginger (LX7008) stencil.


The technique was simple. Tape the stencil to a piece of white linen cardstock (6" x 6"). Use stencil brushes, the Picasso (LL332), and Brilliance Inks to color the design. Remove the stencil, clean and dry it, then tape it back over the colored image.  Apply Dreamweaver Translucent Embossing Paste (DEPT) over the image using the Paste Spreader (LM2010). This new tool is just perfect for these large stencils! Remove the stencil, clean and dry it, always making sure you keep your stencil flat while you wash and dry it. While the paste was drying, I cut my other layers: a small black layer to edge my design (6 1/4" x 6 1/4"); a lighter green layer to compliment the image (7 1/4" x 7 1/4"); another small layer of black (7 1/2" x 7 1/2"); a dark green layer (8 1/2" x 8 1/2"); and a final layer of black (8 3/4" x 8 3/4"). The white mat around the image came with the black frame (10" x 10"), so I used it as my final layer. I removed the glass from the frame before adding my artwork (the translucent paste will protect the image). This could be a great gift for those quilters in your life (or just for you!).

My schedule for the next few weeks is:
Saturday, November 12, 2011 - 1:00 pm Stampology Chicago - Dreamweaver Class
Thursday, December 1, 2011 - 6:30 pm The Cottage Stamper - Dreamweaver Class
Tuesday, December 6, 2011 - 12:30 pm and 6:00 pm The Cottage Stamper - Christmas Mirror
Tuesday, December 13, 2011 - 12:30 pm The Cottage Stamper - Dreamweaver Class (repeat of 12/1)

Hope to see you in a class if you are in the area.
Now head over to the DREAM it UP! blog for more inspiration, then off to the other team members to see what they came up with this week!
Happy Creating,
Louise

Thursday, November 3, 2011

Thursday Dream Scheme

WOW! It's hard to believe it's November already. The weather here has been incredibly mild and sunny, which has been just delightful, but it really makes you wonder what's in store for winter! Hope everyone in the northeast is surviving the snow storm and that your electricity is back!
This week's Dreamweaver Stencils Thursday Dream Scheme challenge came to us from fellow team member Deborah March. We were given a colorway this week to use black and white.  I knew right away the look I wanted to create, then it was a matter of finding just the right stencil. Here's what I came up with this week:

Glossy Black and Glossy White Embossing Pastes were the obvious choice for my project, and the Crested Mum stencil (LL582) worked out great for the focal point image. Simply paste emboss the image on a square piece of black cardstock using the Glossy White EP, then on a square piece of white cardstock using the Glossy Black EP. When both images are completely dry cut each image in quarters, but try to make sure you cut both colors the same way. Cut two black and two white squares that are 1/4" larger than the image pieces. Adhere each piece of the Crested Mum to the opposite color matte, aligning the image so only two sides have a border. Tape them down to a slightly larger square white cardstock, then trim each side to even them all up. Go around the edge with a black marker. Emboss two pieces of white cardstock through a die cut machine using the Herringbone stencil (LJ914). Trim along one side of each Herringbone image to fit the front of a 5 1/2" x 5 1/2" card.  Use black ribbon to cover the seam. Cut a black and a white square mat to center on the card, then use foam tape to mount the Crested Mum to the center of the card.  This technique actually gives you the images for two cards, which is always great.
Black and white images are so crisp and clean, and great for many occasions. Be sure to check out more black and white ideas at the DREAM it UP! blog and at the other team member blogs. Take special note of Lynell's posting for new Dream Team Members, click here to go directly to that post for all the info on how to join this great team.
Here's another sample using the same technique, but only cutting the images in half:

I'll be teaching at Stampology Chicago on Saturday, November 12th. Click here to see the samples and class information.
Happy Creating,
Louise

Thursday, October 20, 2011

Thursday Dream Scheme

Welcome to our Dreamweaver Stencils Thursday Dream Scheme challenge. This week is designer's choice, allowing us to any stencils and products. Halloween is right around the corner and I haven't even started my cards yet, so I thought I better come up with something appropriate that would be easy too! Isn't that what we are always looking for every time we need to make cards! Here's what I came up with this week:


I had to get a little creative with my stencil choices. The background was easy, the Spider web (LJ816) on black paper using White Glossy Embossing Paste (DGWP) and sprinkled with Crystal glitter on the wet paste after the stencil was removed. Let the paste dry, trim to the edge of the web, and mount on an orange card base. The jack-o-lantern would have been easy too, if only I had the jack o lantern stencil (LL531)! But, I don't have that YET, so I looked at what I did have and chose the Fall borders (LJ874) stencil instead. The pumpkin was a nice shape and size, so I taped off the leaves that I didn't want to use at the top of the pumpkin and the small ones on the lower right to create the  perfect image. I used Matte Yellow Embossing Paste(DMYP) and a small amount of Glossy Red Embossing Paste (DGRP) mixed together to create a great orange color just right for my pumpkin (about 1 Tbsp yellow plus about 1/2 tsp red). I paste embossed one pumpkin on acetate and one on white because I wasn't quite sure what look I was going for yet. I had plenty of paste so I kept pasting more images until I ran out of orange paste. The paste goes a long way, so don't mix up too much at a time.  The paste on acetate takes much longer to dry than the one on paper.
While those were drying, I looked through my stencils to see what I had that would help me create my jack-o-lantern look. The Small fern frond (LM2006) stencil was just the thing! I simply chose the size of the frond I needed and taped off the others, here's what it looked like:

Once the orange paste on the white cardstock was dry, I put the pumpkin stencil back over the dry paste and put the "mouth" stencil over that. Black ink and a stencil brush made it easy to add the mouth to the pumpkin. I used a super fine point Sharpie to add the eyes and nose, plus put some detail on the stem and leaves. It was still a little stark, so I used a piece of foam to rouge a little black around and on the image. Edge the white cardstock with a black marker, mounted it onto a piece of orange cardstock (also edged with black) and used foam tape to mount it onto the web background. A simple Happy Halloween sentiment stamped inside will complete the card.
The acetate image was almost dry when I added some Metallic F/X Kiwi (FX10) to the leaves and a little Cocoa (FX18) to the stem. When it was completely dry, I added the face the same way as the other one. I trimmed around the image and used foam tape hidden behind the pasted areas to mount the jack-o-lantern to the web background.  Then I really wished that I had Lynell's great Spider (LS28) stencil, but I don't so I use a black spider button that I had instead.
I had a lot of fun creating these Halloween cards for you, I hope you've enjoyed them. Just remember, try to look at your stencils different ways, you might be surprised by what you see!
This is a busy weekend for me, I'm leaving tomorrow for St. Louis where I'll be teaching 4 classes at  Checkered Cottage. It should be a lot of fun (exhausting, but fun) and I can hardly wait to get there!  If you're in the area, stop by to say hello and to visit the Dreamweaver Stencil Trunk Show they are hosting in conjunction with my classes.
You definately want to stop over at the DREAM it UP! blog for information on how to join our great design team. Lynell has all the details for you. She has been posting Pink and Black images every day this past week so be sure to take the time to look back at them, they are fabulous!
Happy Creating,
Louise

Thursday, October 13, 2011

Thursday Dream Scheme

Wow is it Thursday already!! Each week is flying by so fast. We have been having absolutely glorious weather here in northern Illinois. Every day is sunny and warm with just a little cool breeze to keep you comfortable. Aaaahhh, we are going to miss this very soon!
Halloween is my second favorite holiday (Christmas being the first) so I found a little time this week to get out my fall and Halloween decorations. The colors of fall are so beautiful and warm and fit into my decor just beautifully. So it may seem a little out of season to learn that our colorway challenge for this week's Dreamweaver Stencils Thursday Dream Scheme was to use Pink and Black! They are a stunning combination, but for me bring more romantic thoughts to mind than ghosts and goblins! Here's what I created for this week's challenge:

The new Cameo stencil (LL3017) and Damask background (LJ907) immediately came to mind when I got this challenge. I knew exactly what I would create (I love week's like this!). To create my card I followed these simple steps:
  • Emboss LJ907 Damask on a rose colored cardstock (I used my BigShot)
  • Use a 3/4" stencil brush and Memento Rose Bud ink to sweep color over the embossed damask design
  • Trim to 3 7/8" x  5 1/8"
  • Use a piece of foam to darken around the edge of the damask
  • Cut a matching piece of rose colored cardstock to 2 3/4" x 3"
  • Tape the cameo stencil to the cardstock and apply Glossy Black Embossing Paste (DJKP)
  • Remove and clean the stencil, set the cameo image aside to dry or use a warming tray on the lowest setting to speed the drying process
  • Cut a piece of light pink cardstock to create a card base for a 4 3/4" x 6" card
  • Ink the edges with the foam and Rose Bud ink
  • Cut a piece of black cardstock 4" x 5 1/4" and adhere the Damask layer to it with double sided tape
  • Wrap a black ribbon around the Damask layer the tie a bow
  • Adhere the Damask layer to the front of the card
  • Cut a piece of black cardstock 2 7/8" x 3 1/8"
  • When the cameo image is dry, use the foam and Rose Bud ink to rouge some color around the paste, but try not to get any inside the image
  • Adhere the Cameo to the small black layer
  • Use foam tape to mount the Cameo onto the Damask background
  • Color a Dreamweaver 3" white Embellishment Pin with a COPIC marker to match your design
  • Insert the pin through the ribbon and catch the tip in the layers of cardstock
Ta da! a beautiful card to send to a dear friend for any or no occassion, just because.
What can you come up with for our pink and black challenge?  If you would like to share your  creation with us, you can use the Mister Linky tool over at the DREAM it UP! blog or email it to Lynell at lynell@dreamweaverstencils.com  and she will post it for you.  We love to see what everyone is creating out there!
Happy Creating,
Louise

Thursday, September 29, 2011

Thursday Dream Scheme

Welcome to this week's Dreamweaver Stencils Thursday Dream Scheme.  This week we have been given a sketch challenge to create our designs. Here's what the sketch looks like:

And here's what I created from it:

October is right around the corner and Halloween will be here before we know it, so I chose to create a "Fall-o-ween" card.  The colors of Halloween, but more of a fall theme for the image rather than a jack-o-lantern. The dotted paper is from my left over collection of A Muse papers. I edge the pieces with black COPIC marker to make them stand out from the card front better. The pumpkin is from LL515 Pumpkins stencils. There are three pumpkins on the stencil, so I just taped off the other two pumpkins and paste embossed the single small pumpkin with Matte Black Embossing Paste. After I removed the stencil, I sprinkled the image with fine black glitter. The pumpkin is matted on a black layer then adhered to the front of the card with foam mounting tape. A little black ric rak down the side finished it off! Simple and fun!
Hope you've enjoyed today's challenge. Look for more great ideas on the other team members blogs by clicking on their names on the left side of my blog, but first check out the DREAM it UP! blog to see what Lynell  has come up with for the challenge.

Happy Creating,
Louise

Thursday, July 14, 2011

Dream Scheme Thursday

Welcome to another Dream Scheme Thursday challenge sponsored by Dreamweaver Stencils. This week the design team was given a sketch challenge. Here's what it looks like:

I used  Dreamweaver's wonderful Bird of Paradise stencil (LR503). This stencil is a nice size to work with and looks great in a variety of techniques. Here's what I came up with today:

Start by taping the stencil to white cardstock, stencil with small brushes and pigment inks (I, of course used Brilliance Inks, they are so beautiful), making your color fairly dark. Remove and clean the stencil. Replace the clean, dry stencil back over the colored image, tape in place and apply Regular Embossing Paste (matte white), remove the stencil and immediately sprinkle with crystal glitter. As the paste dries, it absorbs some of the pigment ink for a beautiful pastel image. Deckle the edge when the paste is dry (about20 minutes) and mount on decorative papers.  I know a lot of people relate orange and black to Halloween, but I just love these two colors together, they are so striking! 
Stop over to the DREAM it UP! blog for another great creation, then on to the rest of the design team blogs for even more inspiration!
Happy Creating,
Louise

Thursday, July 7, 2011

Thursday Dream Scheme

Better late than never as the saying goes!! The fourth threw my week off by a day. I was teaching a class today at The Cottage Stamper in St. Charles, IL when one of my students commented how the first thing she does every Thursday is get her cup of coffee and then logon to check out what is new on our Dreamweaver Stencils Thursday Dream Scheme.  She said she just loved my "fireworks"! Well, I was more than a little embarrassed to have to tell her that post was from Saturday and that I had forgotten to do my post for today!  Oh well, that's life.
This week was a free theme so I wanted to share one of the great designs we did at our workshop a couple of weeks ago.  Our focus was working with Mercart metal and Dreamweaver Stencils.  Here's one of the pieces we created at the workshop:

We ran a piece of black metal through a Big Shot using the Bare Trees (LJ849) stencil (be sure the black side is toward the stencil). Turn the metal over and sand the black off the raised tree areas.  Apply a variety of colors of alcohol ink to the exposed silver area of the metal for a beautiful effect. Mount on coordinating papers and embellish. So easy, so pretty!
Hope you've enjoyed today's creation and will give it a try with one of  your stencils. Now check out the DREAM it UP! blog (which happens to be featuring this same stencil) and the other designers as well.
Happy Creating,
Louise

Thursday, June 30, 2011

Thursday Dream Schemes

Well we got back from vacation on Sunday afternoon. Two weddings, a graduation party, and a week in hot and humid Florida visiting Mickey and friends all in 10 days!  You're right, that wasn't a vacation, but it sure was fun! Now back to designing.
This week's Dreamweaver Stencils Thursday Dream Scheme is a colorway challenge given to us by fellow team member Laura.  We had to use the colors purple and yellow as the main focus of our design. Here's what I came up with:


Simply dry emboss the Black Eyed Susan (LJ902) stencil using a machine or by hand on white paper. With the stencil over the embossed design, use small stencil brushes to add color to the design (I used Brilliance Yellow, Orange, Thyme, Ivy, and Chocolate). Mount on a dark purple mat, then on a larger yellow mat. Use foam tape to mount to a dark purple card front.  Add a yellow ribbon with a couple of additional ties and mount to the front of a card.  As you can see, it looks great either as a vertical card or a horizontal card, which ever you prefer.  As a finishing touch, I put glue in the centers of the flowers and sprinkled loose tea on the glue to give the flower centers dimension and texture.
Be sure to check out the other great purple and yellow designs created by the rest of the Design Team, and don't forget to stop over at the DREAM it UP! blog for more inspiration.
Several members of our design team will be participating in a Fourth of July blog hop starting on July 2nd, so be sure to check back for more great ideas and some prizes!
Happy Creating,
Louise

Thursday, June 23, 2011

Thursday Dream Scheme

While you're browsing the great creations from this week's Dreamweaver Stencils Thursday Dream Scheme, I'll be visiting Minnie and Mickey and the wonderful land of Disney with my family!  This week is designer's choice so I decided to share one of my favorite older stencils, Dreamweaver's Dragon (LJ844). He makes up into fabulous cards for those dragon lovers you know (I have two sons who loved D&D, still do). Here he is done with the faux cloisonne technique:

To start, tape the dragon stencil to black paper and apply Yellow Matte Embossing Paste. Remove and clean the stencil and let the paste dry.  Place the clean, dry stencil back over the dry paste and use small stencil brushes and pigment inks to color the dragon. Remove the stencil and sprinkle Ultra-Thick Embossing Enamel (UTEE) over the image, heat carefully. Let the image cool, place the stencil back over the design and add more color where desired. Sprinkle with regular Embossing Powder and carefully heat set the whole image.  Mount on coordinating papers and embellish as desired.
Hope you enjoy this design too! Don't forget to stop over at the DREAM it UP! blog and then to the other designer's blogs for more great ideas.
Happy Creating,
Louise