Showing posts with label DWDMBP Matte Black Embossing Paste. Show all posts

Tuesday, October 17, 2017

Broom Flight


It’s here, It’s here! It’s Halloween season, AND time to start your spooky stamping! Stampendous is excited to be playing along again with the 9th annual 31 Days of Halloween at the Zahar Studio blog with our hostess with the ghostess, Terra! In the past this has been limited to stamped projects, but Terra has blown it wide open this year with tons of great options including mixed media and lots of other art styles. You’ll find a ton of inspiration at this event.
The theme this year is Day of the Dead, although any Halloween themed items can be posted. But beware!! Some of it might be kind of spooky! It’s not for the faint-hearted, or those who dislike Halloween.
How it works:
Stampendous has created a special page which will keep our Halloween Fun easy to find. That page is here:

31 Days of Halloween – Stampendous

The links to our Design Team and their amazing Halloween projects will be posted there along with our posts.  We will be offering our own prizes, as will many of the other participating blogs. Be sure that you read each blog’s rules for their giveaways, they are all separate and different.
Today my card features the awesome stencil, Broom Flight (FMS4076) from Stampendous, paired with a sentiment from Halloween Labels (CLD04).


Supplies:

Stampendous:
FMS4076 Broom Flight Metal Stencil
CLD04 Halloween Labels

Dreamweaver:
DWDMBP Matte Black Embossing Paste
DWDPK Dreamweaver Palette Knife
DWLM2010 Paste Spreader

Plus:
My Color Cardstock - Grape Vine
BoBunny 12" Kiwi Vintage 12KV913
Orange with black dottd circles 
White cardstock
Memento Inks - Cantaloupe, Tangelo, Bamboo Leaves
Foam Applicator
Copic 100
Black Foam Tape

Instructions:
Step 1:  Fold a 6 1/4" x 10" piece of Grape Vine cardstock in half to form a card
Step 2: Tape the Broom Flight stencil to a 4" x 5" piece of the orange paper
Step 3:  Use a palette knife and paste spreader to apply Matte Black Embossing Paste over the image, remove stencil and place in water for cleaning, let paste dry
Step 4:  Stamp the "Witching You A..." on a 3/4" x 1 3/4" piece of white and "Happy Halloween" on a 1" x 1 7/8" piece of white using Memento Tuxedo Black
Step 5: Use a foam applicator to apply the Cantaloupe, Tangelo and Bamboo Leaves inks over the sentiments, edge each piece with the 100 Copic marker, mat each on small pieces of Kiwi Vintage then Grape Vine
Step 7:  Cut 2 pieces of Kiwi 1" x 4 3/4", then cut them each in half (so you have 4), cut a 1" x 5" piece of Kiwi and cut it into 10 pieces 1/2" x 1" each, edge each piece with the Bamboo Leaves ink if desired
Step 8: Cut a 4 5/8" x 5 5/8" piece of the Orange, edge with Copic 100, adhere the 4 larger Kiwi pieces to the back of the 4 corners, then using six of the small pieces, add them to the top and bottom edges, adhere the whole layer to the card front
Step 9:  When the paste is dry, edge the pasted layer with the Copic 100 and adhere to a 4 1/8" x 5 1/8" Grape Vine mat
Step 10:  Cut 5 pieces of Kiwi 1" x 1 1/4", cut one of those in half the long way to get 2 pieces 1/2" x 1 1/4", edge with Bamboo Leave, adhere to the four corners and the sides of the witch layer, then use the remaining 4 pieces of 1/2" x 1 " on the top and bottom edges
Step 11:  Use foam tape to add the Broom Flight to the card front
Step 12:  Adhere the two sentiment pieces to the card

Half way to Halloween!

Happy Creating,
Louise

Friday, September 15, 2017

Cattails Scene

Autumn is here! Cool days, cooler nights, I love it! This is one of my favorite seasons (Spring is the other). I am NOT a hot weather girl! Plus Autumn brings the start of the holidays! 

Stampendous has so many beautiful stencils for making fabulous projects and fall cards. This week the Stampendous Design Team is sharing some ideas for Autumn creations featuring stencils. I'm sharing an easy card that could be used for many occasions, birthdays, sympathy, happy autumn, just because...well, you get it.


Supplies:

Stampendous:
Acrylic Handle

Dreamweaver:
DWLL3035 Cattails Scene
DWDMBP Matte Black Embossing Paste
DWDPK Dreamweaver Palette Knife
DWLM2010 Paste Spreader

Plus:
My Color Cardstock - Tuscan Sun, Sweet Potato, Harvest Orange
Watercolor Paper
Distress Inks - peeled paint, spiced marmalade, mustard seed
Mister bottle with water
Removable Tape
May Arts Ribbon

Instructions:
Step 1:  Fold a 6" x 9 1/2" piece of Tuscan Sun cardstock in half to form an A6 card
Step 2: Cut a 3 3/8" x 4 1/2" piece of Watercolor paper, swipe the ink pads directly on the acrylic handle trying not to mix the colors too much, spritz with water, spritz the paper with a little water then "stamp" the paints in the center of the Watercolor paper, carefully remove the acrylic handle
Step 3: If necessary, use a water brush or small paint brush and water to move the colors a little and blend, let inks dry thoroughly
Step 4: Tape the Cattails Scene stencil to the Watercolor paper, lining up over the painted area, with removable tape
Step 5: Use a palette knife and paste spreader to apply Matte Black Embossing Paste over the design, remove stencil and place in water for cleaning later, let paste dry
Step 6: Adhere the image to a  3 5/8" x 4 5/8" mat of Sweet Potato, then a 3 7/8" x 4 7/8" mat of Harvest Orange
Step 7:  Adhere a piece of green ribbon around the layered image, securing in the back, adhere to card front, and glue a small matching bow on the ribbon

Here's a fall mirror project I did quite a while ago. Click here for the original post with instructions. It features the Long Cattail stencil and the geese.


Check the Stampendous Blog for more Autumn stencil ideas.

Happy Creating,
Louise

Wednesday, June 7, 2017

Fox in the Forest

The wild times continue on the Stampendous Design Team. Our fun theme of "Where the Wild Things Are" is the perfect opportunity to share the beautiful Dreamweaver Fox stencil (DWLL3030) with you. The Birch Forest(R290) stamp makes a great background! We used to live in the Fox Valley area of IL and often saw them out at dusk walking through the neighborhoods. 


Supplies:

Stampendous:
R290 Birch Forest Stamp
MPW811 Multi Media White Paper
MEM01 Memento™ Tuxedo Black Ink by Tsukineko®

Dreamweaver:
DWLL3030 Fox Stencil
DWLS96 Hello Stencil
DWDMBP Matte Black Embossing Paste
DWDPK Dreamweaver Palette Knife
DWLM2010 Paste Spreader
MetallicFX Mica Powders - DWFX04 Moonstone, DWFX18 Cocoa

Plus: 
My Color Cardstock - Winter Lake, Brown Eyes
Fine Line Black Pen
Copic Markers YG93, YG95, YG97, E53, W1, W2, B0000, B41, B97
Removable Tape
Soft Paint Brush
Swiffer Cloth
Foam Tape

Instructions:
Step 1:  Fold a 7" x 10" piece of Winter Lake cardstock in half to form an A7 card
Step 2: Tape the Fox stencil on a 2 3/4" x 3 3/4" piece of white paper with removable tape
Step 3:  Use a palette knife and paste spreader to apply Matte Black Paste over the design, remove the stencil and place in water for cleaning, let paste dry for about 8-10 minutes
Step 4:  Tape the Hello stencil to a 1 1/2" x 2 1/4" piece of Winter Lake with removable tape
Step 5:  Use a palette knife to apply Matte Black Paste over the design, remove stencil and place in water for cleaning later, let dry about 6-8 minutes
Step 6: Use a soft paint brush to gently brush the FX powders on the Fox design where you want them, do not try to be exact or remove excess powder at this point, let paste dry completely, brush the Cocoa color on the Hello, let that dry competely as well
Step 7: Stamp the Birch Forest on a 4 1/2" x 6 1/2" piece of white cardstock using Memento Tuxedo Black ink, keep the trees near the top of the paper, color with Copic markers
Step 8:  Trim the trees to 4 1/8" x 6", mat on a 4 3/8" x 6 1/4" piece of Brown Eyes cardstock, then adhere to the card front
Step 9: Use a piece of Swiffer to wipe the excess powders off the Fox and Hello
Step 10: Cut out the Fox and place pieces of foam tape around the back side, figure out the placement of the Fox and Hello
Step 11: Mat the Hello on a 1 5/8" x 2 3/8" piece of Brown Eyes, adhere to the card front
Step 12: Use the fine line pen to add some "grass" tufts near the bottom where the Fox will be, add the Fox image

Making samples for Stampendous using all the wonderful products they send me makes me one lucky crafter! For more wild ideas from the Stampendous team go to

Stampendous Blog


Happy Creating,
Louise

Friday, March 24, 2017

Follow Your Dreams!

Follow Your Dreams no matter where in the world they take you! This would be a wonderful Graduation card for either high school or college for all those graduations parties that will be coming up soon!

The Stampendous Design Team has been sharing ideas with a theme of "On The Road" this week. This card stretches that road pretty far, but still works I think!

"DREAM"
Supplies:

Dreamweaver:
DWLM289 Globe Stencil
DWLS1003 Dream Stencil
DWLJ817 Leopard Skin Stencil
DWDMBP Matte Black Embossing Paste
DWDPK Dreamweaver Palette Knife
DWLM2010 Paste Spreader
DWNHB-12 ½” Natural Handled Brush

Plus: 
My Color Cardstock – Madras Blue, Winter Lake, Grasshopper
Brilliance Ink – P. Thyme
Foam Tape

Instructions:

  1. Fold a 5 1/2" x 8 1/2" piece of Madras Blue cardstock in half to form an A2 card
  2. Tape the Globe stencil to a 2 1/4” x 3 1/4” piece of Madras Blue cardstock with removable tape
  3. Use a palette knife and paste spreader to apply Matte Black Embossing Paste over the Globe, remove stencil and place in water for cleaning, let paste dry
  4. Tape the Dream stencil to a 1” x 2 1/4” piece of Madras Blue cardstock with removable tape
  5. Use a palette knife and paste spreader to apply Matte Black Embossing Paste over the Dream, remove stencil and place in water for cleaning, let paste dry
  6. Place the Leopard Skin stencil on a 1 1/2” x 5 1/2” piece of Grasshopper cardstock and use a 1/2” stencil brush to apply the Thyme ink, move the stencil around the paper to fill the background
  7. Adhere the Leopard Skin strip to a 1 ¾” x 5 ½” piece of Winter Lake, then adhere to the left side of the card front
  8. When the paste is dry, adhere the Globe to a 2 ½” x 3 ½” piece of Winter Lake, and the Dream to a 1 ¼” x 2 ½” piece of Winter Lake
  9. Adhere the Globe towards the upper left side of the card, overlapping it onto the Leopard Skin pattern
  10. Use foam tape to add the dream to the lower right
For a complete list of today's designers, go to the 

Stampendous Blog

Happy Creating,
Louise

Wednesday, March 22, 2017

Travel Home!

We're back "On The Road" again on the Stampendous Design Team.  Sharing samples using some of our great stamps and stencils that fit the theme perfectly!

Today's card features two of our newer stencils and another great sentiment from the Travel Home Set (SSC1254).


Supplies:

Stampendous:
FMS4062 Giraffe Metal Stencil
FMS4066 Thicket Metal Stencil
SSC1254 Travel Home Stamp Set
MPW811 Multi Media White Paper
MEM01 Memento™ Tuxedo Black Ink by Tsukineko®

Dreamweaver:
DWDMBP Matte Black Embossing Paste
DWDPK Dreamweaver Palette Knife
DWLM2010 Paste Spreader
DWNHB-12 ½” Natural Handled Brush

Plus: 
My Color Cardstock – Fireflies
Black Cardstock
Brilliance Ink – P. Thyme, P. Ivy
Foam Tape

Instructions:

  1. Fold a 7" x 10" piece of Fireflies cardstock in half to form an A7 card
  2. Tape the Giraffe stencil to a 3 ½” x 5 ¼” piece of Fireflies cardstock with removable tape
  3. Use a palette knife and paste spreader to apply Matte Black Embossing Paste over the Giraffe, remove stencil and place in water for cleaning, let paste dry
  4. Place the Thicket stencil on a 4 ¾” x 6 ¾” piece of white cardstock and use a 1/2” stencil brush to apply the Thyme ink, move the stencil around the paper to fill the background
  5. Repeat with the Ivy ink offsetting the stencil so both colors show
  6. Run the Ivy ink pad around the edge and adhere to the card front
  7. Stamp the saying on a 1 5/8” x 1 3/4” piece of white, stencil some leaves around the edges, edge with green
  8. Mount the saying on a 1 7/8” x 2” piece of Fireflies and a 2” x 2 1/8” piece of black
  9. When the black paste is dry, adhere the Giraffe image to a 3 5/8” x 5 3/8” piece of black cardstock
  10. Adhere the Giraffe to the lower right corner of the background
  11. Use foam tape to add the saying
For more "On The Road" samples, head over to the 

Stampendous Blog


Happy Creating,
Louise

Monday, March 20, 2017

Road Trip!

"On the road again...", can't you just hear Willie Nelson singing those words! Of course, now it will be running over and over in your mind for the rest of the day!  The Stampendous Design Team is working with a theme of "On The Road" this week. We will be featuring some of our wonderful stamps and stencils that fit this theme.

Today I'm sharing a fun card using some stencils and a great sentiment from the Campground set (SSC1253). I think it would work for a graduation card or inspiration card.

"Road Trip"
Supplies:

Stampendous:
FMS4061 Tortoise Metal Stencil
SSC1253 Campground Stamp Set
Frantage Color Fragments – Taupe, Chiffon, Ochre
MPW811 Multi Media White Paper
MEM01 Memento™ Tuxedo Black Ink by Tsukineko®

Dreamweaver:
DWLG656 Plantain Leaves Stencil
DWLL332 Picasso Stencil
DWDMBP Matte Black Embossing Paste
DWDEP Regular Embossing Paste
DWDPK Dreamweaver Palette Knife
DWLM2010 Paste Spreader
DWGHB-6 ¼” Gold Handled Brush
DWNHB-12 ½” Natural Handled Brush

Plus: 
My Color Cardstock – Grasshopper
Brilliance Ink – P. Thyme, P. Ivy
Memento Bahama Blue Ink
Copic Markers – R08, YG03, B02
Dries Clear Glue
Foam Tape

Instructions:
  1. Fold a 7" x 10" piece of Grasshopper cardstock in half to form an A7 card
  2. Tape the Plantain Leaves stencil to white cardstock with removable tape
  3. Use the 1/4” stencil brush to apply green inks through the stencil, remove the stencil and let ink dry, clean stencil
  4. Tape the Tortoise stencil over the inked leaves with removable tape
  5. Use a palette knife and paste spreader to apply Matte Black Embossing Paste over the Tortoise, remove stencil and place in water for cleaning, let paste dry
  6. Tape the clean, dry Plantain Leaves stencil to white cardstock with removable tape
  7. Use a palette knife and paste spreader to apply Regular Embossing Paste over the image, remove stencil and place in water for cleaning, let paste dry
  8. On a 4 ½” x 6 ½” piece of white cardstock, stencil the Plantain Leaves several times along the bottom edge and up the left side using the green inks
  9. Use the Picasso stencil to create “clouds” in the “sky” area using a ½” stencil brush and the blue ink
  10. Adhere to the card front
  11. Place the clean, dry Plantain Leaves stencil back over the dry paste and use the green ink to stencil with color, cut out leaving a small white edge all the way around
  12. Cut out the dry Tortoise image
  13. Stamp the saying on a 1 ¼” x 2” piece of white cardstock, color with markers and mount on a 1 ½” x 2 ¼” piece of Grasshopper
  14. Adhere the Tortoise to lower right area of the background
  15. Use foam tape to add the Plantain Leaves to the lower left corner and the saying to the “sky” area
  16. Apply the Color Fragments across the bottom area using a Dries Clear Glue
Head over to the  Stampendous Blog  for a complete list of today's designers.

Happy Creating,
Louise

Thursday, October 13, 2016

Bird of Paradise

This week the Stampendous Design Team is sharing sneak peeks of samples we created for the October 2016 Catalog. We were asked to share our favorite sample with you. Here's mine:

This beautiful Bird of Paradise stencil is one of my favorites and looks incredible when you use the Crackle Paste on it. Of course, the Jungle Leaves stencil is the perfect background stencil to finish it off! Here's how it's done:

Supplies:

Stampendous:
MPW811 Mixed Media White Paper

Dreamweaver:
DWLL454 Long Bird of Paradise Stencil
DWLJ825 Jungle Leaves Stencil
DWLL332 Picasso Stencil
DWDMBP Matte Black Embossing Paste
DWCEP Crackle Embossing Paste
DWDPK Dreamweaver Palette Knife
DWLM2010 Paste Spreader
DWNHB-12 1/2" Brush #12 Natural Handle
DWGHB-6 1/4" Brush #6 Gold Handle Brush

Plus:
My Color Cardstock - Ocean Side
Brilliance Ink - P. Olive, P. Thyme, P. Ivy, Sunflower Yellow, P. Orange, Rocket Red, Mediterranean Blue
Rubber Embossing Mat
Die Cut Machine
Removable Tape
Foam Tape

Instructions:
Step 1:  Fold a 6" x 9 1/2" piece of Ocean Side cardstock in half to form an A6 card
Step 2: Tape the Long Bird of Paradise stencil to a 2" x 5 1/2" piece of  white paper with removable tape
Step 3: Use a palette knife and paste spreader to apply Matte Black Embossing Paste over the design, remove stencil and place in water for cleaning later, let paste dry
Step 4:  Tape the clean dry stencil back over the dry paste with removable tape, use a palette knife and paste spreader to apply Crackle Embossing Paste over the black paste, remove stencils and place in water for cleaning later, let paste dry
Step 5:  Tape the clean dry stencil back over the crackled image, use 1/4" brushes and the Picasso tool to add color to the Bird of Paradise design, remove and clean stencil
Step 6: Use the Rubber Embossing Mat and die cut machine to dry emboss a 4 1/4" x 5 1/2" piece of white using the Jungle Leaves stencil, trim the embossed image close to the design if edges are not even
Step 7:  Use a 1/2" stencil brush and the green inks to brush color over the embossed leaves, adhere to the card front
Step 8:  Cut two 1/4" x 4 1/4" strips of the Ocean Side paper and adhere near the bottom of the embossed Jungle Leaves
Step 9:  Cut two 1/2" x 5 1/2" strips of Ocean Side paper and adhere behind the long edges of the flower image, trim the length to match the Jungle Leaves layer
Step 10:  Use foam tape to apply the Bird of Paradise to the card front

See the Stampendous Blog for more sneak peeks!

My other post today is for our weekly theme of "The Eyes of Halloween". Click here to see it!

Happy Creating,
Louise

Friday, August 5, 2016

Blog Hop Finale!

Welcome to the Stampendous and Creative Impressions blog hop finale! 


This week the design team has been sharing samples we created for the July catalog featuring ribbons and embellishments from Creative Impressions.  A big THANK YOU to Creative Impressions for providing our team members with TONS of their wonderful  ribbons and hardware!!

What's a hop without PRIZES!


Comment for a chance to win one of these great prize packages! US winners only. See Official Rules for details. Deadline to comment is Sunday, August 7th, midnight PDT. Winners will be announced early next week.

Three prize packages that include:
An assortment of ribbons and hardware
PLUS winner’s choice of Create Winter, Create A Poinsettia or Create Fall Stamp Set


Today I'm featuring one of Frans wonderful new stencils called Framed Witch (FMS4036) and some gorgeous orange crepe ribbon from Creative Impressions!


Supplies:


Stampendous:
FMS4036 Framed Witch Metal Stencil
DCP1006 Fitted Frames B size R

Dreamweaver:
DWDMBP Matte Black Embossing Paste
DWDPK Dreamweaver Palette Knife
DWLM2010 Paste Spreader

Plus:
My Color Cardstock - Deep Purple
Graphic 45 Charmed I'm Sure 4501143
Graphic 45 Brews and Potions 4501144
Copic Marker 100
Removable Tape
Creative Impressions 3/4" Orange Crepe Ribbon 70147
Die Cut Machine
Foam Tape

Instructions:
Step 1:  Fold a 7" x 10" piece of Deep Purple cardstock in half to form an A7 card
Step 2: Cut a 4" x 4 3/4" piece of the Charmed I'm Sure paper, edge with 100, adhere to the card front near the top edge, make sure the ruler pattern is going the right direction
Step 3: Cut a 3 3/4" x 4 3/4" piece of the Brews and Potions paper, edge with 100, adhere to the card front under the top paper, watch direction of pattern, adhere a 5/8" x 4 3/4" piece of the purple side of Brews and Potions (edged with 100) across the seam
Step 3:  Tape the Framed Witch stencil to a 4 1/2" x 5 1/2" piece of Brews and Potions paper (striped images side) with removable tape
Step 4:  Use a palette knife and paste spreader to apply Matte Black Embossing Paste over the design, remove stencil and place in water for cleaning later, let paste dry
Step 5: When the paste is dry, use the Fitted Frames die size R to cut the Witch, and, the matching frame (from the purple side of a 4 1/2" x 5 1/2" piece)
Step 6: Edge both frames with the 100 marker and adhere together, wrap an orange ribbon around the lower part of the witch image and tie a bow
Step 7:  Use foam tape to add the frames to the card

Look how beautiful this ribbon is!


Here's the Blog Hop list:

Louise Healy

Happy Creating,
Louise

Thursday, July 28, 2016

Fresh Fall Fun!

Fresh Fall Fun is this week's theme for the Stampendous Design Team. I don't know why I associate Scarecrows with Fall, but I do! (Really, they go up in the spring!) It's probably because St. Charles, IL (where we had our store) has a Scarecrow festival every Fall. At any rate, Fall and Scarecrows go hand in hand in my book.

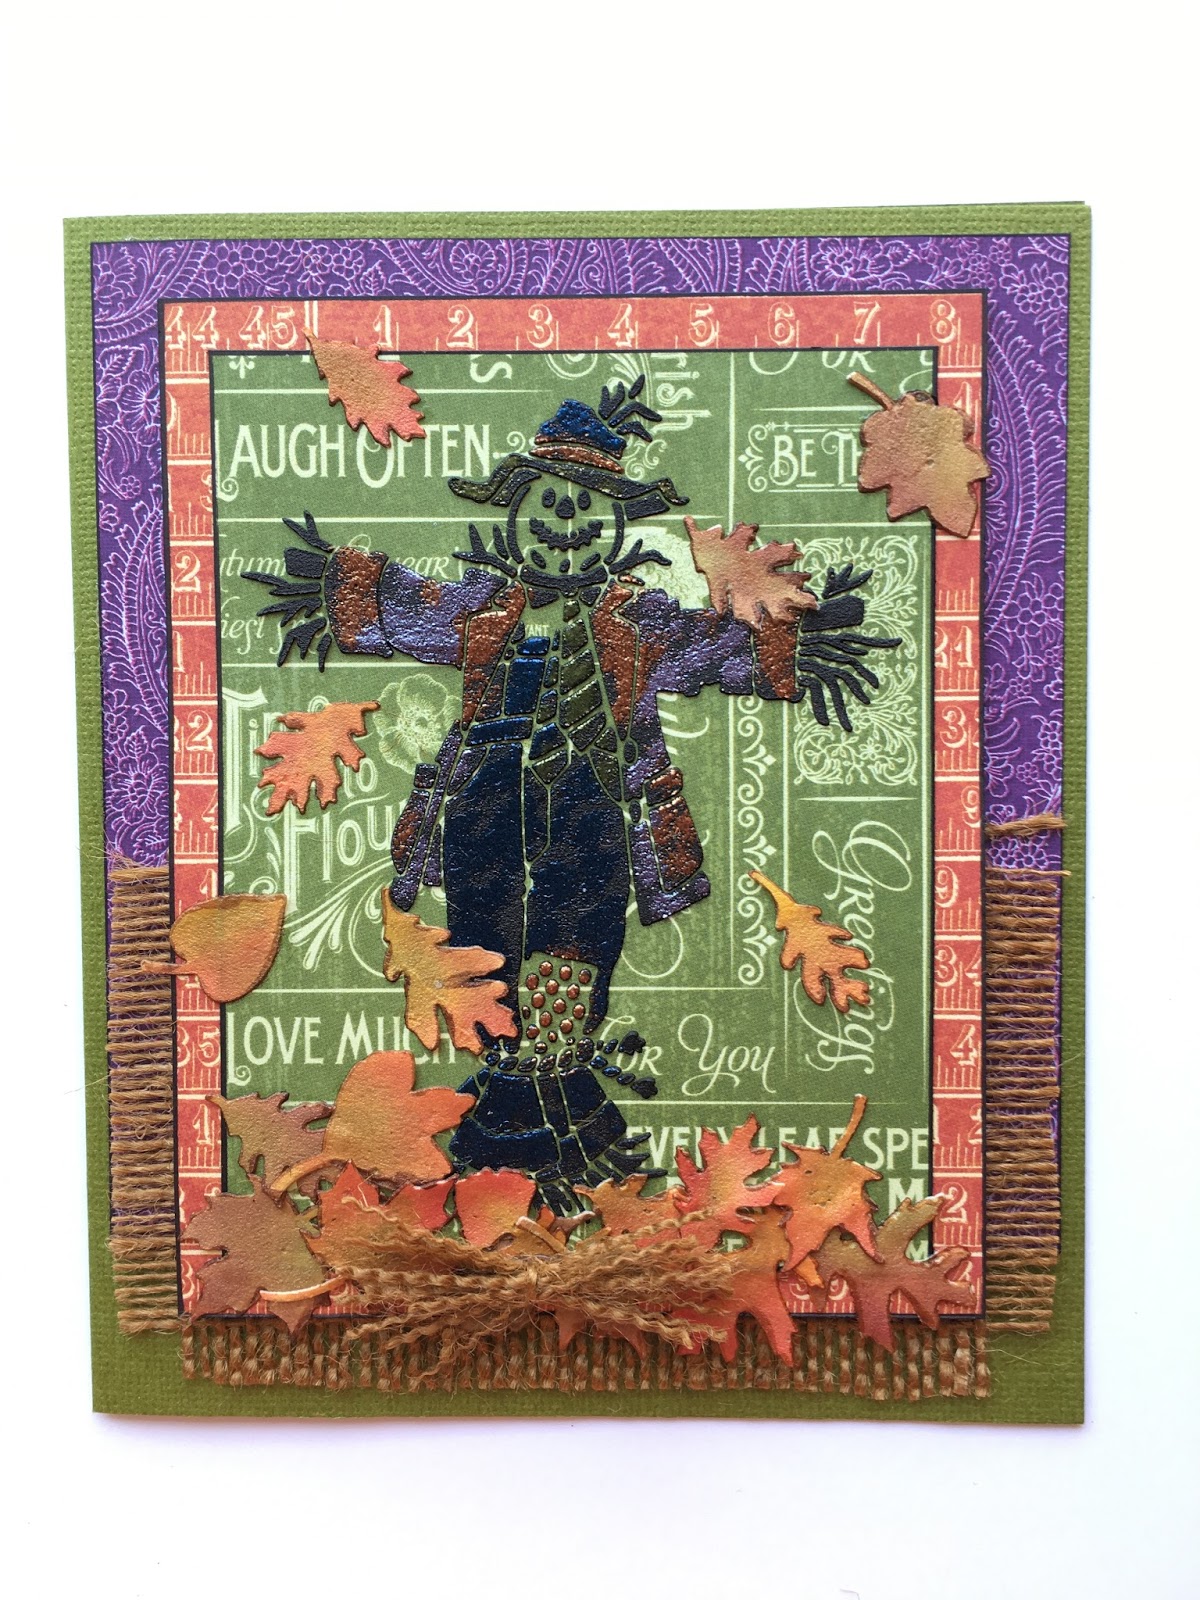
Today is Thursday, which means team members share ideas using stencils. Today I'm sharing a fun card using the Dreamweaver Scarecrow stencil, DWLG686.  Check back tomorrow to see how I created the leaf embellishments!


Supplies:


Stampendous:
PK03 Gemstone Embossing Kit
EPA50 HT400 Embossing Tool

Dreamweaver:
DWLG686 Scarecrow Stencil
DWLG616 Leaf Texture Stencil
DWDMBP Matte Black Embossing Paste
DWDPK Dreamweaver Palette Knife
DWLM2010 Paste Spreader

Plus:
My Color Cardstock - Spanish Moss
Graphic 45 November Flourish 4501050
Graphic 45 Charmed I'm Sure 4501143
Graphic 45 Brews and Potions 4501144
Brown Burlap
Copic Marker 100
Removable Tape
Foam Tape
Scotch Quick Dry Adhesive

Instructions:
Step 1:  Fold a 6" x 10" piece of Spanish Moss cardstock in half to form side fold, 5" x 6" card (fits in an A7 envelope)
Step 2: Cut a 4 3/4" x 5" piece of the Brews and Potions paper (purple side), edge with 100, adhere to the card front near the top
Step 3: Cut a 2 3/4" x 4 3/4" piece of the brown burlap, fray the edges, adhere to the card front under the top paper
Step 4: Cut a 3 3/4" x 4 3/4" piece of the Charmed I'm Sure paper, edge with 100
Step 5:  Tape the Scarecrow stencil to a 3 1/2" x 4 1/2" piece of November Flourish paper (green side) with removable tape
Step 6:  Use a palette knife and paste spreader to apply Matte Black Embossing Paste over the design, remove stencil and place in water for cleaning later, let paste dry
Step 7: When the paste is dry, place the clean, dry Scarecrow stencil back over paste and use a finger dabber to apply VersaMark to the parts of the image where the "clothes" are, remove stencil, sprinkle various colors of embossing powder where desired, tap off extra, heat set, edge with the 100 marker
Step 8: Adhere the Scarecrow to the Charmed I'm Sure layer
Step 9:  Use foam tape to add the Scarecrow to the card
Step 10:  Use the Quick Dry to add some small pasted leaf embellishments (see separate instructions for DWLG616 Leaf Texture in tomorrow's post!) and a small bundle of the burlap tied together to finish the card

For more Fresh Fall Fun see:
Louise Healy

Happy Creating,
Louise

Monday, June 6, 2016

My True North!

Welcome to June! Almost a half year over already! I can't believe it's been a month since we moved, so much has happened!
This week the Stampendous Design Team is showcasing the beautiful new stencils that were released in April. I love this new Compass Metal Stencil (FMS4016) paired with the Voyage Under the Sea collection from Graphic45.  It makes a wonderful masculine card perfect for Father's Day or Birthday (or even Anniversary).  The best part is this is a super quick and easy card to make.

"True North"
Stampendous:
FMS4016 Compass Stencil

Dreamweaver:
DWDMBP Matte Black Embossing Paste
DWDPK Palette Knife
DWLM2010 Paste Spreader

Plus:
My Colors Cardstock - Tropical Splash, Mandarin, Black Suede
Graphic45 Cardstock Steampunk Splash 4501323
Graphic45 Cardstock Deep Blue Dreams 4501324
Copic Marker BG18
Scrapbook Adhesive Black Foam Squares
Removable tape

Instructions:
Step 1:  Fold a 7" x 10" piece of Tropical Splash cardstock in half to form an A7 card
Step 2:  Cut a 4" x 5" piece of the Steampunk Splash paper
Step 3: Tape the Compass stencil to the Steampunk Splash paper with removable tape
Step 4:  Use a palette knife and paste spreader to apply a coat of Matte Black Embossing Paste over the image, remove the stencil and place in water for cleaning, let paste dry
Step 5:  Cut three 2" x 4 3/4" pieces of the back side of the Steampunk Splash paper, edge with BG18 marker and adhere one near the top, one near the bottom and one in the center of the card front
Step 6: Cut a 4 3/8" x 5 3/8" piece of Mandarin cardstock and a 4 1/8" x 5 1/8" piece of Black Suede, adhere them together then adhere the dry Compass layer to the black
Step 7: Adhere the matted Compass layer near the top of the card
Step 8:  Cut out one of the stamp designs from the back side of the Deep Blue Dreams paper, edge with BG18 and mat on a 1 3/8" x 1 3/4" piece of Mandarin cardstock
Step 9:  Use the Black Foam Squares to attach the "stamp" near the bottom of the card

For more creations with these new stencils, check out today's designers.

Louise Healy

Happy Creating,
Louise