Showing posts with label DCP1005 Fitted Frames A Die Cuts. Show all posts

Wednesday, November 15, 2017

A Merry Little Christmas!


It's getting to be that time of year again. You know, the time when Santa Clause is coming to town! This little Seated Elf set from Stampendous makes a darling Christmas card for those on your "good" list! It's a great combination of stamps and matching dies making this a quick and easy card.


Stampendous:
DCP1005 Fitted Frames Set A
GL220U Crystal Multi Glitter
AC672HSG Holo Gold Dot Sparklers
MPW811 Mixed Media White Paper
Acrylic Handle
MEM01 Memento™ Tuxedo Black Ink by Tsukineko®

Plus:
My Color Cardstock - Firecracker
BoBunny Kiwi Vintage 12KV913
Copic Markers - E51, E53, E35, YR24, YG01, YG03, YG06, R27, R30, R32, R39, B60
Zutter 1/2" Corner Rounder
Foam Tape
Dries Clear Glue
Die Cut Machine

Instructions:
Step 1:  Fold a 6" x 91/2" piece of Firecracker cardstock in half to form an A6 card, round the corners
Step 2: Use the Tuxedo Black ink to stamp the images from the Seated Elf set on white cardstock, be sure to leave space around the saying for die cutting, color with Copic Markers
Step 3:  Use the Fitted Frames Set A to cut out the sentiment, cut matching layer from Firecracker cardstock, adhere the layers together
Step 4:    Use the Fitted Frames Set A to cut out a white layer and a matching Firecracker layer for behind the elf, adhere the layers together
Step 5:   Die cut the elf, present and bow
Step 6: Cut a 4 1/2 x 5 3/4" piece of Kiwi Vintage paper, round the corners, edge with Y06, adhere to the card front
Step 7:  Cut a 1/2" x 5 3/4" and a 1/2" x 4 1/2" piece of Firecracker, adhere to the Kiwi layer about an 1" from the left and  1 1/4" up from the bottom
Step 8:  Adhere the white fitted frame layer where the two red pieces cross, adhere the present at the center bottom
Step 9:  Use glue and glitter on the elf's hat and some dots on the present, let dry
Step 10: Use foam tape to add the elf to look like he is sitting on the present, and the bow to look like he is holding it, use foam tape behind the sentiment too
Step 11: Add some small Dot Sparklers at the ends of the elf's collar and on his one shoe to look like jingle bells

Go to the Stampendous Blog for more fun ideas!

Happy Creating,
Louise

Wednesday, February 22, 2017

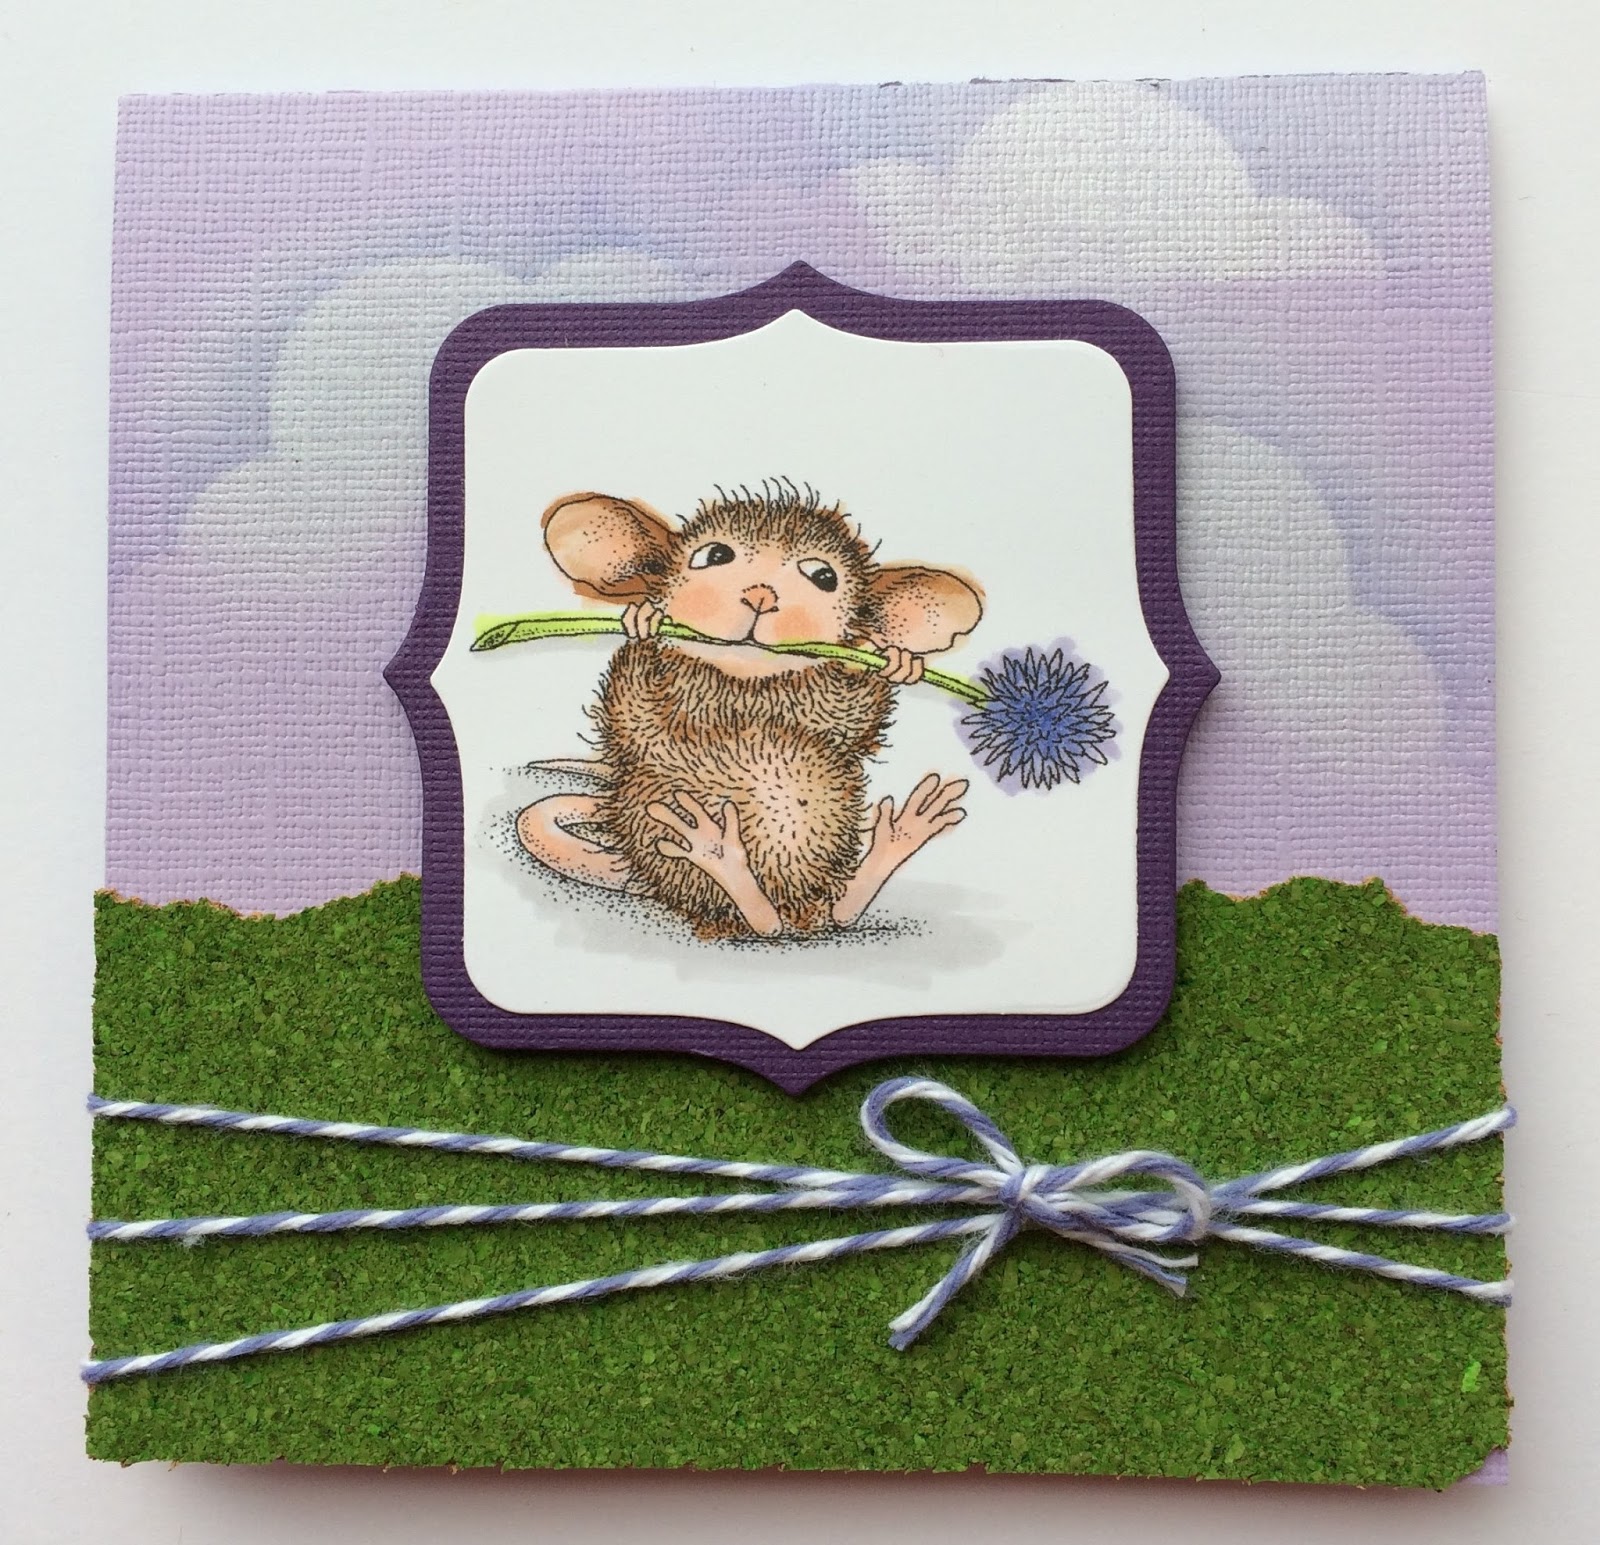
Chive Chewing!

HMH04 Chive Chewing


Stampendous:
HMCH04 Chive Chewing Cling Stamp
DCP1005 Fitted Frames A Cutting Die Set Size F
MPW811 Mixed Media White Paper
Acrylic Handle
MEM01 Memento™ Tuxedo Black Ink by Tsukineko®

Dreamweaver:
DWLL332 Picasso Stencil
DWHNB-12 1/2" Brush #12 Natural Handle

Plus:
My Colors Cardstock - Plum, Lilac Mist
DCWV Green Cork Paper
Copic Sketch Markers - BV00, BV02, BV04, BV11, E01, E31, E33, E37, E95, YG01, YG03, T1
Brilliance Inks Moonlight White, Lavender
Die Cut Machine
WhiskerGraphics Baker's Twine
Scrapbook Adhesive White Foam Squares

Instructions:
Step 1:  Fold a 4 1/4" x 8 1/2" piece of Lilac Mist cardstock in half to form a square, top fold card
Step 2:  Use a 1/2" stencil brush and Brilliance Moonlight White ink to rouge 3 areas of white ink for the clouds
Step 3: Tape off the small openings on the Picasso Stencil with removable tape, place cloud edge over one of the white areas and use a 1/2" stencil brush to lightly brush Lavender ink off the Picasso towards the paper, repeat to form as many clouds as you want
Step 4:  Stamp the Chive Chewing image on a piece of Mixed Media White cardstock using Memento Tuxedo Black Ink, color with Copic Markers
Step 5:  Using the size F frames from the Fitted Frames set, cut the larger frame on Plum cardstock and the smaller frame on the colored image
Step 6: Adhere the two frames together
Step 7:  Tear one long edge of a 2" x 4 1/4" piece of green cork and adhere the cork to the bottom edge of the card front
Step 8: Tie a piece of Baker's Twine around the green cork three times and tie a bow
Step 9: Use foam squares to attach the mouse image to the center


Happy Creating,
Louise

Thursday, November 10, 2016

Chickadee Greetings!

It's hard to believe it's November already! We finally moved into our new house two weeks ago and even though things are getting settled, I feel like the holidays will be here before I know it! Thank goodness I saved some great samples from our July catalog to share with you that are perfect for the holiday season, because my craft room is still in a bit of an uproar!

This week's theme for the Stampendous Design Team is "Winter Tweets". These cute Chickadees (DWLM143) paired with the new Holly Background Stamp (R278) make it easy to create a fun, colorful card to fit the theme perfectly.


Stampendous:
CRR278 Cling Holly Background Rubber Stamp
MGK02 Christmas Micro Glitter Kit - Red, Green
DCP1005 Fitted Frames A Die Set
MMMW811 Mixed Media White Paper

Dreamweaver:
DWLM143 Chickadees Stencil
DWLS91 Season's Greetings Stencil
DWDGKP Glossy Black Embossing Paste
DWDPK Dreamweaver Palette Knife
DWLM2010 Paste Spreader

Plus:
My Colors Cardstock - Firecracker, Evergreen
Memento Ink - Cottage Ivy
Die Cut Machine
Copic Markers - R39, 100
Creative Impressions 1/4" Red Organdy Ribbon 70630
Foam Tape
Removable tape

Instructions:
Step 1:  Fold a 6" x 9 1/2" piece of Evergreen cardstock in half to form an A6 card
Step 2: Tape the Chickadees stencil to a 3" x 3 1/2" piece of white cardstock and Season's Greetings to a 2" x 2 1/2" piece of white cardstock with removable tape
Step 3:  Use a palette knife and paste spreader to apply a coat of Glossy Black embossing paste over the Chickadees image, remove stencils and place in water for cleaning, sprinkle green glitter on the holly leaves and red on the berries, carefully tap off extra glitter, let paste dry
Step 4:  Use a palette knife and paste spreader to apply a coat of Glossy Black embossing paste over the Season's Greetings, remove stencils and place in water for cleaning, sprinkle red glitter on the"S" and "G", tap off extra, sprinkle green glitter on the remaining letters, tap off extra, let paste dry
Step 5:  Cut a 3 1/2" x 4 3/4" and a 2 7/8" x 3 1/8" piece of white cardstock
Step 6: Stamp the Holly Background on each of the white pieces using the Cottage Ivy ink, use the R39 marker to color some of the "berries" and to edge the pieces
Step 7:  Cut a 1 1/2" x 3" piece of Firecraker and adhere it to one side of the smaller stamped piece, adhere to the lower right corner of the card
Step 8:  Wrap a piece of the red ribbon around the larger stamped piece and tie a bow, adhere a 1 1/2" x 5" piece of Firecracker along the left side, adhere to the upper left corner of the card
Step 9: When the paste is dry, use the Fitted Frames to cut out the Chickadees and matching Evergreen frame, use foam tape to add the Chickadees near the upper left
Step 10: Use the Fitted Frames to cut out the Season's Greetings, edge with the 100 marker, use foam tape to add it near the lower right

See the Stampendous Blog for more Winter Tweet ideas.

Happy Creating,
Louise

Thursday, August 25, 2016

Classic Poinsettia

This week the Stampendous Design Team is sharing samples combining stamps from the July catalog and the beautiful papers given to us by Graphic45. Their papers are gorgeous and versatile, they look great on big projects or small ones.

Today I'm sharing a card featuring two stencils and two Graphic45 papers. Dreamweaver's Merry Christmas stencil combines well with Fran's new Classic Poinsettia stencil to create this vintage Christmas card.


Supplies:

Stampendous:
FMS4041 Classic Poinsettia Metal Stencil
DCP1005 Fitted Frames A Die Cut Set
MG01 Crystal Micro Glitter
MG02 Gold Micro Glitter
MG08 Lime Micro Glitter
MG10 Teal Micro Glitter
MG11 Red Micro Glitter

Dreamweaver:
DWLS92 Merry Christmas Stencil
DWDEPT Dreamweaver Translucent Embossing Paste
DWDPK Dreamweaver Palette Knife
DWLM2010 Paste Spreader

Plus:
Red Cardstock
Cream Cardstock
Graphic 45 Good Cheer 4501191
Double sided mounting paper
VersaMark Ink
Die Cut Machine
Copic BG72
Foam Tape

Instructions:
Step 1:  Fold a 7" x 10" piece of Red cardstock in half to form an A7 card
Step 2: Cut a 4 3/4" x 6 3/4" piece of the Graphic 45 paper, cut that piece into two pieces, one 3 1/4" x 4 3/4" and one 3 1/2" x 4 3/4", edge with BG72
Step 3:  Adhere the Graphic 45 pieces to the card front using one pattern at the top and the other pattern at the bottom, adhere a 3/4" x 4 3/4" strip of red cardstock across the seam
Step 4:  Cut a 4" x 5" piece of cream cardstock and a matching piece of double sided mounting paper, attach one side of the mounting paper to the cardstock
Step 5:  Pat VersaMark all over the back of the Classic Poinsettia Stencil
Step 6: Remove the remaining release paper from the double sided mounting paper and carefully place the stencil on the sticky surface with the VersaMark side against the sticky surface, use a piece of release paper to press the stencil in place
Step 7:  Apply the red glitter on the petals, being careful not to get any in the center or on the leaf, rub in place, tap off extra (work in small sections at a time so you can tap off away from areas you want to protect, apply Gold glitter to the center, rub down, tap off extra
Step 8: For the "green" take a little Lime and mix it with some Teal (I did this to match the paper I was using), apply the mixture to the leaf, rub it in, tap off extra
Step 9: Turn the glittered image face down on a paper towel and carefully peel the paper off the stencil making sure to keep the stencil flat on the table, apply Crystal glitter to the background, tap off extra, cut out flower
Step 10:  Die cut a 4" x 4" piece of Good Cheer and a 4 1/4" x 4 1/4" piece of red from the Fitted Frames A Set, edge the Good Cheer with BG72, adhere the frames together and add to card front using foam tape
Step 11:  Use Foam Tape to add the Poinsettia image to the frames
Step 12:  Tape the Merry Christmas stencil to a 1 1/2" x 2 1/2" piece of Cream cardstock with removable tape
Step 13:  Use a palette knife and paste spreader to apply Translucent Embossing Paste over the design, remove stencil and place in water for cleaning later
Step 14:  Sprinkle the "M" and "C" with Red Micro Glitter, and the rest of the letters with the Lime/Teal  combined glitter, tap off extra, let paste dry thoroughly
Step 15:  Adhere the dry Merry Christmas to a 1 5/8" x 2 5/* red mat then to the lower right side of the card front

Stop over at the Stampendous Blog for a list of designers with more great samples!

Happy Creating,
Louise

Wednesday, March 30, 2016

Sending Mice Wishes!

For the next two weeks the Stampendous Design Team is sharing the sweet designs from House Mouse and Friends. These great designs are perfect for so many different occasions and pair perfectly with a background created from stencils! That was part of our challenge, to pair a House Mouse design with one of our stencil designs.

This hop is based on the House-Mouse and Friends Monday Challenge Blog. So for you to be entered to win you must play in the challenge. No commenting is considered an entry to win prizes. 


Prizes
Three entries from the House-Mouse and Friends Linky gallery, chosen at random, will win 1-House-Mouse Designs® Stampendous Cling Rubber Stamp, 1 – Large Dreamweaver Stencils Background Stencil, and 1 – Jar of Embossing Paste. This contest is open to everyone!!

Design teams from the following groups are creating projects and posting on their blogs during the challenge period.

House-Mouse and Friends Monday Blog Challenge

Woodware Craft Collection Stockist (UK distributor) website

Woodware Blog

The Stencil Specialists (AUS distributor)

The Stencil Specialists Blog 

Today I'm showing you the HMCV29 Classified Ad Cling Stamp paired with DWLJ801 Paint Splats Stencil from the Dreamweaver line.


Stampendous:
HMCV29 Classified Ad Cling Stamp
SSC1216 Beary Mice Perfectly Clear Set
MPW811 Mixed Media White Paper
Acrylic Handle
MEM01 Memento™ Tuxedo Black Ink by Tsukineko®
DCP1005 Fitted Frames A Die Cuts - E

Dreamweaver:
DWLJ801 Paint Splats Stencil
DWNHB-12 1/2" Brush #12 Natural Handle
DWGHB-6 1/4" Brush #6 Gold Handle

Plus:
My Colors Cardstock - Cafe Ole
Bazzill Cardstock - Chiffon
Copic Sketch Markers - W0, W1, 0, E31, E33, E37, E42, E51, E93, Y0000, Y26, B0000
Brilliance Ink - Pearlescent Chocolate, Graphite Black, Pearlescent Beige, Sunflower Yellow
Zutter 1/2" Corner Rounder
Rubber Embossing Mat
Die Cut Machine
Foam tape

Instructions:
Step 1:  Fold a 6" x 9 1/2" piece of Chiffon cardstock in half to form an A6 card, brush the edges with brown ink using a 1/2" stencil brush
Step 2:  Place the Splats stencil on the big platform of the die cut machine, spritz a 4 1/4" x 5 1/2" piece of white cardstock with a fine mist of water and lay the paper on the stencil, place the rubber embossing mat on the paper, then 2 new cutting plates and run the stack through the machine
Step 3: Keep the stencil over the embossed image and use a 1/2" stencil brush to the brown ink over the whole design, use a 1/4" brush to add a little black 
Step 4:  Remove the stencil and use a 1/2" brush to add some beige and yellow ink in the background, round the corners and add more brown around the edges
Step 5:  Stamp the saying on the smaller white die cut frame by first inking the "Sending" and stamping that, clean the stamp, ink the "Mice Wishes" and stamp below the "Sending", mat on the matching brown die cut frame
Step 6: Stamp the mouse image on a 2 1/2" x 3 1/4" piece of white, and color with Copic markers, round the corners, run black around the edge
Step 7:  Cut a  2 3/4" x 3 1/2" piece of brown cardstock and round the corners, adhere the mouse image to the mat
Step 8: Adhere the Splat background to the card front, then the mouse image at an angle
Step 9: Use foam tape to attach the saying

Today's list:


Louise Healy


Enter your challenge project on the House-Mouse and Friends blog post for HMFMC #215 Use Stencils! HERE

Happy Creating,
Louise