Showing posts with label Woodware Craft. Show all posts

Thursday, March 26, 2015

Making Texture Blog Hop Day 5!


We have a different sort of collaboration for you!

At Stampendous we’re very excited to be able to offer our products in many countries around the world. We’re able to do this thanks to our terrific distributors in those countries who help retail stores to stock our products. In the UK we have a very long and valued partnership with Woodware Craft Collection. These wonderful folks stock almost all of our products, and they even stock several classic items that have retired from our store here in the US. They also stock almost all of our new Dreamweaver Stencils line, so we thought it would be another great event to celebrate the addition of Dreamweaver to the Stampendousfamily.

This week we’ve been celebrating with the awesome Woodware Design Team and the Dreamweaver Stencils Dream Team all of the the great Stampendous and Dreamweaver Stencils products thatWoodware makes available to the UK market. This is good news for our crafty friends in the UK because we’ll be offering prizes and our UK friends are eligible to win!! We’ll be offering three prizes in the UK and three in the US. Each prize package will consist of  Nathalie Kalbach’s terrific Grunge Mixed Media Cling Rubber Stamp Sets and the beautiful Zen Butterfly Dreamweaver Stencil! Both products are ideal for adding texture and backgrounds to your projects!

And that’s our theme!! Making Texture. For our final day I've created a "sea" of texture for your! Here it is:

"A Sea of Texture"
Here are the steps I used to create this fun Birthday card:
Choose your stencils and cut paper about the same size as the stencil.
Tape them down. Notice the seahorse stencil is placed sideways so that when I apply embossing paste, I will be applying it in the direction of the small bridges, not against them. This gives you less chance of getting paste under the bridges.
I used Dreamweaver Regular Embossing Paste (matte white) with a little Just Peach F/X Powder to create a very light orange paste. I applied it to the two shells, the starfish, and the seahorse. You can see it doesn't take very much paste to create several images. The left over was put in a jar I keep of various colors I've created, it's great for mixed media projects.
After removing the stencils, I sprinkled the two shells, LM104 Nautilus and LM106 Scallop, with a little Stampendous Golden Sand embossing Powder. I also added a little crushed up Fran-tage taupe color fragements on the Nautilus. Both were heated from below first, then on top.
LM181 Seahorse and LM209 Starfish were sprinkled with Fran-tage shabby pink embossing enamel, excess tapped off, then the starfish had a little Golden Sand embossing powder added to the open areas. Both were heated from below first, then above.
I colored more paste with some Kiwi FX Powder for the LM179 Sea turtle, but before removing the stencil, I took a piece of crumpled paper towel and gently dabbed on the paste to give it more texture. When I took the stencil off, I used a soft brush to scatter more Kiwi FX Powder on the paste, heated the whole image, then used a Swiffer cloth to buff off the extra powder. He's pretty cool, the shell looks so "knobby"!
Cut everything out, create a background with a wash of blue ink on watercolor paper, use blue and brown ink to stencil the seaweed pattern in the background (sorry, I used LG679 which I realize now is no longer available), die cut some "coral" using LX7020 Leafless Tree die and light colored cardstock. After laying everything out, I decided it needed a little something else, so I stamped "from all of us" from the Birthday Wish set (SSC1115), the one of the sayings on the inside of the card.
We hope you’ve enjoyed the wonderful inspiration that three talented teams have brought you this week! Be sure to visit all the blog links listed and leave your comments! Each comment will count as an entry towards one of the terrific prize packages.
Check out all these great designers!

Tuesday, March 24, 2015

Making Texture Blog Hop Day 3!


We have a different sort of collaboration for you!

At Stampendous we’re very excited to be able to offer our products in many countries around the world. We’re able to do this thanks to our terrific distributors in those countries who help retail stores to stock our products. In the UK we have a very long and valued partnership with Woodware Craft Collection. These wonderful folks stock almost all of our products, and they even stock several classic items that have retired from our store here in the US. They also stock almost all of our new Dreamweaver Stencils line, so we thought it would be another great event to celebrate the addition of Dreamweaver to the Stampendousfamily.

This week we’re going to celebrate with the awesome Woodware Design Team and the Dreamweaver Stencils Dream Team all of the the great Stampendous and Dreamweaver Stencils products thatWoodware makes available to the UK market. This is good news for our crafty friends in the UK because we’ll be offering prizes and our UK friends are eligible to win!! We’ll be offering three prizes in the UK and three in the US. Each prize package will consist of  Nathalie Kalbach’s terrific Grunge Mixed Media Cling Rubber Stamp Sets and the beautiful Zen Butterfly Dreamweaver Stencil! Both products are ideal for adding texture and backgrounds to your projects!

And that’s our theme!! Making Texture. 
Here's what I "texturized" today:


  • Use the Creative Palette from Stampendous (I have the Rectangles one) to add layers of acrylic paint with a brayer
  • Add designs with stamps or stencils
  • Press a piece of Stampendous Mixed Media White Paper over the paint and rub gently
  • Add another layer of paint to the palette
  • Use a stencil or stamp to press into the design and "lift off" some color and create a design. I used LX7024  Zen Flower to create a design
  • Press your paper again
  • Keep playing until it looks awesome!
  • It did several pieces because it's highly addictive!
  • On one background, I laid the Zen Flower stencil and pasted with Dreamweaver Translucent Embossing Paste, removed the stencil and placed it in water for cleaning later
  • While the paste was still wet, I sprinkled it with a combination of Stampendous aged silver embossing enamel and a little Jeweled gold, let the paste dry, then heated the powders (although I think it would have been neat to heat right away too and have gotten more of the Molten Magic look for even more texture!)
  • I took a left over scrap of background paper and laid the Zen Flower on it and outlined the center openings with a Black Micro 02 pen
  • Cut out the to flowers, adhere them to yellow cardstock and recut around the edges
  • Layer into a beautiful card, embellished with some May Arts Ribbon
We hope you’ll enjoy the wonderful inspiration that three talented teams will bring you this week! Be sure to visit all the blog links listed and leave your comments! Each comment will count as an entry towards one of the terrific prize packages.


Happy Creating,
Louise

Friday, August 15, 2014

Christmas in August Grand Finale!


Well, it has been a whirlwind week of creating for Dreamweaver and Woodware UK teams. We have loved sharing with you and hope you have enjoyed our creations! Our goal was to inspire crafters on both sides of the "pond" with a mix of bothDreamweaver and Woodware UK* products for the holidays! Six days, SIX, of beautiful, elegant, merry, cute, artsy, and craftsy projects to have you heading out to your local stores or internet sites to buy these goodies immediately!


Of course, there are prizes as well. Three prize packages will be given to three commenters during this week's posts on the team's blogs, including five stencils and one nested die set. You can have an opportunity to win these goodies by leaving some holiday sweetness for each team member posting each day, to be one of the three winners for the week. Here are the team members that are inspiring you today:


Here's my grande finale creation:


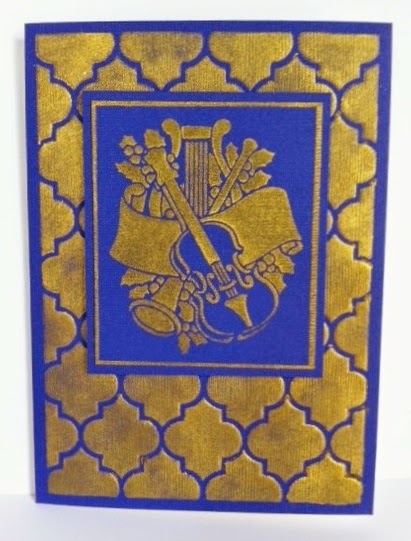
LX7027 Quatrefoil and LL589 Musical Christmas

I knew I had to do something with this beautiful new background stencil, Quatrefoil LX7027. Isn't it gorgeous!!! But at the holidays, I'm all about cards that are easy to mass produce because I make A LOT of cards. This could not be any easier. Simply tape the background stencil to a piece of purple (yes, it actually is purple, I could not get the light to hit it right so that it would photograph as purple and not blue) and use a 1/2" or 3/4" brush to stencil with the beautiful Delicata Golden Glitz ink from Tsukineko. This is by far the easiest metallic gold ink I have ever worked with and a little heat gun on it sets the color so it won't smudge. It looks wonderful just stenciled, but if you want to add a little more dimension, you could dry emboss your image first. The Musical Christmas, LL589, stencil was done the same way, then after I trimmed it to the size I wanted, I used a piece of cardstock as a ruler and edged around the design with the ink too. Mount the instruments onto another layer of purple and use foam tape to mount them to the background. Add to the front of a base card that you have stenciled or stamped with a sentiment.


LL453 Season's Greetings
The image on the front and the sentiment can easily be changed for whatever occasion you need!  Thanks for all the wonderful comments this week, I have enjoyed reading all of them. They are MY inspiration!

*For a stockist near you contact Woodware Craft Collection in the UK and Notions Marketing in the USA.

Happy Creating,
Louise

Thursday, August 14, 2014

Christmas in August Day 5!


Wow! It's been a great week so far! The teams on both sides of the "pond" have been creating wonderful things to inspire you for the upcoming holidays with a mix of both Dreamweaver and Woodware UK* products! Six days, SIX, of beautiful, elegant, merry, cute, artsy, and craftsy projects to have you heading out to your local stores or internet sites to buy these goodies immediately!


Of course, there will be prizes as well. Three prize packages will be given to three commenters during this week's posts on the team's blogs, including five stencils and one nested die set. You can have an opportunity to win these goodies by leaving some holiday sweetness for each team member posting each day, to be one of the three winners for the week. Here are the team members that are inspiring you today:


Here's my creation: 
LG674  Oval Ornament and the new LL3045 Sm Oval Ornament
PLUS the new matching die set DG674 Nested Ornaments Dies

  •  To start, I taped each ornament stencil to some decorative holly cardstock (Graphic45) with removable tape
  • Place a large dollop of Pearlescent Embossing Paste on your craft mat or on a piece of freezer paper, add ONE drop of Wendy Vecchi's Archival Fern Green re-inker to the paste and mix well, it will be a very pale green
  • Use a paste spreader (LM2010) to apply the colored paste over each stencil
  • Remove the stencils and place in water for cleaning
  • Let paste dry thoroughly
  • When the paste is dry, lay the matching die over each ornament and cut them out
  • Lay LJ891 Holly swirls stencil over one ornament and use 1/4" stencil brushes and Fern Green and Red Geranium re-inkers to stencil the design
  • Brush the edges of each ornament with the Fern Green
  • Mount on some beautiful Hanko cardstock and add a bow and fiber from May Arts, clean and elegant
  • I love how the background paper shows through the paste too!

Close up, notice the bird that was on the paper looks like he's eating one of the berries

The left over negatives that I will certainly be using for another project

*For a stockist near you contact Woodware Craft Collection in the UK and Notions Marketing in the USA.

Happy Creating,
Louise

Wednesday, August 13, 2014

August Christmas in August Day 4!


Yes! It's that time of year again! The time when we inspire crafters on both sides of the "pond" with a mix of bothDreamweaver and Woodware UK* products for the holidays! Six days, SIX, of beautiful, elegant, merry, cute, artsy, and craftsy projects to have you heading out to your local stores or internet sites to buy these goodies immediately!


Of course, there will be prizes as well. Three prize packages will be given to three commenters during this week's posts on the team's blogs, including five stencils and one nested die set. You can have an opportunity to win these goodies by leaving some holiday sweetness for each team member posting each day, to be one of the three winners for the week. Here are the team members that are inspiring you today:


Thursday is our normal posting day for the weekly Dreamweaver challenge, so I combined our "August as an Adjective" challenge with this week's "Christmas in August" theme for my card today. Here's my creation: 

LG731 Holly flourish and LL3005 Holly and swirls stencils
plus the new matching die DL3005 Holly and swirls!

LL3005 and DL3005 used to create the crackled holly leaves
This beautiful card has a few steps, but no one takes very long, and the results are worth it! 

  • Paste emboss the Holly and swirls (LL3005) stencil with Glossy Blue (or black if you don't have blue) Embossing Paste, remove and clean stencil and let paste dry
  • Place the clean stencil back over the dry paste and add a coat of Crackle Embossing Paste, remove & clean stencil, let paste dry
  • In the meantime, place the Holly flourish stencil (LG731) on a piece of white cardstock and tape in place with removable tape
  • Place a drop or two of Wendy Vecchi's Archival Re-inker Red Geranium on a craft sheet or palette and pick it up with a 1/4" stencil brush, be sure to work the ink up into your bristles before stenciling with it
  • Use the Picasso tool (LL332) and place one of the small holes over each berry area to stencil on ink with the brush you loaded, wipe off the Picasso with a soft cloth before continuing to the next color
  • Place several drops of Wendy Vecchi's Archival Re-inker Fern Green on a craft mat and load a different stencil brush with this, stencil the leaves and swirls with the Fern Green using the Picasso tool as a shield around the berries
  • Remove and clean the stencil
  • Use a 3/4" brush to pick up some of the Fern Green and brush a light coat around the edges of the entire piece
  • Use a heat tool to set the inks
  • Place the clean, dry Holly stencil back over the dry Crackle paste and use the Fern Green ink and brush to color the holly leaves
  • Gently heat set the ink
  • Place the matching Holly die over the crackled image and run through your die cut maching
  • Cut the leaves away from the rest of the image and brush a little more green ink along the edges
  • Mount everything into an august card embellished with a beautiful ribbon from May Arts

*For a stockist near you contact Woodware Craft Collection in the UK and Notions Marketing in the USA.

Happy Creating,