Thursday, November 28, 2013

Happy Thanksgiving!


Wishing everyone a wonderful Thanksgiving Day! I hope you are able to be with loved ones or dear friends today. I know I am thrilled to have all my family home together counting our blessings.

The Dreamweaver Stencils design team is creating everything but a card this month to show you how truly versatile these beautiful stencils really are. We hope you will be inspired to create something of your own and join our challenge this month. Just link your creation at the DREAM it UP! blog using the linking tool or email a photo and description of your project to lynell@dreamweaverstencils.com, you may win a prize!


This month we are also using the wonderful adhesives from Beacon Adhesives in our work. It's true, the right tool for the job makes it much easier, and the different products from Beacon allow you to work with virtually any media.
Today I am showing a couple of pieces from the past that you may or may not have seen before. Both projects use the Lotus stencil (LG720) that I featured as part of my decorative mirror last week. Two more great gift ideas for the holidays!
LG720 Lotus and leaves from LG625 Flower and leaves stencil


The pin was made by staining grungepaper with Distress Stain worn lipstick, outlining the Lotus stencil (LG720) with a Micron pen in multiple times to create layers, cut out and glued together with ZipDry by Beacon Adhesives. Stain a small piece of grungepaper with Distress Stain peeled paint and outline the leaves of  the Flowers and leaves stencil  (LG625) cut them out and adhere behind the flower. Use Beacon Adhesive Gem-Tac to attach a small pin back. Decorate a shawl or purse with your beautiful pin!

LG720 Lotus, LJ825 Jungle leaves, LJ896 Large flourish
This wall hanging was so easy!. This is a 10" black frame that came with a white mat that has a 4" opening. I used a large stencil brush and Distress Ink forest moss to stencil the Jungle leaves (LJ825) all over the mat. The beautiful Large flourish stencil (LJ896) was paste embossed with Matte Black Embossing Paste in one corner of the mat. The Lotus was paste embossed with Regular Embossing paste on white paper and left to air dry. After the paste is dry, place the stencil back over the paste and use small stencil brushes to add color (you can match it to any decor), I used Distress Inks broken china and faded jeans. Pounce a layer of Distress embossing ink over the color, remove the stencil and sprinkle with clear embossing powder. Tap off the extra powder and heat emboss. Trim the Lotus to fit on a black mat so that when you put it in the opening a small black mat shows around the flower. I thought all the backgrounds were too white, so I used a larger stencil brush (1/2" or 3/4" work well) and distressed the whole thing with Distress Ink vintage photo. Adhere the flower in the mat opening and place in the frame.
A huge thank you to Linda Neff who has been our guest designer this month. Her creations are inspiring! Here are the other team members creating for you this week:

Happy Creating,
Louise

Thursday, November 21, 2013

Holiday Celebrations Week 3!

Welcome to week two of the Dreamweaver Stencils Design Team challenge "Holiday Celebrations!". We are creating everything but a card this month to show you how truly versatile these beautiful stencils really are. We hope you will be inspired to create something of your own and join our challenge this month. Just link your creation at the DREAM it UP! blog using the linking tool or email a photo and description of your project to lynell@dreamweaverstencils.com, you may win a prize!


This month we are also using the wonderful adhesives from Beacon Adhesives in our work. It's true, the right tool for the job makes it much easier, and the different products from Beacon allow you to work with virtually any media.
This week I've created a Christmas mirror to decorate your home with or to give as a gift to a dear friend at this wonderful time of the year. You are going to think I work for IKEA, but really I just love the clean lines of their various products because they are the perfect base for so many craft projects! Here's my project using a red square mirror from IKEA (only $2.99):


This has a few more steps than some projects might, but they are all easy, and dry fast (an important feature in these busy days leading up to the holidays!).

  • Start with a red mirror, or paint a natural mirror red with an acrylic paint
  • Tape LG731 Holly flourish stencil along the bottom right corner of the mirror using removable tape
  • Use a palette knife and paste spreader to apply Metallic Gold Embossing Paste
  • Remove your stencil and place in water for cleaning later
  • Use a soft brush to carefully sprinkle Metallic F/X Powder Kiwi on the holly leaves and Kimono Red on the berries
  • Heat with an heat tool until the paste is bubbly and dry to the touch
  • Clean and dry your stencil
  • Repeat these steps with the stencil now in the upper left corner of the mirror
  • Tape LL3009 Christmas script stencil in the upper right corner of the mirror with removable tape
  • Use a palette knife and paste spreader to apply Metallic Gold Embossing Paste
  • Remove your stencil and place in water for cleaning later
  • Use a soft brush to carefully sprinkle Metallic F/X Powder Kiwi on the holly leaves and Kimono Red on the berries
  • Heat with an heat tool until the paste is bubbly and dry to the touch
  • Clean and dry your stencil
  • Use a piece of Swiffer cloth (you know, the ones for dusting!) to careful wipe away the excess powders (there might still be a little sheen on the surface of the mirror, it actually looks pretty in the background of the design
  • Color a piece of Tim Holtz Grungepaper with Distress Stain peeled paint and dry with a heat tool
  • Tape LG700 Lg poinsettia stencil at one corner of the colored Grungepaper with removable tape
  • Use a palette knife and paste spreader to apply Pearlescent Embossing Paste
  • Remove your stencil and place in water for cleaning later
  • Use a soft brush to sprinkle on Metallic F/X Powders - Goldfinch in center, Kiwi on the leaves, and Pixie Dust and Kimono Red on the flower ( you want most of the paste covered, but it doesn't have to all be covered)
  • Pick up the piece and tap from underneath to help "jump" the powders around to finish coating the paste
  • Flip it over a waste basket to tap of some of the excess powder
  • Heat with a heat tool until bubbly all over the image, cool well
  • Cut out the image leaving a small green edge all the way around
  • Clean and dry your stencil and repeat the steps for a second poinsettia
  • Use a Swiffer to wipe away excess powders from the poinsettias
  • Tape LG720 Lotus stencil to part of the Grungepaper and use the same steps as for the poinsettia to create two Lotus flowers (except there is now Kiwi powder on these)
  • Cut out the images
  • Use a Black Micron 02 pen to outline holly leaves from LL3005 Holly and swirls stencil using left over pieces of the green Grungepaper, or you may need to stain some more depending on how you did your flowers
  • Cut them out in clusters or as individual leaves 
  • Arrange the flowers and holly leaves on the lower left edge of the mirror
  • I used Beacon Adhesives 3-in-1 Advanced Craft Glue to glue everything in place. Notice I did not glue to the edges of the pieces, just in the middles so the edges could lift up and have more dimension
  • The mirror comes with two eye screw hooks which I attached on the back near the very top of the mirror, then threaded a beautiful green ribbon from May Arts through them and tied a bow to create a beautiful hanger for my mirror
The other team members have more great ideas for you this week, so leave me a comment then hop on over to check them out!


Happy Creating,
Louise

Thursday, November 14, 2013

Holiday Celebrations Week 2!

Welcome to week two of the Dreamweaver Stencils Design Team challenge "Holiday Celebrations!". We are creating everything but a card this month to show you how truly versatile these beautiful stencils really are. We hope you will be inspired to create something of your own and join our challenge this month. Just link your creation at the DREAM it UP! blog using the linking tool or email a photo and description of your project to lynell@dreamweaverstencils.com, you may win a prize!


This month we are also using the wonderful adhesives from Beacon Adhesives in our work. It's true, the right tool for the job makes it much easier, and the different products from Beacon allow you to work with virtually any media.
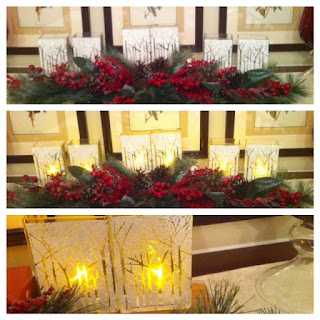
Last year I created a set of candle holders using flat sided vases from IKEA, the LJ849 Bare trees stencil, Glossy White Embossing Paste, and Crystal glitter.
I gave several away as gifts and they were a big hit (if you missed that post, click here to see the step by step process), so what could I do this year to top that! Here's what I came up with:


  • I started with one of the smaller lanterns from IKEA (only $4.99 if you are an IKEA family member!). The nice thing about these is that you can very easily remove the panes of glass while you work on them. I kept them in order so they would fit back in correctly
  • Clean the glass, then lay the Pine cones stencil (LG675) at an angle over the glass panel so the whole image fits on the glass, tape in place with removable tape
  • Use a palette knife and paste spreader to apply a coat of Matte Black Embossing Paste over the stencil
  • Carefully remove the stencil and place in water for cleaning, set the glass aside to dry
  • Clean and dry your stencil
  • Repeat this process until all four panes of glass are pasted
  • Bring the first pane back in front of you and use a soft brush to VERY GENTLY apply Metallic F/X powders over the black paste. I used Cocoa on the stems, Forestry on the needles, and a combination of Eye of the Tiger and Amber Glow on the pine cones. Don't worry about powder residue on the glass, once it is completely dry, you can get it off easily with a Swiffer cloth
  • Repeat for the other panes
  • Re-assemble the lantern, decorate it with a pretty ribbon from May Arts, attach a couple of pine cones near the ribbon with Beacon Adhesives Zip Dry, and put a candle and some small pine cones inside
  • Some greenery near the base looks good too!

I've only made one so far, but I'm going to make a set of them for my son and daughter-in-law for their new fireplace! These are easy and so pretty. There are several Dreamweaver Stencils images that would work great for this project, depending on the season or your setting.
Leave a comment, them link over to see what the rest of team has created this week for you!

Happy Creating,
Louise

Thursday, November 7, 2013

Holiday Celebrations Week 1!


Ready to be festively distressed once again? The Dream Team have been playing with Ranger's Distress Paints, and are ready to inspire you to be distressed as well...paint distressed that is! Dreamweaver Stencils are the perfect choice to mix with all things festively distressed, as nothing shows off color and texture better than great designs. By following our hop and leaving love along the way, you have the opportunity to win a great prize package including five Ranger Distress Paints and five Dreamweaver Stencils! Here's the lineup for today, including our November Guest Designer:

Louise Healy (you're here)

This is also our first posting day featuring our new monthly challenge, "Holiday Celebrations", and for the entire month we will be demonstrating ways to use Beacon Adhesives' entire line of products with Dreamweaver to create special projects in home decor and gifts of love. Here's mine:

To create this Holiday decoration I started with a 4" x 4" x 1" canvas, Distress Paints, and Dreamweaver's  Holly Swirls stencil (LJ891)

I held the stencil in place on each side and used a foam applicator pad to apply a combination of iced spruce, bundled sage, and peeled paint Distress Paint, heat setting each side as I went.
I used the same combination of colors to stencil the front of the canvas, then heat set it.

Next I add several colors of Distress Inks over the entire piece. (wild honey, festive berries, vintage photo, walnut stain) I misted the whole thing with a little water and dried it with a heat tool. The paint resists the inks so it looks like it is sitting on top of the colors. 

In order to paste emboss the Skates stencil (LL3016), I put a small stack of paper squares in the center opening on the back of the canvas, this kept the center from pushing in while I applied the paste.  I taped the Skates stencil to the front of the canvas at an angle and applied Metallic Silver Embossing Paste using a palette knife, removed the stencil and carefully sprinkled just the shoe part of the skates with Crystal glitter, and set it aside to dry.

While the skates were drying, I stenciled the holly leaves and berries from the To:From holly stencil (LS64) with a 1/4" stencil brush and Distress Ink pine needles five times, cut them out, and edged them with vintage photo ink.

Once the silver paste was dry, I used Beacon Adhesives Zip Dry to apply the holly leave clusters where I wanted them. It dries pretty quickly so I was able to add the ribbon all the way around the canvas using Beacon Adhesives FABRI-TAC. I gave that a few minutes to dry before adding three antique buttons to each side using Beacon Adhesives GEM-TAC.
Here's how it looks from the side:

To finish off near the top so the ribbon wouldn't pull apart, I added some of Tim Holtz's Tinsel twine that I first pounced with Adirondack Mushroom Alcohol Ink and heat a little (it makes it look a little more antiquey...yes that IS a word!)

Next I wanted to finish off the back of the canvas, so I cut a square of Manila cardstock to fit it, stenciled the Holly swirls(LJ 891) with Distress Paint pine needles using a foam applicator and heat set it. I applied Distress Ink over the  paint in the same colors as the front, misted it, and dried it with the heat tool.  The Skate stencil (LL3016)  was placed on at the same angle as the front image, but this time I used Distress Ink festive berries on a foam applicator to color the image. I just love how the Distress Paint comes thru the ink so it ends up looking like the skates were put on first and then the holly.  I distressed the edges with vintage photo and walnut stain inks, and adhered it to the back of the canvas with Zip Dry from Beacon.


Back side of the ornament

Last, but not least, I added a little Distress Paint pine needles along the edges and wiped it with a soft cloth while it was still wet to soften it a little, then added Distress Stickles fired brick to the berries of the holly

Ranger products used:
Distress Paints, Distress Inks, Distress Stickles,
Adirondack Alcohol Ink, Foam Applicators, Felt Applicator

Dreamweaver Stencils products used:
LJ891, LL3016, LS64
Metallic Silver Embossing Paste, Stencil brush

Beacon Adhesives products used:
Zip Dry, FABRI-TAC, Gem-Tac
Leave me a comment for a chance to win a prize, then hop on over to the other designers' blogs to see what great projects they've created for you!

Happy Creating,
Louise