Showing posts with label Tim Holtz. Show all posts

Thursday, November 7, 2013

Holiday Celebrations Week 1!


Ready to be festively distressed once again? The Dream Team have been playing with Ranger's Distress Paints, and are ready to inspire you to be distressed as well...paint distressed that is! Dreamweaver Stencils are the perfect choice to mix with all things festively distressed, as nothing shows off color and texture better than great designs. By following our hop and leaving love along the way, you have the opportunity to win a great prize package including five Ranger Distress Paints and five Dreamweaver Stencils! Here's the lineup for today, including our November Guest Designer:

Louise Healy (you're here)

This is also our first posting day featuring our new monthly challenge, "Holiday Celebrations", and for the entire month we will be demonstrating ways to use Beacon Adhesives' entire line of products with Dreamweaver to create special projects in home decor and gifts of love. Here's mine:

To create this Holiday decoration I started with a 4" x 4" x 1" canvas, Distress Paints, and Dreamweaver's  Holly Swirls stencil (LJ891)

I held the stencil in place on each side and used a foam applicator pad to apply a combination of iced spruce, bundled sage, and peeled paint Distress Paint, heat setting each side as I went.
I used the same combination of colors to stencil the front of the canvas, then heat set it.

Next I add several colors of Distress Inks over the entire piece. (wild honey, festive berries, vintage photo, walnut stain) I misted the whole thing with a little water and dried it with a heat tool. The paint resists the inks so it looks like it is sitting on top of the colors. 

In order to paste emboss the Skates stencil (LL3016), I put a small stack of paper squares in the center opening on the back of the canvas, this kept the center from pushing in while I applied the paste.  I taped the Skates stencil to the front of the canvas at an angle and applied Metallic Silver Embossing Paste using a palette knife, removed the stencil and carefully sprinkled just the shoe part of the skates with Crystal glitter, and set it aside to dry.

While the skates were drying, I stenciled the holly leaves and berries from the To:From holly stencil (LS64) with a 1/4" stencil brush and Distress Ink pine needles five times, cut them out, and edged them with vintage photo ink.

Once the silver paste was dry, I used Beacon Adhesives Zip Dry to apply the holly leave clusters where I wanted them. It dries pretty quickly so I was able to add the ribbon all the way around the canvas using Beacon Adhesives FABRI-TAC. I gave that a few minutes to dry before adding three antique buttons to each side using Beacon Adhesives GEM-TAC.
Here's how it looks from the side:

To finish off near the top so the ribbon wouldn't pull apart, I added some of Tim Holtz's Tinsel twine that I first pounced with Adirondack Mushroom Alcohol Ink and heat a little (it makes it look a little more antiquey...yes that IS a word!)

Next I wanted to finish off the back of the canvas, so I cut a square of Manila cardstock to fit it, stenciled the Holly swirls(LJ 891) with Distress Paint pine needles using a foam applicator and heat set it. I applied Distress Ink over the  paint in the same colors as the front, misted it, and dried it with the heat tool.  The Skate stencil (LL3016)  was placed on at the same angle as the front image, but this time I used Distress Ink festive berries on a foam applicator to color the image. I just love how the Distress Paint comes thru the ink so it ends up looking like the skates were put on first and then the holly.  I distressed the edges with vintage photo and walnut stain inks, and adhered it to the back of the canvas with Zip Dry from Beacon.


Back side of the ornament

Last, but not least, I added a little Distress Paint pine needles along the edges and wiped it with a soft cloth while it was still wet to soften it a little, then added Distress Stickles fired brick to the berries of the holly

Ranger products used:
Distress Paints, Distress Inks, Distress Stickles,
Adirondack Alcohol Ink, Foam Applicators, Felt Applicator

Dreamweaver Stencils products used:
LJ891, LL3016, LS64
Metallic Silver Embossing Paste, Stencil brush

Beacon Adhesives products used:
Zip Dry, FABRI-TAC, Gem-Tac
Leave me a comment for a chance to win a prize, then hop on over to the other designers' blogs to see what great projects they've created for you!

Happy Creating,
Louise
Saturday, October 12, 2013

Creative Chemistry Day 5!

I know, technically it's Day 6, but I finally got a few minutes to upload the 3 tags I finished yesterday (3 to go, hopefully tomorrow!).
Creative Chemistry 102 with Tim Holtz has been a lot of fun, and has definitely kept us busy! Here are the 3 tags I have finished for Day 5.
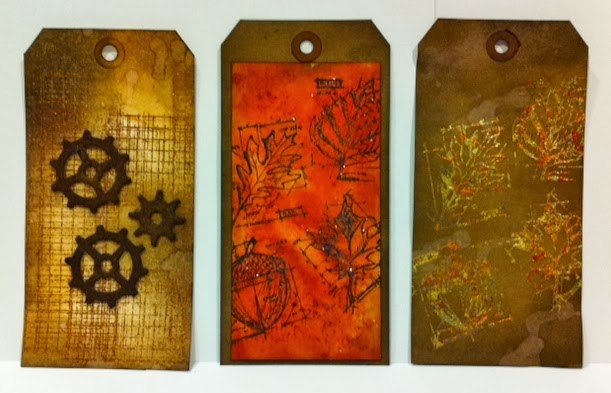
Day 5 Tags


Rusting with Distress Powder

Sticky Powder with Glitter

Sticky Powder with Leafing

Happy Creating,
Louise

Thursday, October 10, 2013

Creative Chemistry Day 4!

Another fun day at Creative Chemistry 102 with Tim Holtz! Today was all about alcohol inks, which I absolutely LOVE working with on projects!
If you are looking for my weekly Dreamweaver Stencil post, click here.

Here are tags for Day 4:

Creative Chemistry 102 - Day 4 Tags
Faux Patina

Tinted Tinsel
Ombre
Monoprint
Faded Layers

Happy Creating,
Louise

Wednesday, October 9, 2013

Creative Chemistry Day 3

The fun continues in day 3 of Creative Chemistry with Tim Holtz. He is keeping us very busy and I'm loving every minute of it! Today one tag needs drying time, so I will have to share that another day, but I have finished the other techniques!
Day 3 tags
UPDATED with Cracked Glass

Faux Cracked Glass

Day 3 Tags - Creative Chemistry 102

Distress Glittering
Distress Glitter Rock Candy

Brayer technique

Smudge stamping

Smudge stamping - first and second impressions

Happy Creating,
Louise

Tuesday, October 8, 2013

Creative Chemistry Day 2!

Updated with the rest of the tags!

Today's techniques in Creative Chemistry 102 with Tim Holtz were all about Distress products and stencils. Being on the Dreamweaver Stencils design team, I knew I was going to have a lot of fun today! I always love to learn how to apply other products to our stencils. There are several homework assignments today, so keep checking back for updates as I complete them!
Day 2 Tags:
First tag of Day2:


Mixed Media Layering
Mixed Media Layering 
Mixed Media Layering - the layers up close!


Embossing with Stencils

Embossing through Stencils
Stencil Stamping
 
Stencil Sketching

Ink Monoprint

Paint Monoprint

.

Happy Creating,
Louise

Monday, October 7, 2013

Creative Chemistry 102 Day 1

Creative Chemistry 102 with Tim Holtz began today and let me tell you, he had us working hard! We learned six wonderful techniques for the new Distress Paints. I'm thrilled because I've had them for a while now, and have used them a little, but now feel confident to incorporate them into a lot more projects. That's what it's all about, learn new things and how to apply them. It's what makes our crafting so much fun!
Here are the tags I created today (there is one tag I have not finished because I'm waiting for the UPS truck!).

UPDATED TO ADD FINAL TAG:

Eroded Metallic

Day 1 Techniques (l to r)
Marbling, Colored Crackle, Altered Surface
Stamping Resist, Industrial

Distress Paint Marbling

Colored Crackle

Altered Surface

Stamping Resist

Industrial
 Here are some close ups of Colored Crackle and Altered Surface


Hope you've enjoyed my creations, I know I had fun making them!

Happy Creating,
Louise

Thursday, August 29, 2013

Christmas in August!

HAPPY BIRTHDAY ELLIE! Today my family is celebrating our darling granddaughter, Ellie's first birthday! It is hard to believe that a whole year has passed by already! We love you!

It's also hard to believe that this is our last Christmas in August challenge for Dreamweaver Stencils. Every month seems to fly by faster and faster. We hope you have been inspired to create your holiday cards and that we have made it a little easier! We would love for you to join our challenges, just link your creation over at the DREAM it UP! blog or send a photo to lynell@dreamweaverstencils.com and she will post it for you.

This week I was inspired by a technique that we used recently in a card club exchange group I belong to. It is a processes where you cut three layers of matching cardstock( each layer is about 1" smaller each direction) and lightly tack the layers together before stamping a large background image or a smaller image several times. Then you mat each layer in a coordinating color and line them back up. It is a very cool look. Here is the card I created for that club using a couple of stamps from Stampers Anonymous Tim Holtz collection:

And here is the card I created using the same process but with  Dreamweaver Stencils products:
LJ922 Christmas borders and LL469 Xmas icons
Glossy Red Embossing Paste and Crystal glitter from Art Glitter
The steps:
  • Cut one piece of white cardstock 4 1/4" x 5 1/2"
  • Cut one piece of white cardstock 3 1/4" x 4 1/2"
  • Cut one piece of white cardstock 2 1/4" x 3 1/2"
  • I used a little dot roller in each corner to adhere the three layers one on top of the other
  • Place the Christmas borders stencil (LJ922) on the stack and tape in place with removable tape
  • Use a palette knife and paste spreader to apply a coat of Glossy Red Embossing Paste over the image
  • Remove the stencil and place in water for cleaning later
  • Immediately sprinkle the wet paste with Crystal glitter, carefully tapping off the extra paste
  • Set the layered piece aside to dry
  • Tape the Xmas icons stencil (LL469) to a small square of white cardstock, positioning the poinsettia portion over the paper and taping off the other sections with removable tape
  • Apply Glossy Red Embossing Paste over the poinsettia area
  • Remove stencil and place in water for cleaning later
  • Sprinkle the wet paste with Crystal glitter
  • Set aside to dry
  • Cut one piece of dark green cardstock (I used a shimmer cardstock) 4 1/4" x 5 1/2" (yes, that's right)
  • Cut one piece of dark green cardstock  3 1/2" x 4 3/4"
  • Cut one piece of dark green cardstock  2 1/2" x 3 3/4"
  • Cut one piece of dark green cardstock 1 7/8" x 1 7/8"
  • Cut a strip of dark green cardstock 3/4" x 4 1/4"
  • When the paste is dry, carefully separate the three layers, I ran the edge of my palette knife under the edges to help get them apart
  • Trim the edges of the largest layer right to the edge of the paste
  • Mount each pasted layer on its matching dark green layer and then on top of each other
  • Adhere the strip of dark green across the three layers
  • Trim around the poinsettia image leaving just a small white edge all the way around
  • Mount it on the small dark green square and then on the card front
  • Cut a base card from white cardstock either 5 1/2" x 8 1/2" (scored at 4 1/4" for a side fold card) or  4 1/4" x 11" (scored at 5 1/2" for a top fold card)
  • Adhere the card front to the base card
Before you head over to the other team member blogs, I just want to let you know that next month we will be doing a collaboration all month long with the team from Art Glitter! We are very excited and look forward to having our own Kristi Parker Van Doren back as a guest designer for the month! You won't want to miss any of it! 

This week's designer links:

Happy Creating,
Louise