Showing posts with label Pearlescent Embossing Paste. Show all posts

Thursday, December 3, 2015

Angel Kisses

Welcome to Dreamweaver Thursday and our weekly theme of "Sugar Plum Wishes and Angel Kisses". The Stampendous Design Team has been busy this week sharing not only ideas for our weekly theme, but hopping with the folks at Patty Pop Ons too!  Be sure to check out all the different ideas!

Yesterday I shared a cute little House Mouse design for the Sugar Plum Wishes side of our theme. Today I showing you a beautiful stencil from Dreamweaver.  It's a simple, but elegant card using our Shadow Technique.


Stampendous:
SSC1231 Holiday Expressions Perfectly Clear Stamps™
SSH57 Jumbo Perfectly Clear™ Acrylic Handle
GM220U Crystal Ultra Fine glitter

Dreamweaver:
DWLJ871 Angel Stencil
DWDPP Pearlescent Embossing Paste
DWDPK Dreamweaver Palette Knife
DWLM2010 Paste Spreader
DWNHB-12 1/2" Brush #12 Natural Handle

Plus:
Cardstock by Bazzill Basics Paper®
Zip Dry™ Paper Glue by Beacon Adhesives
Neenah Papers Classic Crest Cover Solar White 80# 04701
VersaFine Majestic Blue
Double-sided tape
Foam tape

Instructions:

Step 1:  Fold a 7" x 10" piece of blue cardstock in half to form an A7 card


Step 2:  Tape the stencil to a 4 1/4" x 5 1/2" piece of white cardstock and use a 1/2" stencil brush to brush Majestic Blue ink over the whole design, remove the stencil and clean it
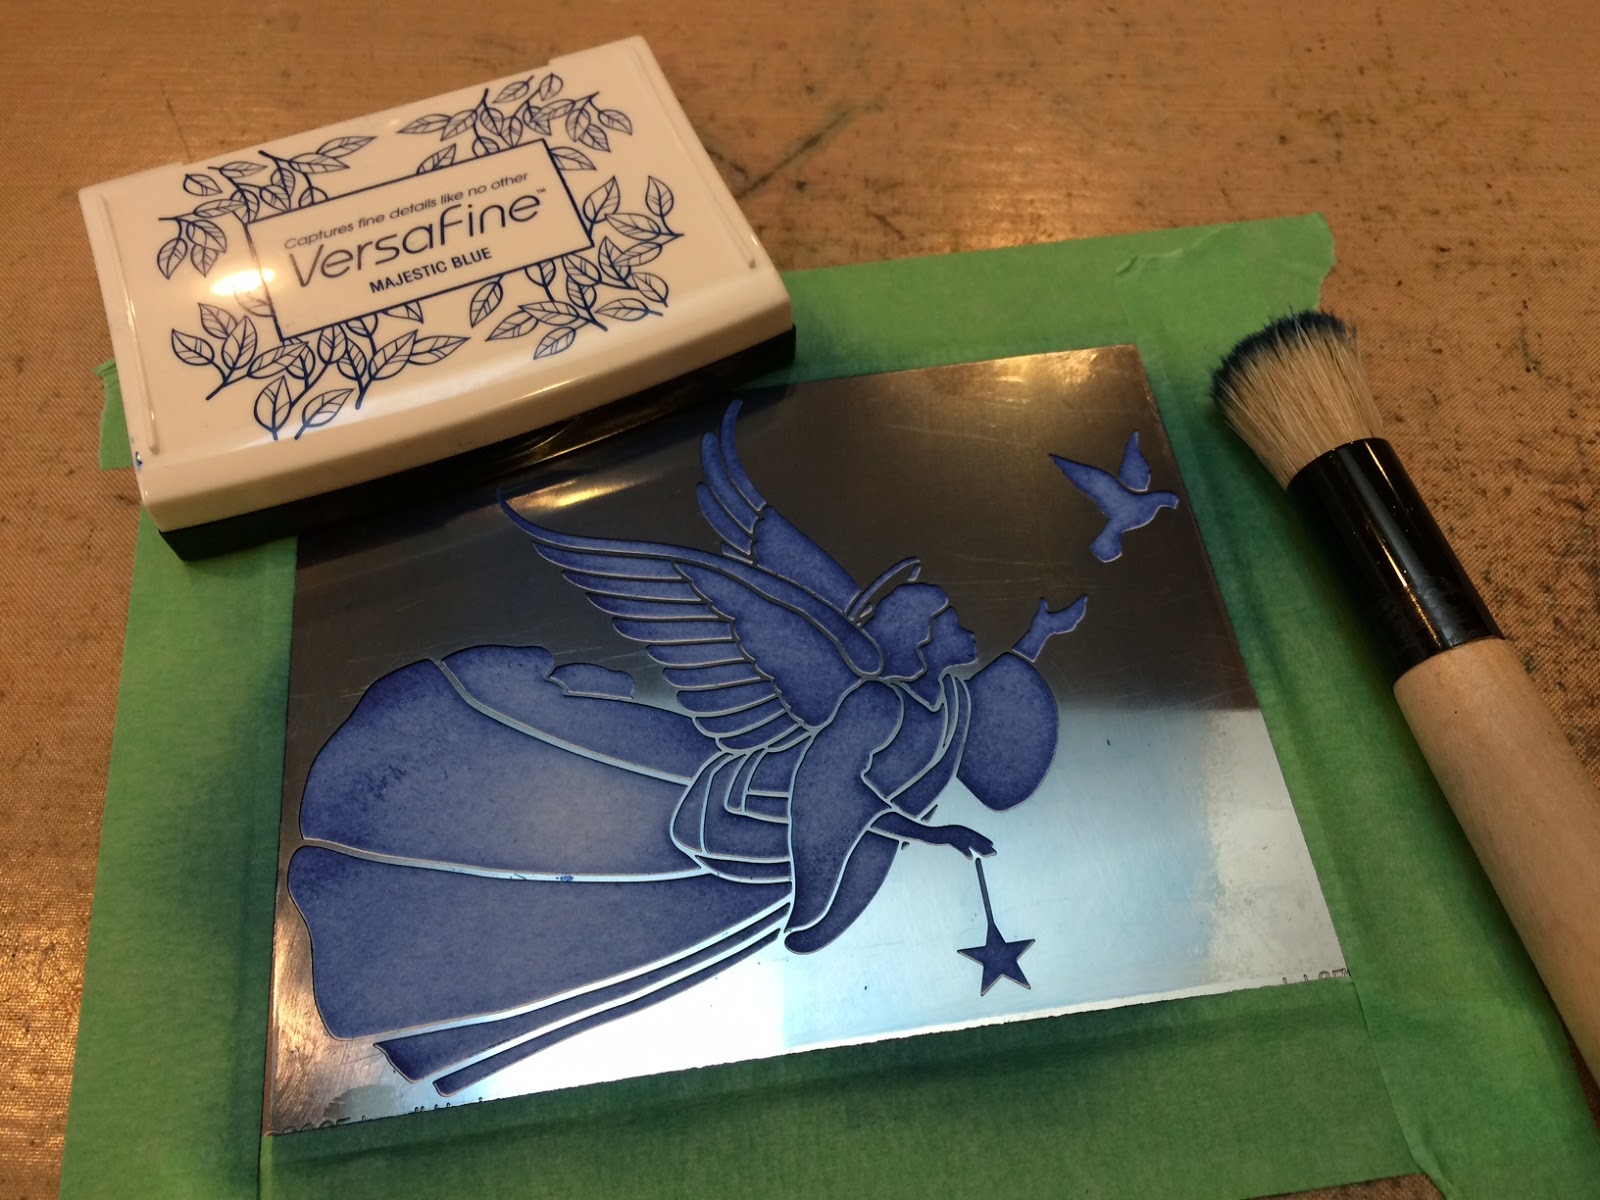


Step 3:  Place the clean, dry stencil back over the design, then shift it up and to the left about 1/16", tape in place

Step 4:  Apply Pearlescent Embossing Paste using a Palette Knife and Paste Spreader, remove stencil and place in water for cleaning


Step 5:  Immediately sprinkle Crystal glitter on the wings, halo, bird, and star, carefully tapping off extra away from the rest of the image, let paste dry thoroughly


Step 6: Mount the Angel to a 4 1/2" x 5 3/4" dark blue mat, then to the front of the card toward the left side

Step 7:  Stamp the saying, from the Holiday Expressions set, on white cardstock ( 1 1/2" x 1 1/2") with Majestic Blue ink, mount on a dark blue mat (1 3/4" x 1 3/4")


Step 8:  Attach the saying to the lower right side with foam tape  


For even more great ideas, stop over at the Stampendous Blog for a complete list of today's players.

Louise Healy 

Happy Creating,
Louise

Thursday, July 30, 2015

Much Ado About Paste!

Where is the summer going! Can it really be almost August!  I don't know about you, but the older I get, the faster the time seems to go! I'm up in beautiful northern Minnesota this week, getting a little "lake" time, hopefully the nights won't be too cold yet! 

This beautiful Christmas Borders stencil is perfect for a technique that is very popular with stampers right now, the triple layer technique, and the Pearlescent Embossing Paste gives it a wonderful, wintery shimmer.

Supplies:DWLJ922_LH_800

Dreamweaver:
DWLJ922 Christmas Borders Stencil
DWDPP Pearlescent Embossing Paste
DWDPK Dreamweaver Palette Knife
DWLM2010 Paste Spreader
Plus:
Neenah Papers Classic Linen Cover Red Pepper 80# 05847
Stardream Papers Shimmer White
May Arts Ribbon
ZipDry™ Paper Glue by Beacon Adhesives™

Instructions:

  1. Step 1:  Fold a piece of  6" x 9 1/4" red cardstock in half to form an A6 card
  2. Step 2:  Cut three pieces of red cardstock, 1 - 4 1/4" x 5 1/2", 1 - 3 1/4" x 4 1/2", 1 2 1/4" x 3 1/2"
  3. Step 3:  Use a small amount of dot roller or repositionable tape to layer the three pieces of red paper on each other, tape the stencil over the red paper
  4. Step 4:  Apply Pearlescent Embossing Paste using a Palette Knife and Paste Spreader, remove and clean the stencil, let dry thoroughly
  5. Step 5:  When the paste is dry, use an x-acto knife to carefully cut each layer apart, trim the largest red layer right along the edge of the paste (it should be 3 7/8" x 5 1/8")
  6. Step 6: Cut three pieces of white shimmer cardstock, 1 - 2 1/2" x 3 3/4", 1 - 3 1/2" x 4 3/4", 1 - 4 1/8" x 5 3/8",  adhere the corresponding red layer to each, then adhere them to each other
  7. Step 7:  Wrap a white, May Arts, ribbon around the layers and tie a bow
  8. Step 8:  Attach pasted image to the front of the card

Because I'm traveling, I don't have access to the last list of team members sharing today, but if you hop on over to the Stampendous blog, you'll find the complete list!

Happy Creating,
Louise

Thursday, July 2, 2015

Dreamweaver By the Sea

Welcome to another Dreamweaver Thursday from our Stampendous Design Team. We are so lucky to receive these great products for being part of the team because we LOVE sharing all the fun things you can create with these wonderful stencils!

We are having a VERY busy week on the Stampendous team. Not only have we been featured on the fabulous blog hop with Spellbinders, we are also doing a collaboration with the beautiful ribbons from May Arts! This week is filled with inspiration. If you missed any of it, check the Stampendous blog for all the daily links.


Our theme this week is "By the Sea"  there are sooooo....many great stencils that fit this theme that it's hard to choose! If you missed my By the Sea post for the  Spellbinder's hop on Monday, click here.  Today I'm sharing TWO fun and easy cards that fit this theme.

First, the fabulous Sailboat stencil (DWLG755). What says "By the Sea" more than a Sailboat!

"Sailing the ocean blue..."

This technique was featured on my blog a while back, click here for the complete tutorial on how to create this. Of course, the darling white "waves" are from May Arts!

The second card was featured in the Stampendous April 2015 catalog. It uses the Jellyfish stencil (DWLG758) and is super easy to make, and would be great for summer birthdays.

Jellyfish done with Pearlescent Embossing Paste
The marble background was created using the Shaving Cream and Reinker technique on glossy paper. When that was dry, I taped the Jellyfish stencil to the marbled background, and used a palette knife and paste spreader to apply Pearlescent Embossing Paste. When the Pearlescent paste dries, it is just a little transparent so it gives the true "see-thru" look of a jellyfish!

Some of the other team members have more "sea-sational" ideas to share with you:


Don't forget to mark your calendar for the big finale of the May Arts hop tomorrow! You might win one of the prizes!

Happy Creating,
Louise

Thursday, August 21, 2014

August as an Adjective continues!

As we are heading towards back-to-school again, it is only appropriate that we break out our dictionary for this month's Dreamweaver challenge..."AUGUST as an ADJECTIVE"! 
Merriam-Webster defines august as, "marked by majestic dignity or grandeur", with synonyms such as, "dignified, distinguished, imposing, portly, solemn, staid, and stately". Now, I don't know just how dignified and stately the Dream Team can become for an entire month, but we are all going to give it a try! How about trying along with us, and linking YOUR creations to the inlinkz tool below for a chance to win the wildest stencil design your little heart is screaming for. 

Here's my creation for this week:

LL3011 - Lovebirds Heart 

LL3011 -Lovebirds Heart in Pearlescent Embossing Paste on cream paper

LL3011 - Lovebirds Heart in Glossy Black Embossing Paste on white paper
Of course, everything looks better embellished with a beautiful ribbon from May Arts!


Put on a straight face for the "A" team this week:


Happy Creating,
Louise

Thursday, May 8, 2014

Flora and Fauna Dreamweaver Style Round 2

Welcome to the merry month of May! The Dream Team are challenging you this month to a "Flora and Fauna" theme! Considering most of the Dreamweaver designs incorporate both of these in the huge variety of stencils, you should have no problem playing along with our challenge this month! As usual, link your creations at the end of the Dream It Up! blog post, or at the end of our posts where it says, "Add Your Link". As the challenge gets underway, you'll see thumbnails of others who are playing along as inspirations for your own creations!
This week I have been busy teaching the Dreamweaver Stencils Certification 2 class along with Pam Hornschu in Geneva IL. Here are a few pics of the class!
Karren from Memories and Beyond, Downers Grove, IL

Carla from Pearl Street Stamping, Tremont, IL
Teachers Margaret and Joan

Jean from Stampin' n Scrapin' Fun, Marshfield, WI
Michelle from Michelle's Crafts, Hayward, WI

Marilyn from Stamp Thyme, Lockport, IL
Pam Hornschu our fearless Dream Team leader!
I have loved the Stylized Dahlia stencil (LG743) ever since it was released. When I'm in a hurry and need a quick, beautiful card I know I can use this stencil and create one in no time. Here are my creations for this week:

LG743 - Stylized dahlia using Pearlescent Embossing Paste and Metallic F/X Powders

LG743 - Stylized dahlia using Glossy White Embossing Paste and glitter
Please welcome our new "B" team, officially posting for the first time!


Happy Creating,
Louise


Thursday, November 21, 2013

Holiday Celebrations Week 3!

Welcome to week two of the Dreamweaver Stencils Design Team challenge "Holiday Celebrations!". We are creating everything but a card this month to show you how truly versatile these beautiful stencils really are. We hope you will be inspired to create something of your own and join our challenge this month. Just link your creation at the DREAM it UP! blog using the linking tool or email a photo and description of your project to lynell@dreamweaverstencils.com, you may win a prize!


This month we are also using the wonderful adhesives from Beacon Adhesives in our work. It's true, the right tool for the job makes it much easier, and the different products from Beacon allow you to work with virtually any media.
This week I've created a Christmas mirror to decorate your home with or to give as a gift to a dear friend at this wonderful time of the year. You are going to think I work for IKEA, but really I just love the clean lines of their various products because they are the perfect base for so many craft projects! Here's my project using a red square mirror from IKEA (only $2.99):


This has a few more steps than some projects might, but they are all easy, and dry fast (an important feature in these busy days leading up to the holidays!).

  • Start with a red mirror, or paint a natural mirror red with an acrylic paint
  • Tape LG731 Holly flourish stencil along the bottom right corner of the mirror using removable tape
  • Use a palette knife and paste spreader to apply Metallic Gold Embossing Paste
  • Remove your stencil and place in water for cleaning later
  • Use a soft brush to carefully sprinkle Metallic F/X Powder Kiwi on the holly leaves and Kimono Red on the berries
  • Heat with an heat tool until the paste is bubbly and dry to the touch
  • Clean and dry your stencil
  • Repeat these steps with the stencil now in the upper left corner of the mirror
  • Tape LL3009 Christmas script stencil in the upper right corner of the mirror with removable tape
  • Use a palette knife and paste spreader to apply Metallic Gold Embossing Paste
  • Remove your stencil and place in water for cleaning later
  • Use a soft brush to carefully sprinkle Metallic F/X Powder Kiwi on the holly leaves and Kimono Red on the berries
  • Heat with an heat tool until the paste is bubbly and dry to the touch
  • Clean and dry your stencil
  • Use a piece of Swiffer cloth (you know, the ones for dusting!) to careful wipe away the excess powders (there might still be a little sheen on the surface of the mirror, it actually looks pretty in the background of the design
  • Color a piece of Tim Holtz Grungepaper with Distress Stain peeled paint and dry with a heat tool
  • Tape LG700 Lg poinsettia stencil at one corner of the colored Grungepaper with removable tape
  • Use a palette knife and paste spreader to apply Pearlescent Embossing Paste
  • Remove your stencil and place in water for cleaning later
  • Use a soft brush to sprinkle on Metallic F/X Powders - Goldfinch in center, Kiwi on the leaves, and Pixie Dust and Kimono Red on the flower ( you want most of the paste covered, but it doesn't have to all be covered)
  • Pick up the piece and tap from underneath to help "jump" the powders around to finish coating the paste
  • Flip it over a waste basket to tap of some of the excess powder
  • Heat with a heat tool until bubbly all over the image, cool well
  • Cut out the image leaving a small green edge all the way around
  • Clean and dry your stencil and repeat the steps for a second poinsettia
  • Use a Swiffer to wipe away excess powders from the poinsettias
  • Tape LG720 Lotus stencil to part of the Grungepaper and use the same steps as for the poinsettia to create two Lotus flowers (except there is now Kiwi powder on these)
  • Cut out the images
  • Use a Black Micron 02 pen to outline holly leaves from LL3005 Holly and swirls stencil using left over pieces of the green Grungepaper, or you may need to stain some more depending on how you did your flowers
  • Cut them out in clusters or as individual leaves 
  • Arrange the flowers and holly leaves on the lower left edge of the mirror
  • I used Beacon Adhesives 3-in-1 Advanced Craft Glue to glue everything in place. Notice I did not glue to the edges of the pieces, just in the middles so the edges could lift up and have more dimension
  • The mirror comes with two eye screw hooks which I attached on the back near the very top of the mirror, then threaded a beautiful green ribbon from May Arts through them and tied a bow to create a beautiful hanger for my mirror
The other team members have more great ideas for you this week, so leave me a comment then hop on over to check them out!


Happy Creating,
Louise

Friday, August 16, 2013

Dreamweaver and Woodware Day 5!

If you missed day 1 click here to check it out
If you missed day 2 click here to be inspired.
If you missed day 3 Click here to see it
If you missed day 4 click here for more great ideas

Welcome to the annual Dreamweaver and Woodware Christmas in August extravaganza week! Monday through Saturday we will be knocking your Christmas stockings off with fun and inspirational ideas for the upcoming holidays. All that you need to do is hop back and forth across the "pond" on each day, oohing and aaahhhing as you go, and leaving us plenty of holiday love. In return, you'll be entered to randomly win one prize package for a UK commenter, and a second prize package for a US commenter, featuring products distributed in the UK by Woodware...including Dreamweaver and Stampendous!

Prize includes four stencils, one die, and two stamps, selection may vary.

I teach at several stores in the Illinois and Wisconsin area and today  I am sharing three cards that I designed last fall for classes. The beautiful Heart Ornaments stencil - LJ921 had just been released and, needless to say, it was a big hit. When I teach a class, I like to use one stencil and teach 3 different techniques to use with that stencil (or any stencil really!). Here they are:

LJ921 - Heart Ornaments
Metallic Gold Embossing Paste with green glitter on the needles while the paste is still wet,
and gold leafing (red leafing) added to the hearts after the paste was dry

LJ921 - Heart Ornaments
Molten Magic technique with Pearlescent Embossing Paste
and Metallic F/X powders sprinkled on wet paste then heated until bubbly

LJ910 - Rolling Hills dry embossed for the background
LJ921 - Heart Ornaments pasted on acetate with Regular Embossing Paste,
colored with stencil brushes and inks when the paste is dry,
dries white glue for the drips on the hearts,
Regular Embossing Paste sculpted onto the branches and sprinkled with Crystal glitter while wet
This card was inspired by one our very talented team leader, Pam Hornshu, had created for CHA that summer.
So there you have it! Three very different cards with the same stencil. I hope you've been inspired this week to start your holiday cards! Don't miss our grand finale tomorrow when all the designers will be playing along. It's going to be fabulous I know!

Remember, the products featured here can be purchased in the UK from stores listed on the Woodware UK site
Now its time for you to leave a comment and move on to the next designer for today:
Louise Healy (you are here)

Happy Creating,
Louise

Thursday, April 25, 2013

Mists, Drizzles and Showers!

This is our last Thursday posting for the Dreamweaver Stencils April challenge of Mists, Drizzles and Showers. I can't say that I'm sorry to be leaving this theme behind! I am really looking forward to the May flowers all those April showers are supposed to bring. My daffodils are finally in full bloom, and add a bright cheerful touch to the dreary landscape. We are supposed to have some nicer weather this weekend so maybe Spring is truly here to stay.
This week I am featuring the Umbrella stencil (LG737) again. It is so amazing how many different techniques there are to play with on these beautiful stencils.


This is what I call my "Monet Impression" (pun intended). Here are the steps:
  • Tape the Umbrella stencil to light tan cardstock with removable tape
  • Use a palette knife and paste spreader to spread a coat of Pearlescent Embossing Paste over the design
  • Remove stencil and place in water
  • Use a soft paint brush to sprinkle various colors of Metallic F/X powders randomly over the umbrella portion, use Cocoa (FX18) on the handle
  • Set aside to dry
  • Use the paste spreader to spread a very thin coat of the Pearlescent Embossing Paste over another square piece of matching cardstock
  • Work quickly to sprinkle the entire piece with various colors of the Metallic F/X powders
  • Let dry
  • Clean and dry your stencil
  • When both pieces are dry, use a piece of Swiffer cloth to buff away any excess powder
  • Layer into a beautiful "Monet" inspired card
Next Tuesday, April 30th, I will be teaching a Dreamweaver class at Memories and Beyond in Downers Grove, IL. Give them a call to sign up, there are still a couple of spots left. Here's what we'll be creating:

LL543 - Sm Fuschia

Be sure to hop over to the other team blogs for more inspiration this week.
Happy creating,
Louise

Tuesday, June 12, 2012

UPCOMING CLASS

Here are the three cards we'll be creating in my upcoming class on June 19 at Memories and Beyond in Downers Grove, IL.  There are still a couple of spots left, so give them call to reserve yours! We'll use the beautiful new Stylized Dahlia stencil (LG743) from Dreamweaver Stencils and learn three techniques, the stencil is yours to take home.

LG743 - Crackle Paste technique

LG743 - Distress Powder technique

LG743 - Molten Lava technique

Hope to see you there.
Happy Creating,
Louise