Showing posts with label LG675 Pine cones. Show all posts

Thursday, November 14, 2013

Holiday Celebrations Week 2!

Welcome to week two of the Dreamweaver Stencils Design Team challenge "Holiday Celebrations!". We are creating everything but a card this month to show you how truly versatile these beautiful stencils really are. We hope you will be inspired to create something of your own and join our challenge this month. Just link your creation at the DREAM it UP! blog using the linking tool or email a photo and description of your project to lynell@dreamweaverstencils.com, you may win a prize!


This month we are also using the wonderful adhesives from Beacon Adhesives in our work. It's true, the right tool for the job makes it much easier, and the different products from Beacon allow you to work with virtually any media.
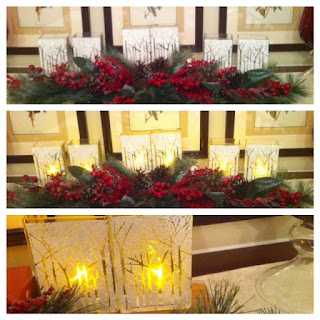
Last year I created a set of candle holders using flat sided vases from IKEA, the LJ849 Bare trees stencil, Glossy White Embossing Paste, and Crystal glitter.
I gave several away as gifts and they were a big hit (if you missed that post, click here to see the step by step process), so what could I do this year to top that! Here's what I came up with:


  • I started with one of the smaller lanterns from IKEA (only $4.99 if you are an IKEA family member!). The nice thing about these is that you can very easily remove the panes of glass while you work on them. I kept them in order so they would fit back in correctly
  • Clean the glass, then lay the Pine cones stencil (LG675) at an angle over the glass panel so the whole image fits on the glass, tape in place with removable tape
  • Use a palette knife and paste spreader to apply a coat of Matte Black Embossing Paste over the stencil
  • Carefully remove the stencil and place in water for cleaning, set the glass aside to dry
  • Clean and dry your stencil
  • Repeat this process until all four panes of glass are pasted
  • Bring the first pane back in front of you and use a soft brush to VERY GENTLY apply Metallic F/X powders over the black paste. I used Cocoa on the stems, Forestry on the needles, and a combination of Eye of the Tiger and Amber Glow on the pine cones. Don't worry about powder residue on the glass, once it is completely dry, you can get it off easily with a Swiffer cloth
  • Repeat for the other panes
  • Re-assemble the lantern, decorate it with a pretty ribbon from May Arts, attach a couple of pine cones near the ribbon with Beacon Adhesives Zip Dry, and put a candle and some small pine cones inside
  • Some greenery near the base looks good too!

I've only made one so far, but I'm going to make a set of them for my son and daughter-in-law for their new fireplace! These are easy and so pretty. There are several Dreamweaver Stencils images that would work great for this project, depending on the season or your setting.
Leave a comment, them link over to see what the rest of team has created this week for you!

Happy Creating,
Louise

Saturday, August 17, 2013

Dreamweaver and Woodware Day 6!

WOW! What a great week filled with so many beautiful ideas for the upcoming holidays! We hope you've all enjoyed the week as much as we have!
If you missed day 1 click here to check it out
If you missed day 2 click here to be inspired.
If you missed day 3 Click here to see it
If you missed day 4 click here for more great ideas
If you missed day 5 click here for even more!

The annual Dreamweaver and Woodware Christmas in August extravaganza week is wrapping up! We have had a Monday through Saturday of knock your Christmas stockings off  fun and inspirational ideas for the upcoming holidays. All that you need to do is hop back and forth across the "pond" on each day, oohing and aaahhhing as you go, and leaving us plenty of holiday love. In return, you'll be entered to randomly win one prize package for a UK commenter, and a second prize package for a US commenter, featuring products distributed in the UK by Woodware...including Dreamweaver and Stampendous!

Prize includes four stencils, one die, and two stamps, selection may vary.

For my grand finale I have chosen the beautiful Pine cones (LG675) stencil from Dreamweaver Stencils. I'm sure you will agree that it is a fabulous stencil. Today I am showing you the same technique on two different papers to demonstrate how you can change the look of the image dramatically depending on the paper you choose. Here they are:

LG675 - Pine cones on smooth cream cardstock
Metallic Gold Embossing Paste and
Metallic F/X powders - Kiwi, Forestry, Cocoa and Amber Glow

LG675 - Pine cones on black linen cardstock
Metallic Gold Embossing Paste and
Metallic F/X powders - Kiwi, Forestry, Cocoa and Amber Glow
They were both done in the Molten Magic technique (can you tell I LOVE this technique!) using the exact same products following these simple steps:

  • Tape the stencil to cardstock with removable tape
  • Use a palette knife and paste spreader to apply Metallic Gold Embossing Paste over the design
  • Remove stencil and place in water for cleaning later
  • Use a soft paint brush to sprinkle the F/X powders over the design (remember, it will look messy)
  • Lift the paper and tap from underneath to further spread the powders
  • Tap off extra powders into a trash can
  • Heat with a embossing gun until the whole design is bubbly
  • Let cool completely
  • Use a Swiffer cloth to gently wipe off any excess powders from the paper and paste
  • Mount into a beautiful card, adding some fabulous May Arts ribbon and a 3" embellishment pin from Dreamweaver Stencils (I used white pins and colored them with a gold Krylon pen)
Here are the close ups of the pine cones:


The extra dimension this technique gives the design is amazing! The gold paste shines through anywhere there was no powder, adding a beautiful metallic shine!

I hope you've enjoyed all the beautiful cards you seen this week and will contemplate joining our monthly Dreamweaver challenges. We love to see what you create too!

Remember, the products featured here can be purchased in the UK from stores listed on the Woodware UK site!

Now it's time for you to leave a comment and move on to the next designer for today: