Thursday, July 30, 2015

Much Ado About Paste!

Where is the summer going! Can it really be almost August!  I don't know about you, but the older I get, the faster the time seems to go! I'm up in beautiful northern Minnesota this week, getting a little "lake" time, hopefully the nights won't be too cold yet! 

This beautiful Christmas Borders stencil is perfect for a technique that is very popular with stampers right now, the triple layer technique, and the Pearlescent Embossing Paste gives it a wonderful, wintery shimmer.

Supplies:DWLJ922_LH_800

Dreamweaver:
DWLJ922 Christmas Borders Stencil
DWDPP Pearlescent Embossing Paste
DWDPK Dreamweaver Palette Knife
DWLM2010 Paste Spreader
Plus:
Neenah Papers Classic Linen Cover Red Pepper 80# 05847
Stardream Papers Shimmer White
May Arts Ribbon
ZipDry™ Paper Glue by Beacon Adhesives™

Instructions:

  1. Step 1:  Fold a piece of  6" x 9 1/4" red cardstock in half to form an A6 card
  2. Step 2:  Cut three pieces of red cardstock, 1 - 4 1/4" x 5 1/2", 1 - 3 1/4" x 4 1/2", 1 2 1/4" x 3 1/2"
  3. Step 3:  Use a small amount of dot roller or repositionable tape to layer the three pieces of red paper on each other, tape the stencil over the red paper
  4. Step 4:  Apply Pearlescent Embossing Paste using a Palette Knife and Paste Spreader, remove and clean the stencil, let dry thoroughly
  5. Step 5:  When the paste is dry, use an x-acto knife to carefully cut each layer apart, trim the largest red layer right along the edge of the paste (it should be 3 7/8" x 5 1/8")
  6. Step 6: Cut three pieces of white shimmer cardstock, 1 - 2 1/2" x 3 3/4", 1 - 3 1/2" x 4 3/4", 1 - 4 1/8" x 5 3/8",  adhere the corresponding red layer to each, then adhere them to each other
  7. Step 7:  Wrap a white, May Arts, ribbon around the layers and tie a bow
  8. Step 8:  Attach pasted image to the front of the card

Because I'm traveling, I don't have access to the last list of team members sharing today, but if you hop on over to the Stampendous blog, you'll find the complete list!

Happy Creating,
Louise

Tuesday, July 28, 2015

Playing with Paste!

And the fun continues for the Design Team! This week we have a theme of "Playing with Paste". There are so many amazing ways to use the various embossing pastes. They are gorgeous and fun to use!

Here is a simple Christmas card I made for the July 2015 Stampendous Catalog. The gold manger scene lends an elegant touch, yet the burlap ribbon and metallic embossing enamels remind us of the rustic side of this blessed event. You might be surprised how I got the gold Manger! Read on...


Supplies
Stampendous
FREG023 Frantage Embossing Enamel aged silver
FREG025 Frantage Embossing Enamel aged copper
EP102 Metallic Embossing Powder Pirate Gold

Dreamweaver
DWLL334 Manger
DWDEPT Dreamweaver Translucent Paste
DWDPK Dreamweaver Palette Knife
DWLM2010 Paste Spreader

Plus
May Arts Burlap ribbon (red edge pulled off)
Neenah Papers Classic Linen Cover Red Pepper 80#
Neenah Papers Classic Crest Cover Classic Cream 80#
Double-sided tape
Foam mounting tape

Instructions

Step 1:  Fold a 5 1/2" x 8 1/2" red card in half to form an A2 card

Step 2:  Tape a 4" x 5 1/4" piece of cream cardstock to the front of the card

Step 3:  Pull the finished edge off both sides of a burlap ribbon and place near the left side of the card

Step 4:  Sprinkle some aged copper, aged silver, and Pirate Gold embossing powders randomly down the burlap, heat from below to set the powders

Step 5:  Paste emboss the Manger stencil on cream cardstock (3" x 3") with Translucent Paste using a Palette Knife and Paste Spreader, remove stencil and place in water for cleaning

Step 6:  Sprinkle the wet paste with Pirate Gold Embossing Powder, tap off extra, let paste dry, then heat set

Step 7:  Tape the embossed Manger to a red mat (3 1/4" x 3 1/4") and attach to the front of the card with foam tape

Seeing as everyone is not as lucky as I am to be a part of a design team and have access to a large variety of product, I decided to use the Translucent Paste and gold embossing powder instead of Gold Embossing Paste to show the type of thing you can do with limited supplies. If you can only have a couple of pastes, I would highly recommend making the Translucent paste one of them. It can be used over a stenciled image to create a clear, glossy finish, you can mix reinkers, paints, or mica powders into it to create any color paste you want, or sprinkle it with embossing powder like I did.

Be sure to check out what other team members have been play with too! I'm on vacation in beautiful northern Minnesota this week, so look for the complete list of participants over at the Stampendous Blog! (Hopefully I won't get eaten alive by the bird-size mosquitoes up there!)

Happy Creating,
Louise

Thursday, July 23, 2015

Dreamweaver Pretty Poinsettia!

The Stampendous Design Team is sharing from the July 2015 Stampendous Catalog again this week. Our new weekly theme is "Pretty Poinsettias". There are several Dreamweaver stencils that feature poinsettias, all of them are fabulous and make beautiful holiday cards and projects.

Today for Dreamweaver Thursday, I'm sharing a card that is not in the catalog, but uses the elegant Tall Poinsettia stencil (DWLL3046) which is featured in the catalog. 


"Pretty in White"

Both the background (LX7026 Chevron) and Tall Poinsettia were paste embossed with Glossy White Embossing Paste, then the wet paste was sprinkled with Crystal glitter. Wait for it all to dry, cut the bottom edge of the background in a zig-zag following the design, layer it all up for a beautiful card.

I'm at the CHA Paper Arts show this week, so for the most current list of other Dreamweaver Thursday and Pretty Poinsettias creations today go to the Stampendous Blog. Here are the links for this week so far:

Monday

Tuesday

Wednesday

Thursday

Happy Creating,
Louise

Wednesday, July 22, 2015

Poinsettia Magic!

The Stampendous Design Team is sharing from the July 2015 Stampendous Catalog again this week. Our new weekly theme is "Pretty Poinsettias". There are several gorgeous stamps and Dreamweaver stencils that feature poinsettias, all of them are fabulous and make beautiful holiday cards and projects. I have always loved this beautiful stencil from Dreamweaver, as I'm sure you'll understand when you see what an elegant card you can create with it!

This was done with our Molten Magic Technique.  I pasted the Poinsettia with Pearlescent Embossing Paste, removed the stencil, sprinkled the wet paste with Metallic F/X powders (mica powders), tapped off most of the powders, then heated the image until it was bubbly and almost dry. Once it dries completely, dust it with a Swiffer cloth to remove the residue from the powders.

Here's a mirror project I did a while back with this stencil (and a few others!) and this technique.


If you'd like more detail about the mirror project, click here.

Stop over at the Stampendous Blog today too! Here are the earlier links for this week.


Monday

Tuesday

Happy Creating,
Louise

Tuesday, July 21, 2015

Pretty Poinsettia Ornament!

The Stampendous Design Team is excited to share more beautiful designs from the July 2015 Stampendous Catalog. This week our theme is "Pretty Poinsettias", and if you've seen the cover of the new catalog you know why we had to have this theme! If you haven't seen it, what are you waiting for! Click here to see it online.

Today I used the Oval Ornament and just the Poinsettia from the Three Christmas Icons stencil to create a beautiful, old-fashioned ornament card. 

DWLG674_DWLL469_LH_800

Supplies


Stampendous:SSC1068 Christmas Wishes Perfectly Clear Stamps Set
Dreamweaver:
DWLG674 Oval Ornament
DWLL469 Three Christmas Icons
DWLL332 Picasso Shield/Stencil
DWETMD Embossing Tool Medium
DWNHB-12 1/2" Brush #12 Natural Handle
DWGHB-6 1/4" Brush #6 Gold Handle
Plus:
Cardstock by Bazzill Basics Paper®
Classic® Red Pepper & Classic Cream Linen Cover Stock by Neenah Paper®
Sheet Music
Brilliance™ Rocket Red & Pearlescent Ivy Ink by Tsukineko®
Delicata™ Golden Glitz Ink by Tsukineko®
Ribbon by May Arts
ZipDry™ Paper Glue by Beacon Adhesives™
Wax Paper
Hole Punch
Deckle-Edged Scissors
Foam Mounting Tape

Instructions:

  1. Tape the Oval Ornament stencil to a piece of cream cardstock, turn the paper over, rub with wax paper, and dry emboss the ornament with an embossing tool, be sure to go around the outer edge of the stencil too.
    IMG_7904
    IMG_7906
  2. Turn the image back to the front, tape it all around and use a 1/2" stencil brush to add color around the outer edge of the ornament, use a Picasso tool to shield the topper.
  3. Step 3:    Lay the Three Christmas Icons stencil over the oval and tape in place, use a 1/4" stencil brush and inks to add red ink to the Poinsettia, and gold to the center, use the Picasso tool to place color.
    IMG_7911
    IMG_7914IMG_7915
  4. I liked how it looked, but decided it was too flat, so I trimmed the ornament piece to 4" x 4", put the Poinsettia stencil back over it, turned it over and embossed the flower too.
    IMG_7916IMG_7919IMG_7920
  5. Remove the poinsettia stencil and  place the ornament stencil back on, use the 1/2" brush to add more green ink all around the edges.
    IMG_7921
    IMG_7922
  6. Fold a 5 1/2" x 11" piece of dark green cardstock in half to form a square card, trim a 5 1/2" x 5 1/2" piece of music paper with a deckle scissors and brush with red, green and gold inks, tape to the front of the card.
  7. Tape the ornament on a red mat, punch a hole in the ornament hanger, add a little gold thread and a May Arts bow to the top of the ornament, adhere the ornament to the card front with foam tape.
    IMG_7926
  8. Here's a suggestion for the inside of the card, lightly stencil the ornament on cream cardstock, and stamp the sentiment from the Christmas Wishes set using Versafine Onyx Black.
  9. IMG_7924

I'm at the CHA Paper Arts show this week, so for the most current list of other Pretty Poinsettias creations today go to the Stampendous Blog.  Here are yesterday's links in case you missed them!

Monday


Happy Creating,
Louise

Friday, July 17, 2015

Stampendous and Chameleon Final Hop!

Today is the final day of the Stampendous - Chameleon Blog Hop! The Stampendous Design Team has been sharing the designs from the July 2015 Stampendous Catalog with you this week! Over the next several weeks, our weekly themes will spotlight different parts of the catalog. This week our theme has been  "Christmas in July". There are so many beautiful designs to choose from, it was hard to choose just five for this week!

Our designs were colored with the fabulous Chameleon markers, so we've been having a Blog Hop this week too! You won't want to miss a day of the fun, so be sure to go back and check out the days you missed! And, of course, there are PRIZES! A huge thank you to Chameleon for providing each design team member a complete set of their great markers!


Chameleon™ Art Products is a company determined to change the way you think about marker pens. They pride themselves on having developed real innovation that enhances your ability to maximize your creativity. Their markers bring color control and simplicity to your art, and you can create stunning 3D effects, smooth transitions, highlights, and shading gradations all with one pen.


When you combine this simple coloring versatility with Stampendous® and House-Mouse Designs® images, you can create fantastic projects quickly. Stampendous stamps are beautifully enhanced by the simple blending made possible with this range of innovative markers. The colorless blending tool acts as a “foolproof” finish for your project. You won’t believe the stunning range of colors that can be achieved with these markers, and the array of original projects you can create with the combination of Stampendous and Chameleon.

The new Cozy Kitten stamp is so adorable and is easy to color. Create a fun matching background with the detail pen from the Chameleon set and color it to match the Kitty's pillow!

V313_LH_800

Supplies
Stampendous:V313 Cozy Kitten
MPW811 Mixed Media White Paper
MEM01 Memento™ Tuxedo Black Ink by Tsukineko®
Plus:Epic Black & Red Pepper Classic Linen Cover Stock by Neenah Paper®
Chameleon™ Markers (RD4, NU1, OL3, PK3, NU3, BR2, YO3, CB, D, BK4)
Gold Buttons
Double-Sided Tape
Zip Dry™ Paper Glue by Beacon Adhesives

Instructions:

  1. Fold a 5 1/2" x 8 1/2" piece of red cardstock in half to form an A2 top-fold card.
  2. Stamp the Cozy Kitten on a  2 1/4" x 3" piece of white cardstock and color with Chameleon pens.
  3. Use the Chameleon Detail pen to draw angled lines on a piece of white 4" x 5 1/4" cardstock and color with Chameleon pens to match the kitten's pillow.
  4.  Adhere the background on the card front.
  5.  Adhere the Kitten to a black mat, then a red mat, then adhere both layers to the lower right side of the card.
  6.  Make a small red flag and attach to the upper left, and attach 2 buttons with Zip Dry.

Friday team members sharing ideas:

Louise Healy
Chameleon Pens Blog


Happy Creating,
Louise

Thursday, July 16, 2015

Dreamweaver and Chameleons

Today is Dreamweaver Thursday and the Stampendous Design Team is so excited to be sharing the designs from the July 2015 Stampendous Catalog with you this week! Over the next several weeks, our weekly themes will spotlight different parts of the catalog. This week we are starting off with a theme of  "Christmas in July". There are so many beautiful designs to choose from, it was hard to choose just five for this week!

Our designs were colored with the fabulous Chameleon markers, so we are having a Blog Hop this week too! You won't want to miss a day of the fun, and of course, there are PRIZES! A huge thank you to Chameleon for providing each design team member a complete set of their great markers!


Chameleon™ Art Products is a company determined to change the way you think about marker pens. They pride themselves on having developed real innovation that enhances your ability to maximize your creativity. Their markers bring color control and simplicity to your art, and you can create stunning 3D effects, smooth transitions, highlights, and shading gradations all with one pen.

When you combine this simple coloring versatility with Stampendous® and House-Mouse Designs® images, you can create fantastic projects quickly. Stampendous stamps are beautifully enhanced by the simple blending made possible with this range of innovative markers. The colorless blending tool acts as a “foolproof” finish for your project. You won’t believe the stunning range of colors that can be achieved with these markers, and the array of original projects you can create with the combination of Stampendous and Chameleon.

Hmmm...can you really use Chameleon markers with your stencils?  ABSOLUTELY! Here is the Dreamweaver Snowman, pasted with Regular Embossing Paste, dried, then colored with the markers!

DWLG645_LH_800


Supplies
Stampendous:EJS02 Spoonful of Snow Embossing Powder and Elements
EP525 Sparkle Puff Embossing Powder

Dreamweaver:
DWLG645 Snowman Stencil
DWDEP Regular Embossing Paste
DWDPK Palette Knife
DWLM2010 Paste Spreader

Plus:Tropical Cardstock by Bazzill Basics Paper®
Chameleon Pens (OR4, BR5, BL6, CG8, BK4, CB)
Double-Sided Tape
Heat Embossing Tool

Instructions:

  1. Fold a 4 3/4" x 12" piece of Tropical cardstock in half to form an A6 top-fold card.
  2. Tape a 4 1/4" x 5 1/4" piece of Solar White cardstock to the front of the card.
  3. Paste emboss the Snowman stencil on white cardstock (3 1/2" x 4 1/2") with Regular Embossing Paste using a Palette Knife and Paste Spreader, remove stencil and place in water for cleaning.
  4. Sprinkle the wet paste with Sparkle Puff Embossing Powder on the snowflakes and snow at the bottom only, tap off extra, let paste dry, heat set the powder.
  5. Place the clean, dry stencil back over the Snowman and use Chameleon pens to color the dry paste of the snowman, remove stencil and finish coloring.
  6. Tape the Snowman to a mat of Tropical cardstock 3 3/4" x 4 3/4", then to the front of the card.
  7. Sprinkle the "ground" area with Spoonful of Snow, heat from below to set.

Thursday team members sharing ideas:


Chameleon Stampendous Blog Hop additional members:

Happy Creating,
Louise

Wednesday, July 15, 2015

Beary Christmas!

The Stampendous Design Team is so excited to be sharing the new designs from the July 2015 Stampendous Catalog with you this week! Over the next several weeks, our weekly themes will spotlight different parts of the catalog. This week we are starting off with a theme of  "Christmas in July". There are so many beautiful designs to choose from, it was hard to choose just five for this week!

Our designs were colored with the fabulous Chameleon markers, so we are having a Blog Hop this week too! You won't want to miss a day of the fun, and of course, there are PRIZES! A huge thank you to Chameleon for providing each design team member a complete set of their great markers!


Chameleon™ Art Products is a company determined to change the way you think about marker pens. They pride themselves on having developed real innovation that enhances your ability to maximize your creativity. Their markers bring color control and simplicity to your art, and you can create stunning 3D effects, smooth transitions, highlights, and shading gradations all with one pen.


When you combine this simple coloring versatility with Stampendous® and House-Mouse Designs® images, you can create fantastic projects quickly. Stampendous stamps are beautifully enhanced by the simple blending made possible with this range of innovative markers. The colorless blending tool acts as a “foolproof” finish for your project. You won’t believe the stunning range of colors that can be achieved with these markers, and the array of original projects you can create with the combination of Stampendous and Chameleon.

This darling stamp makes for a fun, happy holiday card. Add a little Spoonful of Snow here and there for extra texture and sparkle!

P274_LH_800

Supplies:

Stampendous:P274 Bear Sled
MPW811 Mixed Media White Paper
EJS02 Spoonful of Snow
MEM01 Memento™ Tuxedo Black Ink by Tsukineko®
Plus:Peeled Paint Cardstock  by Core'dinations®
Winter Wonderland Paper by My Mind's Eye
Classic® Red Pepper Linen Cover Stock by Neenah Paper®
Chameleon™ Markers (BR2, BR5, RD4, CG8, PK3, NU3, BK4, OL3, CB
Heat Tool
Double-Sided Tape

Instructions:

  1. Fold a 5 5/8" x 9 1/4" piece of green cardstock in half to form a top-fold card.
  2. Stamp the Bear Sled  on a  3 1/2" x 4 1/2" piece of white Mixed Media Paper and color with Chameleon pens, trim to 3 1/8" x 4 1/8", mat on a 3 1/4" x 4 1/4" red mat.
  3. Sprinkle Spoonful of Snow in various parts of the background and heat from below to set.
  4. Edge a piece of striped paper (4 1/4" x 5 1/4") with the red marker and tape to the front of the card.
  5.  Tape two 1/4" or 1/2" strips of green cardstock on the striped paper to look like ribbon.
  6.  Tape the image to the front of the card.

Wednesday team members sharing:

Louise Healy
Chameleon Pens Blog

Happy Creating,
Louise

Tuesday, July 14, 2015

Nestled in Bed!

The Stampendous Design Team is so excited to be sharing the new designs from the July 2015 Stampendous Catalog with you this week! Over the next several weeks, our weekly themes will spotlight different parts of the catalog. This week we are starting off with a theme of  "Christmas in July". There are so many beautiful designs to choose from, it was hard to choose just five for this week!

Our designs were colored with the fabulous Chameleon markers, so we are having a Blog Hop this week too! You won't want to miss a day of the fun, and of course, there are PRIZES!


Chameleon™ Art Products is a company determined to change the way you think about marker pens. They pride themselves on having developed real innovation that enhances your ability to maximize your creativity. Their markers bring color control and simplicity to your art, and you can create stunning 3D effects, smooth transitions, highlights, and shading gradations all with one pen.

When you combine this simple coloring versatility with Stampendous® and House-Mouse Designs® images, you can create fantastic projects quickly. Stampendous stamps are beautifully enhanced by the simple blending made possible with this range of innovative markers. The colorless blending tool acts as a “foolproof” finish for your project. You won’t believe the stunning range of colors that can be achieved with these markers, and the array of original projects you can create with the combination of Stampendous and Chameleon.

Today I'm sharing another sweet House-Mouse Design called Nestled in Bed. Can't you just image the sugar plums dancing through their dreams! 

Supplies:

Stampendous:
HMR39 Nestled in Bed
CRS5073 Cling Filigree Set
PW811 Mixed Media White Paper
MEM01 Memento™ Tuxedo Black Ink by Tsukineko®
Plus:
Cardstock by Bazzill Basics Paper®
Memento™ Bamboo Leaves Ink by Tsukineko®
Kraft Cardstock
Chameleon™ Markers (RD4, NU1, PK3, YG3, BG4, OR4, YO3, BR5, CG8, BR2, NU3, CB)
Ribbon by May Arts
Double-Sided Tape
ZipDry™ Paper Glue by Beacon Adhesives™

Instructions:

  1. Fold a 7" x 10" piece of blue cardstock in half to form a top-fold card.
  2. Stamp the Filigree on the top of a 4 3/4" x 6" piece of white cardstock with Bamboo Leaves, use a 1/2" brush to add more green to the background.
  3. Tape a 2 1/4" x 6" piece of kraft cardstock near the bottom of the filigree and color with BR2 and BR5 to look like a wood floor, add a strip of blue cardstock across the middle, then two pieces of Yellow May Arts ribbon across the blue, add to the front left of the card.
  4. Stamp the Peace On Earth on a  4 1/4" x 5 1/2" piece of white cardstock and color with Chameleon pens, trim to 4" x 5 1/4", mat on a blue mat 4 1/8" x 5 3/8".
  5. Use foam tape to add the image to the front add a small yellow bow on the right hand side.

Tuesday team members playing along!


Happy Creating,
Louise

Monday, July 13, 2015

Stampendous and Chameleon Color Your Week!

The Stampendous Design Team is so excited to be sharing the new designs from the July 2015 Stampendous Catalog with you this week! Over the next several weeks, our weekly themes will spotlight different parts of the catalog. This week we are starting off with a theme of  "Christmas in July". There are so many beautiful designs to choose from, it was hard to choose just five for this week!

Our designs were colored with the fabulous Chameleon markers, so we are having a Blog Hop this week too! You won't want to miss a day of the fun, and of course, there are PRIZES!


Chameleon™ Art Products is a company determined to change the way you think about marker pens. They pride themselves on having developed real innovation that enhances your ability to maximize your creativity. Their markers bring color control and simplicity to your art, and you can create stunning 3D effects, smooth transitions, highlights, and shading gradations all with one pen.

When you combine this simple coloring versatility with Stampendous® and House-Mouse Designs® images, you can create fantastic projects quickly. Stampendous stamps are beautifully enhanced by the simple blending made possible with this range of innovative markers. The colorless blending tool acts as a “foolproof” finish for your project. You won’t believe the stunning range of colors that can be achieved with these markers, and the array of original projects you can create with the combination of Stampendous and Chameleon.


Today I am sharing this quick and easy card featuring the adorable Peace on Earth stamp from the House-Mouse Designs line at Stampendous. Chameleon was kind enough to provide each design team member with the full set of their fabulous markers, so it made coloring this darling design a snap!

HMR35_LH_800

Supplies:

Stampendous:
HMR35 Peace on Earth
MPW811 Mixed Media White Paper
MEM01 Memento™ Tuxedo Black Ink by Tsukineko®
Plus:
Sea Water Cardstock by Bazzill Basics Paper®
An Eerie Tale Abracadabra Patterned Paper by Graphic 45®
Chameleon™ Markers (NU3, OR4, BR2, YG3, CG8, CB, GR3, OL3, YL2, RD4, NU1, BG4, BL3, BR5, YO3, BV4)
Double-Sided Tape
ZipDry™ Paper Glue by Beacon Adhesives™

Instructions:

  1. Fold a 6 1/4" x 10" piece of blue cardstock in half to form a top-fold card.
  2. Stamp the Peace On Earth on a  4 1/4" x 5 1/2" piece of white Mixed Media cardstock and color with Chameleon pens, trim to 3 7/8" x 5 1/8", mat on a blue mat 4 1/8" x 5 3/8".
  3. Cut a piece of decorative cardstock 4 1/2" x 5 3/4", tape to the front of the card.
  4. Tape the image to the front of the card.

Monday team members sharing more fun designs:

Louise Healy


Happy Creating,
Louise

Thursday, July 9, 2015

Dreamweaver Thursday

Welcome to another Stampendous Dreamweaver Thursday! This week our theme has been "Go Climb a Tree!". It just brings back so many memories, both from my own childhood, and my kids. When we lived in Maryland, my husband built our boys a wonderful tree house that all the neighborhood kids LOVED! So many wonderful summer days with a yard full of happy kids. That saying "Enjoy the little things in life" is so true, life has a way of speeding by before we realize it!

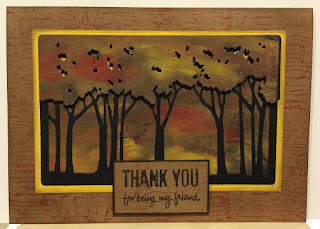
Enough of that. Dreamweaver has so many lovely tree stencils, and a couple of dies. Tuesday I shared my summertime version of the Leafless Tree die (if you missed it, click HERE). Today I thought I would share another Dreamweaver die, Tree Line (DG745) in fall colors.


Dies help you create quick, beautiful cards. Here's how I did it:


Die cut the Tree Line on black cardstock and adhere to a yellow mat

Use the Creative Palette and acrylic paints to create a fall colored background paper,  let dry
Die cut the Tree Line from the background paper you created, cut the tops off the trunks

Adhere the background papers to the openings of the black matted image
Use foam tape to add the "leaves" to the tree tops
Stamp the front of an A7 kraft cardstock card using Stampendous Industrial Set (ASCRS03)
Stamp sentiment on a small piece of stamped kraft using Stampendous Happy Greetings Set (SSC1214)

Check out these "tree-mendous" creations too:

Louise Healy

BIG NEWS - Starting next week we will be sharing our creations from the new Stampendous Holiday Catalog. All the coloring was done with Chameleon Color Tones Pens so we'll be having a week long hop with them too.  Of course, what's a hop without some prizes! Don't miss a day of it.


Happy Creating,
Louise