Friday, August 26, 2016

Berry Decorations!

This week the Stampendous Design Team is sharing samples combining stamps from the July catalog and the beautiful papers given to us by Graphic45. Their papers are gorgeous and versatile, they look great on big projects or small ones.

Today I'm sharing a card featuring the darling new House Mouse Berry Decorations Stamp, two Graphic45 papers and a scrumptious ribbon from Creative Impressions.


Stampendous:
HMCR77 Berry Decorations Cling Stamp
GL220U Crystal Glitter
MPW811 Mixed Media White Paper
Acrylic Handle
MEM01 Memento™ Tuxedo Black Ink by Tsukineko®

Plus:
My Colors Cardstock - Dare Devil, Evergreen
Graphic 45 HoHoHo 4500988, Merry Mistletoe 4500991
Copic Sketch Markers - G12, G14, G17, G20, Y0000, Y06, YR000, R29, R30, R39, E27, E37, E42, E49, E53, W0, W2, W4, B60, BG10
Creative Impressions 1/4" Red and Green Grosgrain Ribbon 80234
Beacon Adhesive Fabri Tac
Scotch Quick Dry Adhesive
Foam Tape
Craft Glue Dots
Zutter 1/2" corner rounder

Instructions:
Step 1:  Fold a 7" x 10" piece of Dare Devil cardstock in half to form an A7 top fold card, round all corners
Step 2:  Stamp the Berry Decorations image on a 4" x 5" piece of white cardstock with Tuxedo Black ink, color with Copic markers
Step 3: Trim image to 3 5/8" x 4 3/4",  round all corners, mat on a 3 3/4" x 4 7/8" piece of Evergreen with rounded corners
Step 4:  Use a small paint brush to add some glue in "snow" area at the bottom of the image, sprinkle wet glue with Crystal Glitter, tap off extra, let dry
Step 5:  Cut a 2" x 4 3/4" piece from the HoHoHo paper and a 4 3/4" x 4 3/4" piece of the Merry Mistletoe paper, round two corners on each making sure the words are going the right directions, edge with the G17 marker, adhere to card front
Step 6:   From the Evergreen paper cut one 1/2" x 4 3/4" piece and one 1/2" x 6 3/4" strips, adhere the shorter one over the seam and the longer across the front near the bottom
Step 7:  Use FabriTac to adhere the ribbon to the two green strips
Step 8: Use foam squares to attach the mouse image
Step 9: Tie a small matching bow and adhere to the left side with a Craft Glue Dot

Go to the Stampendous Blog for more ideas!

Happy Creating,

Louise

Thursday, August 25, 2016

Classic Poinsettia

This week the Stampendous Design Team is sharing samples combining stamps from the July catalog and the beautiful papers given to us by Graphic45. Their papers are gorgeous and versatile, they look great on big projects or small ones.

Today I'm sharing a card featuring two stencils and two Graphic45 papers. Dreamweaver's Merry Christmas stencil combines well with Fran's new Classic Poinsettia stencil to create this vintage Christmas card.


Supplies:

Stampendous:
FMS4041 Classic Poinsettia Metal Stencil
DCP1005 Fitted Frames A Die Cut Set
MG01 Crystal Micro Glitter
MG02 Gold Micro Glitter
MG08 Lime Micro Glitter
MG10 Teal Micro Glitter
MG11 Red Micro Glitter

Dreamweaver:
DWLS92 Merry Christmas Stencil
DWDEPT Dreamweaver Translucent Embossing Paste
DWDPK Dreamweaver Palette Knife
DWLM2010 Paste Spreader

Plus:
Red Cardstock
Cream Cardstock
Graphic 45 Good Cheer 4501191
Double sided mounting paper
VersaMark Ink
Die Cut Machine
Copic BG72
Foam Tape

Instructions:
Step 1:  Fold a 7" x 10" piece of Red cardstock in half to form an A7 card
Step 2: Cut a 4 3/4" x 6 3/4" piece of the Graphic 45 paper, cut that piece into two pieces, one 3 1/4" x 4 3/4" and one 3 1/2" x 4 3/4", edge with BG72
Step 3:  Adhere the Graphic 45 pieces to the card front using one pattern at the top and the other pattern at the bottom, adhere a 3/4" x 4 3/4" strip of red cardstock across the seam
Step 4:  Cut a 4" x 5" piece of cream cardstock and a matching piece of double sided mounting paper, attach one side of the mounting paper to the cardstock
Step 5:  Pat VersaMark all over the back of the Classic Poinsettia Stencil
Step 6: Remove the remaining release paper from the double sided mounting paper and carefully place the stencil on the sticky surface with the VersaMark side against the sticky surface, use a piece of release paper to press the stencil in place
Step 7:  Apply the red glitter on the petals, being careful not to get any in the center or on the leaf, rub in place, tap off extra (work in small sections at a time so you can tap off away from areas you want to protect, apply Gold glitter to the center, rub down, tap off extra
Step 8: For the "green" take a little Lime and mix it with some Teal (I did this to match the paper I was using), apply the mixture to the leaf, rub it in, tap off extra
Step 9: Turn the glittered image face down on a paper towel and carefully peel the paper off the stencil making sure to keep the stencil flat on the table, apply Crystal glitter to the background, tap off extra, cut out flower
Step 10:  Die cut a 4" x 4" piece of Good Cheer and a 4 1/4" x 4 1/4" piece of red from the Fitted Frames A Set, edge the Good Cheer with BG72, adhere the frames together and add to card front using foam tape
Step 11:  Use Foam Tape to add the Poinsettia image to the frames
Step 12:  Tape the Merry Christmas stencil to a 1 1/2" x 2 1/2" piece of Cream cardstock with removable tape
Step 13:  Use a palette knife and paste spreader to apply Translucent Embossing Paste over the design, remove stencil and place in water for cleaning later
Step 14:  Sprinkle the "M" and "C" with Red Micro Glitter, and the rest of the letters with the Lime/Teal  combined glitter, tap off extra, let paste dry thoroughly
Step 15:  Adhere the dry Merry Christmas to a 1 5/8" x 2 5/* red mat then to the lower right side of the card front

Stop over at the Stampendous Blog for a list of designers with more great samples!

Happy Creating,
Louise

Monday, August 22, 2016

Wonderous Kitten!

This week the Stampendous Design Team is sharing samples combining stamps from the July catalog and the beautiful papers given to us by Graphic45. Their papers are gorgeous and versatile, they look great on big projects or small ones.

Today I'm sharing a card featuring the darling new Wonderous Kitten Stamp and two Graphic45 papers and a scrumptious ribbon from Creative Impressions.


Stampendous:
CRW173 Cling Wonderous Kitten Stamp
MPW811 Mixed Media White Paper
Acrylic Handle
MEM01 Memento™ Tuxedo Black Ink by Tsukineko®

Plus:
My Colors Cardstock - Firecracker, Evergreen, Mint Julep
Graphic 45 HoHoHo 4500988, Merry Mistletoe 4500991
Copic Sketch Markers - E42, E44, E47, E51, R00, R30, R29, R89, B0000, B60, YG11, YG17, YG67,100
Creative Impressions 3/4" Green Crepe Ribbon 70149
Foam Tape
Ruler, pencil, scissors

Instructions:
Step 1:  Fold a 7" x 10" piece of Firecracker cardstock in half to form an A7 top fold card
Step 2:  Stamp the Wonderous Kitten image on a 3 3/4" x 4 1/4" piece of white cardstock with Tuxedo Black ink, color with Copic markers
Step 3: Use a ruler and pencil to draw a light line across the image down near paws, trim image across the line, cutting around the paws, edge with the 100 marker
Step 4:  Cut a 4 1/4" x 4 3/4" piece of the Merry Mistletoe paper (red side), edge with 100, adhere to the right side of the card front
Step 5:  Cut a 2 1/2" x 4 3/4" piece of the Evergreen paper, adhere to the left of the Merry Mistletoe paper
Step 6:   Cut a 2" x 4 3/4" piec of Mint Julep paper and adhere it to the Evergreen piece
Step 7:  Cut a 1 3/8" x 4 3/4" piece of the HoHoHo paper (striped pattrn side), cut a ribbon edge at the bottom, edge with 100, adhere to a 1 1/2" x 4 7/8" piece of Evergreen, trim the bottom to match the ribbon cut, adhere to the Mint Julep layer
Step 8: Wrap the ribbon around the card and tie a bow on the left side
Step 9: Use foam tape to attach the kitten image

See the Stampendous Blog for the list of designers with more great samples combining Stampendous and Graphic45!

Happy Creating,
Louise

Wednesday, August 17, 2016

Love you to the Moon!


Artist Nicoletta Zanella from the Pink Your Life Design Team has created some wonderful, whimsical characters that are now part of the Stampendous Family. We're so excited to welcome the Whisper Friends to our lineup and have a chance to play with these darling images. Our July catalog introduced Pink Your Life to stamping audiences everywhere, and we know you'll be as excited as we are.

The Stampendous design team is back for a second week of Pink Your Life in a blog hop with prizes, just as we promised back in July during our sneak peek week. 

We'll be giving away one set of each Pink Your Life Perfectly Clear Stamp Set. US winners only.

SSCP103 Whisper Friends Perfectly Clear Stamps Set
SSCP104 Whisper Friends Christmas Perfectly Clear Stamps Set
SSCP105 Whisper Houses Perfectly Clear Stamps Set
SSCP101 Little Angels Perfectly Clear Stamps Set
SSCP102 Mushrooms Perfectly Clear Stamps Set


Here's a sweet little card featuring the Little Angel stamp (PLV01) from Pink Your Life.


Stampendous:
PLCV01 Little Angel Cling Stamp
SSC1213 Life Words Perfectly Clear Set
DCP1005 Fitted Frames A Cutting Dies
MPW811 Mixed Media White Paper
Acrylic Handle
MEM01 Memento™ Tuxedo Black Ink by Tsukineko®

Plus:
My Colors Cardstock - Tuscan Sun, Coral Rose
Copic Sketch Markers  Y00, Y02, Y17, YR000, R00, R81, R85, R89, B60, B41, E53, C1, T3, 0
Foam Tape
Creative Impressions Crepe Ribbon
Die Cut Machine

Instructions:
Step 1:  Fold a 5 1/2" x 11" piece of Tuscan Sun cardstock in half to form a top fold A2 card
Step 2:  Stamp the Little Angel on a 2 3/8" x 3 1/4" piece of white cardstock with Memento Tuxedo Black ink
Step 3: Color images with the Copic Markers
Step 4:  Mount the colored Angel on a 2 5/8" x 3 1/2" piece of Coral Rose cardstock
Step 5:  Stamp to sentiment on white cardstock and use a small square die from the Fitted Frames A set to cut out the sentiment and a matching Coral Rose mat
Step 6: Tie a matching ribbon around the bottom edge of the card and tie a small knot
Step 7:  Use foam tape to adhere the Little Angel and the sentiment to the card front


See more ideas and get the details for winning a prize over at the Stampendous Blog!

Louise Healy

Happy Creating,
Louise

Thursday, August 11, 2016

If You Give a Mouse a Paint Brush!

If You Give a Mouse a Paint Brush! That's the theme at HOOT - no, not a festival of owls, the Heart of Ohio Tole Convention - http://heartofohiotole.org/convention/ this week in Columbus, OH. Stampendous has been featuring the beautiful painting of designer Debbie Cole. If you've missed some of the projects, you will want to go back and check them out!

I think "If You Give a Mouse a Paint Brush..." they would paint a beautiful background for this beautiful dragonfly stencil!

Supplies:
SSH34 Medium Handle
DWLM193 Dreamweaver Dragonfly Stencil
DWDMBP Matte Black Embossing Paste
DPK Palette Knife
SSC1214 Happy Greetings Perfectly Clear Stamps
MEM01 Memento Tuxedo Black Ink
Watercolor Paper
Black cardstock
Olive cardstock
Brayer
Small Paint Brush
Acrylic Paint - Spanish Olive, Bright Yellow, Orange, Holiday Red

Steps:
  1. Cut a 4" x 5" piece of watercolor paper, mist with water
  2. Place the various colors of paint along the long edge of the Medium Handle, spread with a brayer, mist lightly with water, "stamp" the paint onto the watercolor paper
  3. Use a damp paint brush to smooth out the colors
  4. When the paint is dry, tape the Dragonfly Stencil to the background with removable tape
  5. Use a palette knife to spread Matte Black Embossing Paste across the  stencil, remove stencil and place in water for cleaning, let paste dry
  6. Stamp the sentiments from the Happy Greetings set
  7. Cut a 6" x 10" piece of Olive cardstock, score and fold to form a 5" x 6" card
  8. Mount the dragonfly on a 4 1/4" x 5 1/4" piece of black cardstock, then on the card front

The acrylic block is the perfect way to create beautiful backgrounds when you want a distinct shape.  Of course, the Creative Palette is perfect to use when you want to create a bigger background.


Happy Creating,

Louise

Friday, August 5, 2016

Blog Hop Finale!

Welcome to the Stampendous and Creative Impressions blog hop finale! 


This week the design team has been sharing samples we created for the July catalog featuring ribbons and embellishments from Creative Impressions.  A big THANK YOU to Creative Impressions for providing our team members with TONS of their wonderful  ribbons and hardware!!

What's a hop without PRIZES!


Comment for a chance to win one of these great prize packages! US winners only. See Official Rules for details. Deadline to comment is Sunday, August 7th, midnight PDT. Winners will be announced early next week.

Three prize packages that include:
An assortment of ribbons and hardware
PLUS winner’s choice of Create Winter, Create A Poinsettia or Create Fall Stamp Set


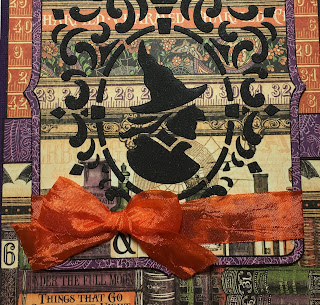
Today I'm featuring one of Frans wonderful new stencils called Framed Witch (FMS4036) and some gorgeous orange crepe ribbon from Creative Impressions!


Supplies:


Stampendous:
FMS4036 Framed Witch Metal Stencil
DCP1006 Fitted Frames B size R

Dreamweaver:
DWDMBP Matte Black Embossing Paste
DWDPK Dreamweaver Palette Knife
DWLM2010 Paste Spreader

Plus:
My Color Cardstock - Deep Purple
Graphic 45 Charmed I'm Sure 4501143
Graphic 45 Brews and Potions 4501144
Copic Marker 100
Removable Tape
Creative Impressions 3/4" Orange Crepe Ribbon 70147
Die Cut Machine
Foam Tape

Instructions:
Step 1:  Fold a 7" x 10" piece of Deep Purple cardstock in half to form an A7 card
Step 2: Cut a 4" x 4 3/4" piece of the Charmed I'm Sure paper, edge with 100, adhere to the card front near the top edge, make sure the ruler pattern is going the right direction
Step 3: Cut a 3 3/4" x 4 3/4" piece of the Brews and Potions paper, edge with 100, adhere to the card front under the top paper, watch direction of pattern, adhere a 5/8" x 4 3/4" piece of the purple side of Brews and Potions (edged with 100) across the seam
Step 3:  Tape the Framed Witch stencil to a 4 1/2" x 5 1/2" piece of Brews and Potions paper (striped images side) with removable tape
Step 4:  Use a palette knife and paste spreader to apply Matte Black Embossing Paste over the design, remove stencil and place in water for cleaning later, let paste dry
Step 5: When the paste is dry, use the Fitted Frames die size R to cut the Witch, and, the matching frame (from the purple side of a 4 1/2" x 5 1/2" piece)
Step 6: Edge both frames with the 100 marker and adhere together, wrap an orange ribbon around the lower part of the witch image and tie a bow
Step 7:  Use foam tape to add the frames to the card

Look how beautiful this ribbon is!


Here's the Blog Hop list:

Louise Healy

Happy Creating,
Louise

Thursday, August 4, 2016

Stampendous and Creative Impressions!

Welcome to the Stampendous and Creative Impressions blog hop! 


This week the design team has been sharing samples we created for the July catalog featuring ribbons and embellishments from Creative Impressions.  A big THANK YOU to Creative Impressions for providing our team members with TONS of their wonderful  ribbons and hardware!!

What's a hop without PRIZES!


Comment for a chance to win one of these great prize packages! US winners only. See Official Rules for details. Deadline to comment is Sunday, August 7th, midnight PDT. Winners will be announced early next week.

Three prize packages that include:
An assortment of ribbons and hardware
PLUS winner’s choice of Create Winter, Create A Poinsettia or Create Fall Stamp Set


Today is Thursday, so I'm sharing a creation using stencils and some great ribbon and brads from Creative Impressions.


Stampendous:
MG11 Red Micro Glitter

Dreamweaver:
DWLM250 Merry Christmas Stencil
DWLL467 Three Deer Stencil
DWDGP Metallic Gold Embossing Paste
DWDPK Dreamweaver Palette Knife
DWLM2010 Paste Spreader

Plus:
My Colors Cardstock - Firecracker
Cream Cardstock
Graphic 45 Merry Mistletoe 4500991
Creative Impressions 80234 1/4" Red and Green Grosgrain Ribbon
Creative Impressions Brads
Copic Marker R29
Foam Tape
Removable tape

Instructions:
Step 1:  Fold a 7" x 10" piece of Firecracker cardstock in half to form an A7 card
Step 2: Tape the Merry Christmas and Three Deer stencils to a 4" x 6" piece of cream cardstock with removable tape
Step 3:  Use a palette knife and paste spreader to apply a coat of Metallic Gold embossing paste over the image, remove stencils and place in water for cleaning, carefully sprinkle the red glitter on the "MERRY" and the reigns connecting the reindeer, tap off extra, let paste dry
Step 4:  Trim the dry, pasted image to 3 3/4" x 5 3/8"
Step 5:  Adhere the trimmed image to a 4" x 5 5/8" mat cut from the Merry Mistletoe paper, using the more red side, edge the patterned paper with the R29 marker
Step 6: Adhere a piece of the red and green ginham ribbon across the center, punch two small holes and add two brads
Step 7:  Cut a 4 3/4" x 6 3/4" piece of the Merry Mistletoe paper using the more creamy side, edge with R29, adhere to front of card
Step 8: Use foam tape to add the pasted image to the card front setting it at an angle

Here's a close up of the embellishments:


Today's list of designers:

Louise Healy


Happy Creating,
Louise