This week the design team has been sharing samples we created for the July catalog featuring ribbons and embellishments from Creative Impressions. A big THANK YOU to Creative Impressions for providing our team members with TONS of their wonderful ribbons and hardware!!
What's a hop without PRIZES!
Comment for a chance to win one of these great prize packages! US winners only. See Official Rules for details. Deadline to comment is Sunday, August 7th, midnight PDT. Winners will be announced early next week.
Three prize packages that include:
An assortment of ribbons and hardware
PLUS winner’s choice of Create Winter, Create A Poinsettia or Create Fall Stamp Set
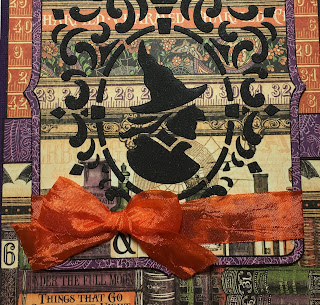
Today I'm featuring one of Frans wonderful new stencils called Framed Witch (FMS4036) and some gorgeous orange crepe ribbon from Creative Impressions!
Supplies:
Stampendous:
FMS4036 Framed Witch Metal Stencil
DCP1006 Fitted Frames B size R
DCP1006 Fitted Frames B size R
Dreamweaver:
DWDMBP Matte Black Embossing Paste
DWDPK Dreamweaver Palette Knife
DWLM2010 Paste Spreader
DWLM2010 Paste Spreader
Plus:
My Color Cardstock - Deep PurpleGraphic 45 Charmed I'm Sure 4501143
Graphic 45 Brews and Potions 4501144
Copic Marker 100
Removable Tape
Creative Impressions 3/4" Orange Crepe Ribbon 70147
Die Cut Machine
Foam Tape
Instructions:
Step 1: Fold a 7" x 10" piece of Deep Purple cardstock in half to form an A7 card
Step 2: Cut a 4" x 4 3/4" piece of the Charmed I'm Sure paper, edge with 100, adhere to the card front near the top edge, make sure the ruler pattern is going the right direction
Step 3: Cut a 3 3/4" x 4 3/4" piece of the Brews and Potions paper, edge with 100, adhere to the card front under the top paper, watch direction of pattern, adhere a 5/8" x 4 3/4" piece of the purple side of Brews and Potions (edged with 100) across the seam
Step 3: Tape the Framed Witch stencil to a 4 1/2" x 5 1/2" piece of Brews and Potions paper (striped images side) with removable tape
Step 4: Use a palette knife and paste spreader to apply Matte Black Embossing Paste over the design, remove stencil and place in water for cleaning later, let paste dry
Step 5: When the paste is dry, use the Fitted Frames die size R to cut the Witch, and, the matching frame (from the purple side of a 4 1/2" x 5 1/2" piece)
Step 6: Edge both frames with the 100 marker and adhere together, wrap an orange ribbon around the lower part of the witch image and tie a bow
Step 7: Use foam tape to add the frames to the card
Step 7: Use foam tape to add the frames to the card
Look how beautiful this ribbon is!
Here's the Blog Hop list:
Louise Healy
Happy Creating,


