Showing posts with label Delicata Golden Glitz. Show all posts

Thursday, April 23, 2015

Showers of Showers! Week 4

Ever use the expression, "When it rains, it pours"? This does not have to be a bad thing, does it? For the month of April, the Dream Team are featuring "Showers of Showers" as our theme. As usual, we'd love for you to play along. Just link your creation on the Dream It Up!blog for a chance to win the stencil of your choice...bonus chances for incorporating Dreamweaver and/or Stampendous in your design. Here's what I'm showering you with this week...
"May you be showered with happiness"
Letterpress technique
The Letterpress technique is so easy and creates a beautiful look. It just needs two simple steps.
First: ink the back of the stencil with Delicata ink Golden Glitz from Tsukineko (any color works)
Second: Place the stencil ink side up on the large platform of a die cut machine, place a piece of cardstock carefully on the stencil, then the rubber embossing mat, and finally, two plastic cutting plates. Run through the machine to transfer the ink to the paper. Of course, a beautiful ribbon from May Arts is always the perfect finishing touch.
Here's a close up:
Background:  LX7001 Damask
Saying:  LG738 Rain words 
Our "B" wants to "shower" you with lots more ideas, so be sure to stop over and leave them a "shower" of comments!

Happy Creating,
Louise
An InLinkz Link-up

Friday, August 15, 2014

Christmas in August Grand Finale!


Well, it has been a whirlwind week of creating for Dreamweaver and Woodware UK teams. We have loved sharing with you and hope you have enjoyed our creations! Our goal was to inspire crafters on both sides of the "pond" with a mix of bothDreamweaver and Woodware UK* products for the holidays! Six days, SIX, of beautiful, elegant, merry, cute, artsy, and craftsy projects to have you heading out to your local stores or internet sites to buy these goodies immediately!


Of course, there are prizes as well. Three prize packages will be given to three commenters during this week's posts on the team's blogs, including five stencils and one nested die set. You can have an opportunity to win these goodies by leaving some holiday sweetness for each team member posting each day, to be one of the three winners for the week. Here are the team members that are inspiring you today:


Here's my grande finale creation:


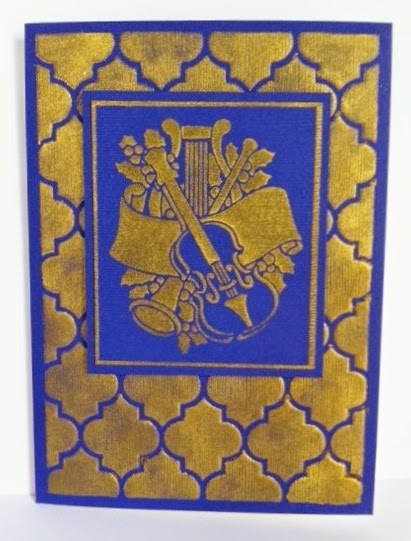
LX7027 Quatrefoil and LL589 Musical Christmas

I knew I had to do something with this beautiful new background stencil, Quatrefoil LX7027. Isn't it gorgeous!!! But at the holidays, I'm all about cards that are easy to mass produce because I make A LOT of cards. This could not be any easier. Simply tape the background stencil to a piece of purple (yes, it actually is purple, I could not get the light to hit it right so that it would photograph as purple and not blue) and use a 1/2" or 3/4" brush to stencil with the beautiful Delicata Golden Glitz ink from Tsukineko. This is by far the easiest metallic gold ink I have ever worked with and a little heat gun on it sets the color so it won't smudge. It looks wonderful just stenciled, but if you want to add a little more dimension, you could dry emboss your image first. The Musical Christmas, LL589, stencil was done the same way, then after I trimmed it to the size I wanted, I used a piece of cardstock as a ruler and edged around the design with the ink too. Mount the instruments onto another layer of purple and use foam tape to mount them to the background. Add to the front of a base card that you have stenciled or stamped with a sentiment.


LL453 Season's Greetings
The image on the front and the sentiment can easily be changed for whatever occasion you need!  Thanks for all the wonderful comments this week, I have enjoyed reading all of them. They are MY inspiration!

*For a stockist near you contact Woodware Craft Collection in the UK and Notions Marketing in the USA.

Happy Creating,
Louise

Tuesday, June 10, 2014

Dreamweaver and Imagine Crafts Day 2!


 Welcome to Day 2 of our first ever collaboration week with Imagine Crafts/Tsukineko! We've shared all of our toys on both sides, so be prepared for Endless Possibilities! Three prize packages are available, each containing one set of each of these inks and stencils/dies. Just leave comments on each post of each day this week (June 9th - June 13th) for a chance to win! Winners will be announced on Tuesday, June 17th!
Imagine Crafts New StazOn Pads from Tsukineko
Stencils and Dies Prize Package

I was so inspired by yesterday's projects using the irRESISTible sprays that I had to try them for myself! Here's what I created for you today:
LL3039 Owl buddy, DG751 Nesting Owls, LJ849 Bare Trees
He has a few steps, but I had so much fun and love how he turned out. Follow the directions to create your own design!

  • Place the Owl buddy stencil (LL3039) on cream cardstock in the bottom of your spray box
  • Shake the Bronze irRESISTible spray from imagine crafts vigorously
  • Spray over stencil until you get the level of coating you like (too much will cause some leaking under the stencil edges)
  • Lift off the stencil and place in water for cleaning, let the owl dry
  • Meanwhile, place the clean stencil face down on a paper towel in the spray box
  • Spray over the back of the stencil with the Bronze spray until a nice coating covers the stencil
  • Carefully lift the stencil by the edges and take it out of the box onto a clean paper towel
  • Immediately lay a piece of glossy cardstock over the inked stencil, rub it gently, then peel it off (you have to work quickly because the irRESISTible starts to dry immediately)
  • Place the stencil in water and let the glossy paper dry
  • Repeat the process with the Bare Trees stencil (LJ849) on glossy cardstock to create the background - you must move very quickly with this one because of all the thin bridges
  • Use the matching owl from the Nesting Owls die set (DG751) to cut the pieces from the owl that was sprayed on natural cardstock. It's easy to line the die up over the sprayed image, cutting side toward the image, tape in place, and run through your machine
  • Edge each piece with a black marker, I used the Memento Tuxedo Black marker from imagine crafts
  • Glue each piece in place on the glossy cardstock image
  • Mat the owl and the trees on black mats
  • Add some beautiful ribbon from May Arts
  • The cardstock for the base card was too stark so I used an ink blusher from imagine crafts to rouge on some of their beautiful Delicata Golden Glitz ink, it gave a golden shimmer to the cardstock that matched the ribbon perfectly

A close up showing the glossy image with the die cut image glued in place
Here's what the glossy image looked like before the die cut piece were added, and the negative
left over after die cutting (which will be used in a different project!)

LL3039 Owl buddy and its matching die from DG751 Nesting Owls

Just Imagine the possibilities of what everyone else has created!

Happy Creating,
Louise