Showing posts with label SSC1146 - Mother's Love. Show all posts

Thursday, April 12, 2012

Dreamweaver Stampendous Blog Hop Day 4!


Well the blog hop has been a blast so far with 3 days to go! We hope you've enjoyed our creations so far and will continue to join us until Saturday for even more great samples.
Each day this week, you will be directed from both the Stampendous Impressions' blog or the Dream It Up! blog to the players du jour for your oohing and aaahing pleasure. Everyone will be playing on Saturday, the 14th with our final hop for the week. This is your opportunity to see how to mix and mingle your creativity...if you are a stenciler, you will be fascinated at combining stamps with your first love. If you are a stamper, you will be wowed at how stencils can add to your impressions.
Here's my creation for you today. It fills the Dreamweaver Stencils April challenge of "Bring May Flowers" and incorporates part of a wonder set from Stampendous called "Mother's Love" (SSC1146).


The steps to create this are:
  • Tape the Iris (LL320) stencil to light purple cardstock using removable tape
  • Use the Paste Spreader (LM2010) to apply Pearlescent Embossing Paste across the image
  • Use a soft paint brush to sprinkle Metallic F/X Powders ( 05 - Goldfinch, 11 - Ivy Garden, and 14 - Purple Satin) over the wet paste, it will look kind of messy at this point, but don't worry, it will be spectacular at the end!
  • Remove and clean the stencil, set the image aside to dry
  • Stamp the Happy Mother's Day saying on matching paper with Archival Jet Black ink (this is an acrylic stamp set, so I just snipped between the words and stacked them vertically on a grid block)
  • Layer on dark purple then on dark green cardstock using foam tape
  • When the paste is dry (about 50 minutes), use a swiffer cloth to wipe off the excess powders
  • Trim close around the design
  • Layer on dark purple, trim again
  • Layer on dark green cardstock with foam tape
  • Tape the Large flourish stencil (LJ896) to a corner of light green cardstock and use a 3/4" stencil brush to apply Distress Ink Forest Moss ink to the design
  • Layer on dark green cardstock
  • Embellish with a pretty ribbon
Be sure to leave comments as you tour the blogs (with your email addy!) for a chance to win one of three combined sets of these Dreamweaver and Stampendous goodies:

*For shipping and handling purposes, USA/APO/FPO/Canada winners only

 
Here are today's players


Leave me some love before you "gear up" for the next player!

Happy Creating,
Louise

Wednesday, April 11, 2012

Dreamweaver Stampendous Blog Hop Day 3!


Get ready to be inked, pasted, encrusted, stenciled and stamped! All of this week the Dreamweaver Stencils' Dream Team and the Stampendous Design Teams will be providing some "Dream-pendous" inspiration for you, with multiple opportunities to win some fabulous prizes from both companies. Each day this week, you will be directed from both the Stampendous Impressions' blog or the Dream It Up! blog to the players du jour for your oohing and aaahing pleasure. Everyone will be playing on Saturday, the 14th with our final hop for the week. This is your opportunity to see how to mix and mingle your creativity...if you are a stenciler, you will be fascinated at combining stamps with your first love. If you are a stamper, you will be wowed at how stencils can add to your impressions.

Stampendous SSC1146 Mother's Love
Dreamweaver Stencils LM281 Baby Toy Border
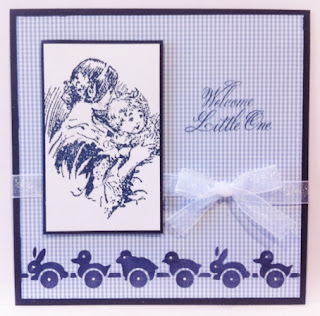
My fellow Dream Team Member, Pam Hornschu knew that this stamp set would be perfect for me, after all, I recently found out I'm going to be a Grandma soon! So thanks Pam. and Stampendous. People who know me, know that I love to create Clean and Simple (CAS) style cards most of the time and these stamps lend themselves to that style perfectly. I used Distress Ink Chipped Sapphire to stamp the mother and child image (SSC1146 Mother's Love) on smooth white paper, then mounted it on a small layer of navy cardstock. The Welcome Little One is stamped with the same ink directly on the  small gingham print. I taped the Baby Toy Border (LM218) along the bottom edge of the gingham and used a small stencil brush to add color with the same ink. The gingham was added to a layer of navy cardstock. I added a small sheer white ribbon around it and attached the navy layer to the front of a white card. The mother and child image was attached to the front with foam tape. Use an Inkssentials White Opaque Pen to add eyes to the animals and axels to the wheels.

Be sure to leave comments as you tour the blogs (with your email addy!) for a chance to win one of three combined sets of these Dreamweaver and Stampendous goodies:


*For shipping and handling purposes, USA/APO/FPO/Canada winners only.
Here are the Wednesday players.

__._,_.___
I will be publishing my creations on Wednesday, Thursday, and Saturday, but stop by each day for the list of that day's players. Good luck!
Happy Creating,
Louise