Thursday, May 9, 2013

Happy Mother's Day

Happy Mother's Day to all! I hope you have a wonderful day with your family, or even just by yourself doing crafts! Do you still need a "little something" for your Mother or friend? Then my project this week for the Dreamweaver Stencils May challenge of Tiny Treats or Treasures could be the perfect thing. It really doesn't take that long to make even though there are several steps.
I used the wonderful new Shasta Flower Trio (LL3031) stencil to create this fun notecard folder. This makes a great hostess gift or teacher gift too.

Shasta Flower Trio - LL3031

Start by cutting two pieces of chipboard 5" x 7", and
two pieces of decorative paper (text weight works best) 6" x 8"

Use a permanent glue stick to cover one side of the chipboard with a nice
coating of glue (you can use any adhesive that you like for this, I use glue sticks because
they are very inexpensive and do the job well)
Place it glue side down on the back of the decorative paper,
turn it over and burnish it well with a dry, wadded up paper towel or rag

Trim the corners, do not go all the way to the chipboard, you need a little
to cover the corners

Add glue to the edge of the chipboard and the paper,
bring the two long edges over first, then the two shorter one, tucking
in the little wing at the corners (like when you wrap a present),
burnish well
Repeat for the other cover

Use a contrasting piece of paper to create a spine 2 3/4" x 8",
on the back side of the spine paper
measure in 1" from each side, mark near the top and bottom
Put glue along the outer edges of the spine paper,
use the marks to line up the covers, centering top to bottom,
carefully turn the whole thing over and burnish well

Add glue to the small flaps at the top and bottom and
fold them in making sure to press them into the spine opening,
burnish well
To form the corner pockets for inside the folder
cut two pieces of the decorative paper 4" x 4"
Score 3/4" from two adjacent sides, crease well
Trim out the little square of paper from where the two creases crossed,
fold the opposite corner over to form a triangle, glue the triangle down,
repeat for the other piece
Cut a piece of contrasting paper (I like to use the same paper as the spine) 6 3/4" x 10 1/2"
Put glut on the two small flaps of one corner pocket and attach one pocket to each bottom corner
of the inside paper

Put glut on the entire back of the inside paper making sure to get all the way to the edges
Center the paper inside the covers burnishing it well all over
Press the paper gently into the spine area
Use a bone folder to carefully crease the paper into the spine

Fold in the two sides to form your folder
Cut 5 pieces of  yellow paper 2 1/2" x 4 1/2"
Tape your stencil to the paper with removable tape
Use a palette knife and paste spreader to apply
Dreamweaver Embossing Paste (regular matte white) to the stencil

Repeat for a total of 5 images
Wash and dry your stencil and tools

Let the paste dry for a couple of minutes (about 5)
Use a soft brush to carefully apply Dreamweaver Metallic F/X powders to the
flower centers and leaves (Goldfinch, Kiwi, Ivy Garden), let dry completely then
wipe off excess powders with a Swiffer cloth

Cut four white cards 4 1/4" x 11", score at 5 1/2" and fold in half
Add a strip of matching cover paper to one side of each card,
mount the flowers on small black mats and place one on each card
(black mat 2 5/8" x 4 5/8")

Put two cards and two envelopes in each side pocket

Mount one matted flower with foam tape to the cover,
add three Candies (paper brads, I colored them black to match)
You could also add a beautiful May Arts ribbon around the notebook before adding the image  and tie
a pretty bow for a closure.
 Well, I hope you made it all the way through! I know it was a lot of pictures, but these are so easy to make and with all the paper choices and stencil choices, the possibilities are truly endless! If you want to add more notecards, you would need to leave a wider spine and adjust the size of your inside paper accordingly.

Be sure to stop over at the other designer's blogs for more Tiny Treat ideas. We hope you will consider joining our challenge this month, just add your project to on the DREAM it UP! blog for a chance to win a beautiful stencil of your choice. You can also join the challenge by sending a picture of your project directly to lynell@dreamweaverstencils.com and she will post it for you. Good luck!


Happy Creating,
Louise

Thursday, May 2, 2013

Tiny Treats

Welcome to the Dreamweaver Stencils May designer challenge. This month we have been given the task of creating "Tiny Treats" (or gifts) perfect for teacher gifts, party favors, hostess gifts, well, I think you get the picture.
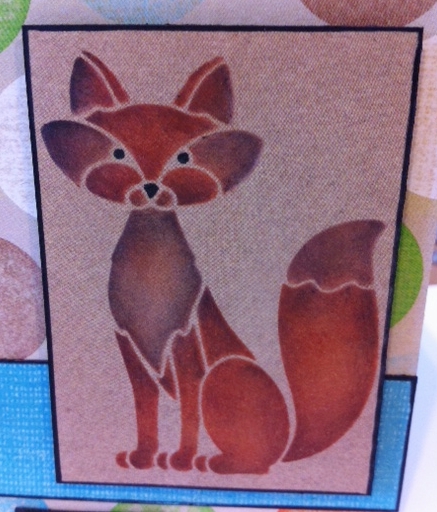
Dreamweaver Stencils just released 6 wonderful new stencils that should be getting to stores near you very soon. One of the new designs is a darling little fox. Actually, it comes in two sizes, which is even better! We live in the Tri-cities area of Illinois right along the Fox River, so this little guy immediately won my heart. I'm sure you'll be seeing several ideas for these new beauties in the next couple weeks on the team blogs.
This week I have created a little post-it note gift. I love how just a little paper and a cute design really dresses up an every day staple. I used to make these for my kids' teachers. They always appreciated them because we all know teachers can use a lot of notes throughout a school year. They make great little favors for parties too, and can be made in any size to fit whatever size notepad you have.
LM2016 Small Fox

First create the folder from decorative cardstock.
Stencil inks over the Small Fox stencil.
Decorate the folder with the stenciled image, a strip of  blue, and brads

Glue a post-it notepad inside. Notice the little flap folded over the one edge,
underneath that I put a little strip of magnet, and one on the outside front of the cover
to act as a closure.

Here it is from the side. The green notepad matches the green circles on the paper

Here's a close up of the fox. I used Brilliance Inks (Rust, Beige, Coffee Bean, and Graphite Black)
The paper he is stenciled on is the back side of the circle paper the folder is made from.

The paper is from BASICEGREY's  bow ties collection called marbles and dodge ball. The folder is 4 1/8" x 10", scored 3 1/2" from one end, then move over 1/2", move over 4 1/16", move over 1/2", then 3/4" scoring after each move. There should be 5/8" left after the last score. Fold it all up, decorate it, and you're done! Sometimes I use a cute ribbon as a closure, or two brads and a string, it depends what the outside looks like and what seems to fit.

Be sure to see what out other team members have created this week, then get creative yourself and join our monthly challenge! Sign up over at the DREAM it UP! blog.


Happy Creating,
Louise

Thursday, April 25, 2013

Mists, Drizzles and Showers!

This is our last Thursday posting for the Dreamweaver Stencils April challenge of Mists, Drizzles and Showers. I can't say that I'm sorry to be leaving this theme behind! I am really looking forward to the May flowers all those April showers are supposed to bring. My daffodils are finally in full bloom, and add a bright cheerful touch to the dreary landscape. We are supposed to have some nicer weather this weekend so maybe Spring is truly here to stay.
This week I am featuring the Umbrella stencil (LG737) again. It is so amazing how many different techniques there are to play with on these beautiful stencils.


This is what I call my "Monet Impression" (pun intended). Here are the steps:
  • Tape the Umbrella stencil to light tan cardstock with removable tape
  • Use a palette knife and paste spreader to spread a coat of Pearlescent Embossing Paste over the design
  • Remove stencil and place in water
  • Use a soft paint brush to sprinkle various colors of Metallic F/X powders randomly over the umbrella portion, use Cocoa (FX18) on the handle
  • Set aside to dry
  • Use the paste spreader to spread a very thin coat of the Pearlescent Embossing Paste over another square piece of matching cardstock
  • Work quickly to sprinkle the entire piece with various colors of the Metallic F/X powders
  • Let dry
  • Clean and dry your stencil
  • When both pieces are dry, use a piece of Swiffer cloth to buff away any excess powder
  • Layer into a beautiful "Monet" inspired card
Next Tuesday, April 30th, I will be teaching a Dreamweaver class at Memories and Beyond in Downers Grove, IL. Give them a call to sign up, there are still a couple of spots left. Here's what we'll be creating:

LL543 - Sm Fuschia

Be sure to hop over to the other team blogs for more inspiration this week.
Happy creating,
Louise

Thursday, April 18, 2013

Rain, Rain Go Away!

I know that's not really our challenge theme this month, but that's how I feel right now. I need sunshine soon! I am grateful that it's not snow, but enough already! It seems that our Dreamweaver Stencils April challenge of Mists, Drizzles and Showers has been an accurate forecast of our weather.
To go along with the rainy weather, I am showing yet another idea for the the Umbrella stencil (LG737), this time using Zentangle. Enjoy!


If you haven't tried using your stencils with this fun technique, you don't know what you're missing! Stencils are the perfect starting point because they provide natural divisions for your various Zentangle patterns. Check for classes in your area, you'll have fun, I promise! I use Sakura Micron pens to do mine.

Be sure to stop by the rest of the teams' blogs for more inspiration.


Happy Creating,
Louise

Thursday, April 11, 2013

Mists, Drizzles and Showers!

The April Dreamweaver Stencils challenge of "Mists, Drizzles & Showers!" perfectly describes the weather outside as I prepare this posting. It is a gray, gloomy day here, though I'm not complaining because our relatives in MN are getting more snow! I'll take a rainy spring day instead, the daffodils seem to be liking it. 
This week I am sharing a card that I made for Lynell a couple of years ago. I have always loved how it turned out, so I hope you don't mind seeing it again, it is perfect for this challenge.

LJ905, LJ908, LG738
This uses three great stencils and is a bright and cheery card, perfect for lifting someones spirits when you include a personal note inside! Here are the steps I used:
  • Use a light box or die cut machine to emboss the Umbrella bkg (LJ908) stencil on white cardstock
  • Leave the stencil in place over the embossed image and use 1/4" stencil brushes to add various colors to the umbrellas (tape the stencil in place with removable tape)
  • Clean off the Umbrella stencil and place back over the colored umbrellas, taping it down
  • Tape the Rain stencil (LJ905) over the umbrellas
  • Use a Palette Knife and Paste Spreader to apply a coat of Translucent Embossing Paste over the Rain stencil
  • Remove and clean stencil, let paste dry
  • Tape off the word you want from the Rain words stencil (LG738) and use a 1/4" stencil brush to stencil the words on white cardstock
  • Remove the stencil and add a little of the same color around the edge of the words
  • Mount onto coordinating cardstocks
  • Finish the whole thing off with some fun ribbon flowers.
We are happy to welcome back our guest designer Alison Heikkila. This weeks designers are:


Happy Creating,
Louise

Thursday, April 4, 2013

Mists, Drizzles and Showers!

Happy April everyone. You knew our Dreamweaver Challenge during April had to have something to do with showers, right! Hopefully April will offer a lot of sunshine and warm weather too, but we definitely need some April showers for the May flowers.

We hope you will create something for our April challenge and link it on the DREAM it UP! blog using the Mr. Linky tool, or email a picture of it to lynell@dreamweaverstencils.com and she will post it for you. You might win a great prize!

My first post for April, shoos the showers away! I really need some sunshine and warmth for a few days at least.
Umbrella, Rain, and Rain Words
LG737, LJ905, LG738

This card is really very simple:
  • Tape the Umbrella stencil (LG737) to white cardstock with removable tape
  • Use a palette knife and paste spreader to apply Glossy Red Embossing Paste (DGRP)
  • Remove the stencil and place in water for cleaning
  • Let the paste dry
  • Place the clean dry stencil face down on back of decorative paper and trace the umbrella openings with a pen or pencil
  • Cut out the umbrella pieces just outside the outline (so the line still shows)
  • When the paste is dry, use liquid glue to attach the paper pieces to the appropriate opening of the pasted umbrella
  • Lay the Rain stencil (LJ905) over the umbrella image and use a 1/4" stencil brush and light blue ink to stencil some raindrops in the background
  • Use a clear glitter pen to add a little sparkle to the raindrops
  • Stencil the "Rain, Rain, Go Away" words from the Rain Words stencil (LG738) on white cardstock using a 1/4" stencil brush and red ink
  • Mount in layers using coordinating cardstock
This week our new team members join our weekly postings AND we have a guest designer too! Here are their links so you can check out their great creations.


Happy Creating,
Louise

Thursday, March 28, 2013

A bloomin' Spring!

It's hard to believe that we're already on our last posting for the March Dreamweaver Stencil challenge of "A bloomin' Spring!". It's still not quite Spring here, but luckily we dodged the last snow storm that blanketed southern Illinois! My daughter is supposed to be playing golf this Friday in their first invitational of the Spring season, we'll see...
I hope you had a chance to "meet" our new team members on the DREAM it UP! blog last week. We are excited to have them join the Dream Team and look forward to their posts starting next week.
Sure signs of Spring are the beautiful bulbs that bloom while there is still a nip in the air. While they might be blooming a  little later this year, I still look forward to them and the fresh swath of color they provide. Tulips are some of my favorites, though I've stopped planting them now that our neighborhood is mature enough to have squirrels (you gardeners out there will understand!). I swear they watch you plant them, then dig them up and eat them as soon as you turn your back! Oh well, I guess I'll have to be satisfied with coloring my own tulips. Here's what I created this week.

LL444 - Mack tall tulips

This is the beautiful Mack tall tulips stencil (LL444) from Dreamweaver Stencils. I kept it clean and simple with crisp lines and colors, just like Spring!
  • Tape the stencil to white cardstock with removable tape
  • Apply inks using small stencil brushes (use the Picasso (LL332) to keep your colors in place)
  • Remove and clean your stencil
  • Mount on "spring-colored" paper and add a beautiful ribbon
The rest of the team have more springtime cards to share with you, so take some time to "smell the flowers!" 

Only a few days left for you to join our March challenge. Just link your blog on the DREAM it UP! blog using the Mr. Linky tool, or email a picture of your creation to lynell@dreamweaverstencils.com. Join us in April for our new Dreamweaver challenge!

Happy Creating,
Louise