Showing posts with label Brilliance Inks. Show all posts

Friday, September 20, 2013

Dreamweaver & Quietfire Awesome in Autumn Day 4!


Our amazing week of Awesome in Autumn continues! This week we are playing with the Quietfire Design team, and are so excited to play with their amazing images and sentiments. In their beautiful calligraphic style, their quotes and thoughts are the perfect addition to our Dreamweaver designs. Follow along with us, and leave your comments for an opportunity to win one of two wonderful prize packages:


Here's what I've created for today's post:

Autumn is my favorite time of year, so I just love this month's challenge of Awesome in Autumn! And with the month quickly coming to an end, I had to use Dreamweaver's beautiful Fall borders stencil (LJ874) . This versatile stencil has two corner designs that are so fabulous, you'll see the other corner tomorrow!
 Follow these easy steps:

  • Tape your stencil to the upper left corner of cream colored cardstock with removable tape (make sure you put some tape over the parts of the other corner design so you don't accidentally get ink where you don't want it!)
  • Use small stencil brushes and ink pads to color the image, I used Brilliance Sunshine Yellow, P. Orange, Rocket Red, P. Beige, and Coffee Bean
  • Use the Picasso (LL332) to help place color and to add a little vein to the leaves
  • Remove the stencil, and stamp the saying from Quietfire Design #5820 Every Blade in the Field with Brilliance Coffee Bean ink
  • Use a 3/4" stencil brush to brush in Distress Ink forest moss around the edge of images and around the edge of a background layer
  • Use a 3/4" stencil brush to add just a little Brilliance P. Orange to the background piece
  • Add a piece of beautiful ribbon from May Arts to the colored background piece, then assemble all the layers into an Awesome in Autumn card!
Tomorrow will be the final day of our hop with Quietfire, and the last chance to win a fabulous prize package, you won't want to miss it!


Check out today's awesomeness which includes...

Louise Healy (you are here)

Happy Creating,
Louise

Thursday, May 2, 2013

Tiny Treats

Welcome to the Dreamweaver Stencils May designer challenge. This month we have been given the task of creating "Tiny Treats" (or gifts) perfect for teacher gifts, party favors, hostess gifts, well, I think you get the picture.
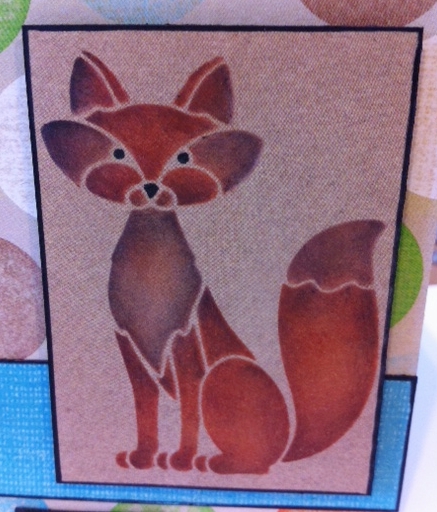
Dreamweaver Stencils just released 6 wonderful new stencils that should be getting to stores near you very soon. One of the new designs is a darling little fox. Actually, it comes in two sizes, which is even better! We live in the Tri-cities area of Illinois right along the Fox River, so this little guy immediately won my heart. I'm sure you'll be seeing several ideas for these new beauties in the next couple weeks on the team blogs.
This week I have created a little post-it note gift. I love how just a little paper and a cute design really dresses up an every day staple. I used to make these for my kids' teachers. They always appreciated them because we all know teachers can use a lot of notes throughout a school year. They make great little favors for parties too, and can be made in any size to fit whatever size notepad you have.
LM2016 Small Fox

First create the folder from decorative cardstock.
Stencil inks over the Small Fox stencil.
Decorate the folder with the stenciled image, a strip of  blue, and brads

Glue a post-it notepad inside. Notice the little flap folded over the one edge,
underneath that I put a little strip of magnet, and one on the outside front of the cover
to act as a closure.

Here it is from the side. The green notepad matches the green circles on the paper

Here's a close up of the fox. I used Brilliance Inks (Rust, Beige, Coffee Bean, and Graphite Black)
The paper he is stenciled on is the back side of the circle paper the folder is made from.

The paper is from BASICEGREY's  bow ties collection called marbles and dodge ball. The folder is 4 1/8" x 10", scored 3 1/2" from one end, then move over 1/2", move over 4 1/16", move over 1/2", then 3/4" scoring after each move. There should be 5/8" left after the last score. Fold it all up, decorate it, and you're done! Sometimes I use a cute ribbon as a closure, or two brads and a string, it depends what the outside looks like and what seems to fit.

Be sure to see what out other team members have created this week, then get creative yourself and join our monthly challenge! Sign up over at the DREAM it UP! blog.


Happy Creating,
Louise

Thursday, August 16, 2012

Christmas in August Week 3

The days are definitely getting shorter here in northern Illinois, and the nights have been a little cooler too. Before we know it the holidays will be upon us again, so it's  not a bad idea to start putting some thought into holiday card making in August!
This week I want to share another card using the same two stencils I showed you at the beginning of the month. Here's the first card again, just to remind you:
LG731 Holly Flourish
LL3009 Christmas script
Now here's another design featuring the same two stencils.
LG731 Holly Flourish
LL3009 Christmas script
I know! Can you believe how different they look. Even though each uses the Glossy Green Embossing Paste on the Christmas stencil, by using different finishing techniques you get a completely new look.
For the second card:
  • Use a small stencil brush and Brilliance Ivy to color the Holly Flourish design on white or cream cardstock, moving the stencil around to fill the background layer
  • Let dry or heat set
  • Rouge Distress Inks around the background with a sponge of foam pad(Fired Brick and Mustard Seed)
  • Tape down the Christmas stencil on white or cream cardstock with removable tape
  • Apply Glossy Green Embossing Paste with the paste spreader
  • Remove and clean the stencil, let paste dry thoroughly
  • Rouge Distress Inks over the pasted image with a sponge of foam pad(Fired Brick and Mustard Seed)
  • Edge both layers with the Ivy ink
  • Add a beautiful ribbon around the background layer and mount it on the front of the card
  • Add the Christmas layer with foam tape
Next week we will begin our week long blog hop with our friends in the UK, you won't want to miss it! We'll be highlighting the beautiful new Christmas/Winter designs just released at CHA AND you might win some great stencils!

So be sure to join us starting on Monday for more Christmas in August.
Now check out the other great designs our team has come up with for this week.
Happy Creating,
Louise

Thursday, August 9, 2012

Christmas in August

Welcome back to week two of the Dreamweaver Stencils Christmas in August challenge. It's never too early to design your Christmas or Holiday cards, of course, no matter how early I design mine, it seems I'm always making them in December! This week I created a card using the paper piecing technique, but by using decorative paper it was very quick and easy to make!

LG674 Oval Ornament - Paper piecing
  • Start by choosing a decorative paper with a nice Christmas design that fits well in the Oval Ornament stencil (LG674). I used a piece of Authentique Paper from the Wonder collection. The sweet little poinsettia design is on one side, and the beautiful stripes are on the other side, so they match perfectly.
  • Lay the ornament stencil over the part of the paper you want inside your ornament and trace around the inside edge of the stencil with a Black Micron Pen (I used an 02)
  • Cut out the ornament from the decorative paper staying as close to the black line as possible without cutting away the black line
  • Emboss the ornament stencil on cream or natural cardstock
  • Leave the stencil in place and add color to the ornament cap and hook area by using a small stencil brush and gold or silver ink (I used Brilliance Galaxy Gold)
  • Round the corners with a corner rounder
  • Glue the decorative paper ornament over the embossed ornament
  • Cut out another flower and layer it on the first to give it more dimension
  • Mount ornament on a dark green layer, then the stripe paper, then another dark green
  • Embellish with a bow at the top of the ornament and a gem in the center of the flower
Want to get into the holiday spirit a little early? Link your own Christmas in August creations to the Dream It Up! blog mr. linky, or email pics of your creations to lynell@dreamweaverstencils.com, for an opportunity to win this wonderful newly released Heart Ornaments:


 Don't you just love this new design? There are several newly released stencils and products from CHA last month, which you can view for yourself HERE. During the week of August 20th - 25th, the Dream Team will be posting all week with a hop on Saturday to top it all...featuring all of these new fabulous designs...in collaboration with the Woodware UK team. Just a little hint...you may want to buy all of these new designs now, so you are ready and waiting for the inspiration that will come your way that week! Meanwhile, check out what the rest of the team has been creating this week:
Happy Creating,
Louise

Thursday, June 21, 2012

Glitter Challenge

Week three of our Dreamweaver Stencils and Art Glitter combined June challenge brings more great ideas of how to combine these wonderful products. Our challenge is to create wedding themed cards using the Double-Glitter Technique. Here's my version of a "Summer Wedding" card:


The stencil is Dreamweaver's Long stem rose (LL375)  and the glitters are Ultra Fine Pink Smoothie and Microfine Rock Moss with Crystal in the background. Because the colors are transparent they are very subtle, so after glittering I laid the stencil back over the glitter and used a small stencil brush to add some Brilliance Pearlescent Coral to the rose just to bring it out a little more. A small black soot mat makes the glitter layer really stand out, and the pink layer ties everything to the beautiful Graphic 45 background paper. Of course, a nice bow always adds a wonderful finishing touch. I thinks this would make the perfect card for a summer wedding (especially if it is a garden wedding).
 
Visit the Art Glitter blog and the Dream It Up! blog for fabulous inspiration from both talented design teams. We are encouraging all of you to play along with the challenge of creating with Dreamweaver Stencils and Art Glitter*, preferably using the Double-Glitter Technique with a wedding theme. Just link your creation to the Mr. Linky on the Dream It Up! blog, or email pics to lynell@dreamweaverstencils.com, for an opportunity to win one of four fabulous glitter and stencil prize packages. One winner will be chosen each week. (US and Canada only, please).


For more inspiration from the Art Glitter design team, please visit their blog for a complete list of players throughout the month.
For more inspiration from the Dream Team, here's the blog list for this week:

Have a "sparkly" good week!
Happy Creating,
Louise

Thursday, April 26, 2012

April...Brings May Flowers

Our Dreamweaver Stencils April challenge is almost over. You have until Monday, April 30th to submit your creations on Mr. Linky on the DREAM it UP! blog, or by emailing a photo directly to Lynell at lynelll@dreamweaverstencils.com. Our theme this month was April...Brings May Flowers. We've seen a lot of beautiful floral creations this month by all the team members, plus several people have joined our challenge.
This week I chose a more tropical image rather than a spring image. This one just says "Hawaiian vacation!". Don't you agree?


This is an older design called Heliconia (LL358). It is a beautiful version of this fabulous plant. Here are the simple steps to create this card:
  • Dry emboss the Heliconia on white cardstock
  • With the stencil still in place, use small stencil brushes to add color to the image
  • I used Memento Tangelo, Lady Bug, and Rhubarb Stalk on the flower and Brilliance Thyme and Ivy on the leaves
  • Remove the stencil and use the green brush to add some green around the edges
  • Tape the Friends (LM210) stencil to the front of an orange card near the right side (I taped over the "S" for this card)
  • Apply Glossy Black Embossing Paste
  • Remove and clean the stencil, let the paste dry
  • Layer the flower image on a small black mat
  • Use foam tape to layer the flower onto a deeper orange layer matted in black
  • Add two brads
  • Mount it to the front of the card
  • Send it to a good friend with a nice note inside!
Be sure to hop over to the other team member blogs to see what they've created this week.

Happy Creating,
Louise


Thursday, April 5, 2012

April Showers bring...

May flowers!  The new Dreamweaver Stencils April challenge is "Bring May Flowers!". I don't know about the rest of you, but in our area (northern IL) we are experiencing one of the earliest springs on record. Yesterday as I sat at my craft table working on today's post, I enjoyed the beautiful view out my window of my crab apple trees in full bloom. We have two whites and two pinks and they are breathtaking right now. Normally they are just coming into bloom the last weekend of April! They were my inspiration for today's post using the Cherry blossoms (LG644) stencil.


This is a very easy card, really a "back to basics" card. Here's how you do it:
  • Tape the stencil to light green cardstock with removable tape
  • Apply Dreamweaver Embossing Paste (DEP) to the paste spreader (LM2010) using a palette knife (DPK).
  • Spread the paste over the stencil
  • Remove and clean stencil, let paste dry
  • Place clean and dry stencil back over dry paste and tape in place with removable tape
  • Use small gold handled stencil brushes to apply color to the paste (I used Brilliance Coral, Coffee Bean, Sunflower Yellow). The Picasso stencil (LL332)  is a great tool for shielding the blossoms from the brown ink
Picasso - LL332
  • Add a pretty layer of pink behind the blossoms and mount to the front of a card with foam mounting tape
  • A beautiful, springy card for a birthday, anniversary, shower, Mother's Day, really any occasion
Don't forget that you can play along with our monthly challenges. Simply create your own version of "Bring May Flowers" and link it on the DREAM it UP! blog using the Mr. Linky tool. If you don't have a way to link it to us, simply email a picture of your design to lynell@dreamweaverstencils.com and she will be happy to post it for you. Remember, you have to play to win!
One more card to share with you today, a simple Easter card to wish you all a very Happy Easter!


Now check out the designs from the rest of the team by clicking on their names below:

Happy Creating,
Louise

Thursday, February 16, 2012

Dream Scheme Thursday

Welcome to the  third week of Dreamweaver Stencils February challenge. This month's challenge is anything GREEN (as in the color), "green" (as in reduce, reuse, recycle), or St. Patrick's Day themed. You are encouraged to play along with us throughout the month for the chance to win a wonderful prize from Dreamweaver. Just create something gorgeous (no pressure!), post it on your blog or whatever public forum you use, then go to the DREAM it UP! blog to add a link to your creation using the Mr. Linky tool. If you don't have a blog or a way to link your design, just email it to Lynell at lynell@dreamweaverstencils.com and she will post it on her blog for you. We would love to see what you have created this month!
Today I am using two of the new stencils released last month at CHA. The Open Butterfly (LG740) and Mushrooms (LL3025). I took a little liberty with the green theme, but as you can see there's still a lot of green!

To create the background
  • place the Mushroom stencil in the lower left corner of a piece of white cardstock (3 1/2" x 4 1/2")
  • Use painters tape or removable tape to mask off the large mushroom
  • Apply Brilliance Thyme ink with a 1/2" stencil brush all over the grass and small mushroom in the left corner only
  • Apply a little Brilliance Ivy ink with another 1/2" stencil brush just on the grass (use a Picasso LL332 to shield the small mushroom from the ivy color)
  • Use a 1/4" stencil brush to apply Brilliance Coffee Bean ink on the small mushroom cap and stem, but leave a little of the light green showing in the center of the cap
  • Move the stencil to the lower right corner of the piece and repeat the steps for the other small mushroom
  • Move the stencil back over so the mushroom from the right corner is next to the other mushroom in the left corner that you did first, and add  a third small mushroom as shown
  • Remove the stencil and tape, clean and dry the stencil
  • Use the 1/2" brush and Thyme ink to sweep some green ink near the bottom of the stenciled mushrooms
  • Use another 1/2" brush and Memento Bahama Blue to sweep some color at the top to create the sky
  • Adhere to a solid green mat (3 3/4" x 4 3/4") then to the front of a green gingham check card (finished card size is 4 3/4" x 6")
To create the Crackled Butterfly:
  • Tape the Open butterfly stencil (LG740) to a piece of green cardstock (I used the same color as my green mat for the background) using removable tape of gentle painters tape
  • Apply a layer of Glossy Green Embossing Paste using the Paste spreader tool (LM2010)
  • Remove stencil, place in water to clean, making sure to keep your stencil flat while gently brushing with a small fingernail brush
  • Place the clean stencil on a piece of soft cloth (I use old t-shirts) and dry thoroughly
  • Let the green paste dry naturally (about 40-50 minutes) or place the pasted design on a warming tray set to the low setting (about 20 minutes)
  • When the green paste is dry, place the clean, dry stencil back over the green paste and tape all around the design again
  • Use the paste spreader to apply a coat of Crackle Embossing Paste over the green layer. You don't want to scrape too hard, or your crackle layer will be too thin
  • Remove and clean the stencil
  • Set the Crackled image aside to dry. The cracks will begin to appear within 10 minutes, but drying time is about the same as for the green
  • When the Crackle paste is dry, return the stencil to the design again and tape all around
  • Place a piece of felt on the Color Solutions applicator and apply a variety of colors to the felt (I used Iceberg, Citron, Sugar Plum and Creme Brulee) making sure to keep the drops a little separated from each other
  • Use  a pouncing motion to apply the colors over the crackled image
  • Reapply more drops as needed trying to keep the colors in their original spot
  • Put a drop of Creme Brulee on a craft mat and use a brush pen nib to pick up the ink and apply it to the body of the butterfly
  • Remove the stencil (don't clean it yet, I have more to tell you!)
  • Let the inks dry for just a minute or two, then cut out the butterfly and adhere just at the body to the mushroom layer (so the wings flap free)
Now what about all that beautiful Color Solutions ink still on the stencil?  Well, I can't stand wasting it so here's what I do:

  • Place the butterfly stencil on a clean paper towel (ink side up)
  • Use a mini mister or any fine mister bottle to spray the ink with alcohol (not the thinner or blending solution, you are not supposed to spray those!) until it is wet again
  • Place a clean piece of white cardstock over the wet inks and use a gentle rubbing motion across the image to transfer the wet ink to the cardstock
  • Cut around the image with a deckle scissors
  • Use the 1/2" brush and Memento Bahama Blue ink to sweep some color around all the edges
  • Mount into another beautiful card!
I know this has been a lot of steps, but none of them really take very long, and the results are definitely worth it. I hope you've enjoyed today's creations and will spend a little more time checking out what the rest of the team has created for you today.
Happy Creating,
Louise

Saturday, October 2, 2010

Autumn in the AIr!

Day two of the Dreamweaver Stencils blog hop! Hopefully you hopped to the four blogs in yesterday's hop and left your comments for those fabulous creations! Today you should be hopping here from Liz's blog.
Do you recognize the image above from my sneak peek? It is Dreamweaver's beautiful Fall boarders stencil (LJ874) and the new Thanks stencil (LS1006) used to create a simple fall thank you note. The pumpkin corner was pasted with White Matte Embossing Paste. When the paste dries, you place your clean stencil back over the paste and use small stencil brushes to add color on top of the paste. Don't forget to use an edge of your Picasso (LL332) to add the veins on the leaves. Details count! Place the thanks stencil above the pumpkin and use a stencil brush to color that. Cut the edge with a deckle scissors, edge with a brown marker and mount into a great card. Supplies: White Matte Paste, Brilliance Inks - Sunflower Yellow, Pearlescent Orange, Rocket Red, Pearlescent Thyme, Pearlescent Ivy, Pearlescent Chocolate, COPIC Africano (E27), natural linen cardstock, fern green cardstock.

I love how versatile the Dreamweaver Stencils are when you are creating. In my classes we use one stencil and learn three techniques, otherwise we tend to keep using it the same way every time we pull that stencil out. This card highlights the other corner of the Fall boarders stencil, the beautiful oak leaves corner as well as the Autumn stencil (LM295). Again I simply used the white matte paste on the leaves, let it dry and put the stencil back on to color it (same Brilliance inks as on the first card). When coloring the acorns, I used openings in the Picasso to help keep that dark brown ink off the leaves. Don't forget the veins in the leaves too! After I colored the leaves, I used Memories Mists Bright Gold over the paper (even over the colored leaves). It gives a wonderful gold shimmer to the whole background. Stencil the Autumn with the Pearlescent Chocolate, and use that small stencil brush to sweep in some brown on all the edges. Mount that on dark brown cardstock, add a ribbon and one of Dreamweaver's new Embellishment Pins (I used a gold one and colored it to match my design with a COPIC marker, YR07). Mount that onto a burnt orange cardstock for another beautiful fall creation!

Last, but not least, this card uses both corners along with the Autumn stencil to really give that look of Indian Summer! This card is a little more work, but is worth the effort. Paste one of the corners with the white matte embossing paste and let it dry. Then paste the other corner with the white paste. Color with the Brilliance inks and stencil brushes using the Picasso to help with the details. Stencil the word Autumn in a "rainbow" of colors to match the rest of the design. Use a large stencil brush (at least the 3/4" brush) to brush brown in around the edges and into the background. I like to use a really large brush to do this, a No. 12. Most craft stores have these. Mount on brown and rust for another beautiful design.
Three stencils, one paste, endless possibilities! I will be posting some other ideas with these stencils next week so be sure to stop back and see some other techniques using these.
To purchase these wonderful products, you can find a retail store near you by going to Dreamweaver's Where to Buy page.
Don't forget to leave a comment here for another chance for a prize. Just link to the Dreamweaver Stencils site, choose your favorite stencil, paste and F/X powder, and tell me why you chose those. I will be selecting a random winner on Monday, October 4, 2010 from everyone who leaves me a comment. I'm the last hop of the day, but you can start again tomorrow at the DREAM it UP! blog for another inspirational day and more chances to win!
Official Blog Hop Info
We want you to have the chance to win your favorite stencil, embossing paste and Metallic F/X powder. For each comment you post along the hop, you need to choose a stencil, paste and powder you like best, identify it to us, tell us why it's your favorite and how you think you might use it. Be sure to comment on each blog along the hop!
Blog Candy - How to get it!
For each comment on the different blogs, you need to choose a different stencil, paste and Metallic F/X color...in case you win more than once! At the end of the three days, each member of the Dream Team will choose a random entry to win and post it on their blog by midnight of Monday, October 4.
Another Opportunity to win!
In addition to commenting on each designer's blog, you have another opportunity to win by becoming a follower on the DREAM it UP! blog. After you become a follower, leave a comment on that blog saying you have done that. With eleven designers and this, you have TWENTY-TWO chances to WIN!!! All winners will be selected by Random.org and posted on each designer's blog by midnight Monday, October 4.
Blog Hop Schedule
It is not imperative to follow this schedule, but different designers will be posting their creations on different days, so take one last look on Sunday to make sure you've taken advantage of all your opportunities to win blog candy! Here's the schedule
Friday, October 1st
Saturday, October 2nd
Louise (you're here!)
Sunday, October 3rd
Happy Creating,
Louise