At Dreamweaver Stencils, we love to make our monthly challenges something for everyone, and not so strict that no one wants to play along. This month our challenge is, "Old, New, Borrowed, Blue", with the obvious thought being a wedding theme...but not necessarily. Add an old embellishment or picture. Use a new stencil design or technique. Borrow, or CASE (copy and say everything) another designers project, and obviously, blue...is blue. Where will YOUR creative process take you for this month? We'd love to see! And remember, linking your creations with the Inklinkz tool at the end of the team posts, provides you with the opportunity to win the stencil of your choice!
For this first week of our new challenge, I have gone with the Old/New theme. Ever since the Stylized Dahlia stencil (LG743) was released in 2012, it has been one of my favorite stencils (I know, I say that about all of them!). It is so versatile and looks wonderful in a large variety of techniques. Here are some samples of a class I taught in June of 2012 with this fabulous stencil (for the "Old" part of the challenge):
When Dreamweaver announced last month that one of the four new die cuts being released in June was the matching die for this wonderful stencil, I was thrilled! For the "New" part of the challenge here's what I created:
*Note* - While Glossy Red Embossing Paste is no longer available, it is easy to make your own using Translucent Embossing Paste (about 1 Tbsp), and red acrylic paint (tube not bottle) mixed in (start with about 1/4 tsp, then adjust)
Next week the Dream Team will be doing a collaborative Blog Hop with Imagine Crafts. Each day various team members will be posting ideas using Dreamweaver stencils and various products from Imagine Crafts. The fun starts Monday, and the grand finale will be Friday. Be sure to stop by each day, I'm sure there will be prizes involved!
For this first week of our new challenge, I have gone with the Old/New theme. Ever since the Stylized Dahlia stencil (LG743) was released in 2012, it has been one of my favorite stencils (I know, I say that about all of them!). It is so versatile and looks wonderful in a large variety of techniques. Here are some samples of a class I taught in June of 2012 with this fabulous stencil (for the "Old" part of the challenge):
 |
| LG743 - Red Glossy Embossing Paste with Crackle Paste over, let dry, then stencil with Brilliance inks from Tsukineko |
 |
| LG743 - Double Glitter Technique, but with Ranger Distress Embossing Powders instead of glitter (heat set after powders are all in place) |
 |
| LG743 - Molten Magic Technique, Pearlescent Embossing Paste with Metallic F/X powders sprinkled over wet paste, heat until bubbly |
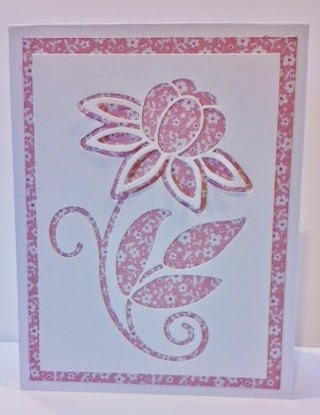 |
| DG743 - Stylized Dahlia die, cut out of plain white cardstock and the negative image mounted over patterned cardstock. Notice how you can leave the "petals" loose for more dimension (save the other pieces for another card) |
 |
| LG743 - Pasted embossed with Glossy Red Embossing Paste, let dry DG743 - place double sided mounting paper on the back of some pink and green papers, die cut images and peel off release paper to stick the pieces where you want them |
Next week the Dream Team will be doing a collaborative Blog Hop with Imagine Crafts. Each day various team members will be posting ideas using Dreamweaver stencils and various products from Imagine Crafts. The fun starts Monday, and the grand finale will be Friday. Be sure to stop by each day, I'm sure there will be prizes involved!
Here's what our "A" team has been working on this week:
Louise Healy
9 comments:
What a fun and inspiring display of the 'old.' The two new cards using the diecut are adorable. Using the sticky back paper is a great tip!
what a nice cards! lovely flower!
Your old and your new cards are all lovely!! Beautiful work, Louise!
I love all your cards Louise, and one of my favorite stencils.
Love all the different versions of your cards :)
Such a showoff! Such a wonderful batch of cards! Will you be teaching this as a class?
What a great way to show off the versatility of this die!
LOVE...the way you used the positive and negative pieces of the cut die. I especially liked that you let the laciness of the petals float free on the negative one.
Post a Comment