Showing posts with label Distress Embossing Powder. Show all posts

Thursday, July 17, 2014

JULY...a month to DIE for Week 3!

Welcome to week three of our Dreamweaver Stencils July Challenge!  All of this month the Dream Team are featuring our newest toys...our DIES! You'd be surprised at how many we have, and what fun things you can do with them...especially when used in conjunction with many of their matching stencils. They are such a simple way to create an effective card.

This week my creation incorporates three of our dies and three stencils. Yes, it's a little more work than last week's card, but it is so cute! Here it is...


Dog Days of Summer!
See, it is totally worth it! 
The background was created using 3/4" stencil brushes and Distress Inks (Salty Ocean, Peeled Paint, and Vintage photo). I used the Picasso (LL332) to create some clouds (I told you there were three stencils!).

So what are the three dies? They are DX7020 - Leafless tree, DD003 - Leafy Branch, and DL3029 - Dog. The decorative papers for the Leafy Branch and the Dog had Double-sided mounting paper put on the back before cutting. I did not do that to the tree because I wanted the branches to be flexible. I just used a dot roller on the back of the trunk and some lower branches to adhere the tree. The Leafy branch was cut apart so I could stick the leaves all over the tree limbs.

LL3029 - Dog stencil was paste embossed on light green paper with Matte Black Embossing Paste and set aside to dry. The cut pieces were edged with black marker and stuck on him. This allowed me to keep his eyeball, nose, collar and back spot black for more contrast. I added a little glue and glitter to his collar. 

The Sun stencil (LR502) was paste embossed with Matte Black Embossing Paste, then, before removing the stencil, a combination of Distress Embossing Powders were sprinkled over the wet paste (spiced marmalade, mustard seed, fired brick), the stencil carefully removed, heat set the powders being careful not to let the paste bubble.

I'm sure that our "A" team is just DIE-ing to show you their creations, as well as our Guest Designer for the month of July...

Happy Creating,
Louise

Thursday, June 5, 2014

Old, New, Borrowed, Blue

At Dreamweaver Stencils, we love to make our monthly challenges something for everyone, and not so strict that no one wants to play along. This month our challenge is, "Old, New, Borrowed, Blue", with the obvious thought being a wedding theme...but not necessarily. Add an old embellishment or picture. Use a new stencil design or technique. Borrow, or CASE (copy and say everything) another designers project, and obviously, blue...is blue. Where will YOUR creative process take you for this month? We'd love to see! And remember, linking your creations with the Inklinkz tool at the end of the team posts, provides you with the opportunity to win the stencil of your choice!
For this first week of our new challenge, I have gone with the Old/New theme.  Ever since the Stylized Dahlia stencil (LG743) was released in 2012, it has been one of my favorite stencils (I know, I say that about all of them!). It is so versatile and looks wonderful in a large variety of techniques. Here are some samples of a class I taught in June of 2012 with this fabulous stencil (for the "Old" part of the challenge):
LG743 - Red Glossy Embossing Paste with Crackle Paste over, let dry, then
stencil with Brilliance inks from Tsukineko
LG743 - Double Glitter Technique, but with Ranger Distress Embossing Powders
instead of glitter (heat set after powders are all in place)
LG743 - Molten Magic Technique, Pearlescent Embossing Paste with
Metallic F/X powders sprinkled over wet paste, heat until bubbly
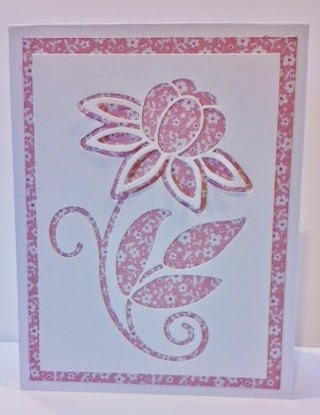
When Dreamweaver announced last month that one of the four new die cuts being released in June was the matching die for this wonderful stencil, I was thrilled! For the "New" part of the challenge here's what I created:
DG743 - Stylized Dahlia die, cut out of plain white cardstock and the negative image mounted over
patterned cardstock. Notice how you can leave the "petals" loose for more dimension (save the
other pieces for another card)
LG743 - Pasted embossed with Glossy Red Embossing Paste, let dry
DG743 - place double sided mounting paper on the back of some pink and green papers,
die cut images and peel off release paper to stick the pieces where you want them
*Note* - While Glossy Red Embossing Paste is no longer available, it is easy to make your own using Translucent Embossing Paste (about 1 Tbsp), and red acrylic paint (tube not bottle) mixed in (start with about 1/4 tsp, then adjust)

Next week the Dream Team will be doing a collaborative Blog Hop with Imagine Crafts. Each day various team members will be posting ideas using Dreamweaver stencils and various products from Imagine Crafts. The fun starts Monday, and the grand finale will be Friday. Be sure to stop by each day, I'm sure there will be prizes involved!

Here's what our "A" team has been working on this week:

Louise Healy

Happy Creating,
Louise


Saturday, October 12, 2013

Creative Chemistry Day 5!

I know, technically it's Day 6, but I finally got a few minutes to upload the 3 tags I finished yesterday (3 to go, hopefully tomorrow!).
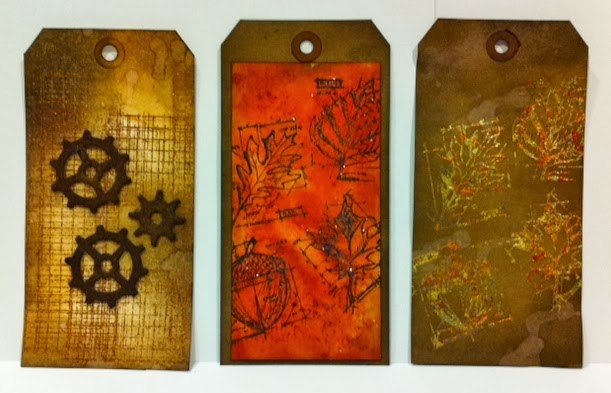
Creative Chemistry 102 with Tim Holtz has been a lot of fun, and has definitely kept us busy! Here are the 3 tags I have finished for Day 5.
Day 5 Tags


Rusting with Distress Powder

Sticky Powder with Glitter

Sticky Powder with Leafing

Happy Creating,
Louise

Thursday, November 1, 2012

CAS Distress & Dreamweaver Christmas


Still feeling festive? We hope so! Dreamweaver and Ranger still have two weeks left of our Festively Distressed collaboration, and we are full of distressing ideas...Tim Holtz' Distress Powder ideas, that is. Mixed with our fabulous line of stencil designs and exciting products, your creativity will know no bounds! If you missed the first two weeks, start HERE and HERE!

For our postings this week and next, we are offering you the opportunity to win one of two prize packages, perfectly coordinated for your holiday crafting. Simply leave a comment on each of our Dream Team's posts, and YOU could be one of two randomly selected winners!


The Dream Team have been challenged for the month of November to create something CAS (clean and simple) for the holidays. The extra challenge is mixing the Distress Powders in for the collaboration with Ranger. Think that it's possible? Well...let's see...

Here's what I came up with:
Tape LL316 Gaslight to striped cardstock and spread with Glossy White Embossing Paste.
Remove and clean the stencil
Sprinkle the NOEL with Peeled Paint Distress Embossing Powder, tap off extra.
Use a straw to place the other colors of embossing powders, holding the design at an angle so the extra powder falls off to the side of the image

Continue adding powders to each area.
Fired brick on bow, black soot on the pole, weathered wood on the lamp edges and finial, mustard seed on the flame, and black soot to finish the top.
Mount it on a small black mat, then to the front of a card with matching papers.

LL316 Gaslight with Glossy White Embossing Paste and Distress Powders

LL316 Gaslight with Glossy Black Embossing Paste and Distress Powders

Here they are side by side. You can see what a difference it makes to put the black paste under the powders rather than the white, the colors are very deep  on the black.
Lynell's cards the past couple of weeks inspired me to try the powders on paste, and it was a lot of fun. It is pretty easy to keep your colors where they belong. You could do it with the stencil on, but I find it much easier to do with it off and then you don't have to worry about the stencil sticking to the paper if it sits on there too long.

So tell me what you think in your comment below before heading over to the rest of the Dream Team posts:

The Ranger blog is offering another amazing prize opportunity, just for playing along with the Ranger/Tim Holtz Distress Powders and Dreamweaver Stencils and linking your creation on the Ranger blog. You can find more details HERE.

We hope that you have been inspired by our creations, and will continue to follow the Dream Team through the Dream It Up! blog as well as to like us on our Facebook page. We really encourage you to play along with our monthly challenges for more prize opportunities and creative fun!

Happy Creating,
Louise

Tuesday, March 27, 2012

Day 7 Tim's Online Class

Three more cool techniques from Tim Holtz's Creative Chemistry 101 class. Thank goodness for the scrubbie for cleaning hands because we certainly are getting inky! Here are my samples for Day 7:
Stay tuned for more samples tomorrow!
Happy Creating,
Louise