Showing posts with label Crackle Embossing Paste. Show all posts

Friday, August 7, 2015

Create Fall Finale!

This is our final day for our weekly theme of "Create Fall". We hope you've been inspired by all the creations you've seen this week from our team. Fall is right around the corner, and now is the perfect time to start making those Fall, Halloween, and Thanksgiving cards.

Today I have a little tutorial for you featuring the beautiful Oak Leaf and Maple Leaf stencils.

Supplies:DWLL3043_DWLL3044_LH_800


Stampendous:
CP811 Creative Palette
NKCRS02 Cling Wired Set
SSH57 Jumbo Perfectly Clear™ Acrylic Handle

Dreamweaver:
DWLL3043 Oak Leaf Stencil
DWLL3044 Maple Leaf Stencil
DWCEP Crackle Embossing Paste
DWNHB-12 1/2" Brush
DWNHB-18 1/4" Brush
DWLL332 Picasso
DWDMBP Matte Black Embossing Paste
DWLX7024 Zen Flower
DWDPK Palette Knife
DWLM2010 Paste Spreader

Plus:
Memento Inks - Dandelion, Tangelo, Lady Bug, Rhubarb Stalk, Bamboo Leaves, Potter's Clay (to color the maple leaf)
Chameleon Color Tones Pens - YL2, OR4, RD4, OL3, CB (on the Crackle Paste)
Acrylic Paints
Core'dinations Tea Dye cardstock
Neenah Classic Linen Cover 80# Epic Black 08126 (to use with the Creative Palette)
Neenah Classic Crest Cover 80# Classic Cream 04594
Tonic Ticket corner punch
Brayer

Instructions:

  1. Fold the Tea Dye card in half to form an A7 card.
  2. Brayer acrylic paints on the Creative Palette and press the black cardstock over it, lay the Zen Flower stencil on the palette and gently brayer more paint over it, press the cardstock back over the stencil and paint, dry well.
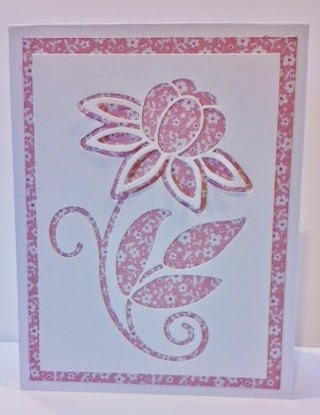
  3. Tape the Maple Leaf stencil to cream cardstock and use 1/4" stencil brushes to add color, use an edge of the Picasso tool to add "veins" to the leaf.
    Step 0 Step 1
  4. Lay the Oak Leaf stencil  near the opposite side and tape in place.
    Step 2 Step 3
  5. Apply Matte Black Embossing Paste using a Palette Knife and Paste Spreader.
    Step 6
  6. Remove and clean the stencil, let the paste dry.
    Step 5
  7. Place the clean, dry stencil back over the dry paste and skim a coat of Crackle Paste over the dry Black paste using a Palette Knife and Paste Spreader.
    Step 6
    Step 7
  8. Remove and clean the stencil, let the paste dry, it will crackle as it dries.
    Step 8 Step 9
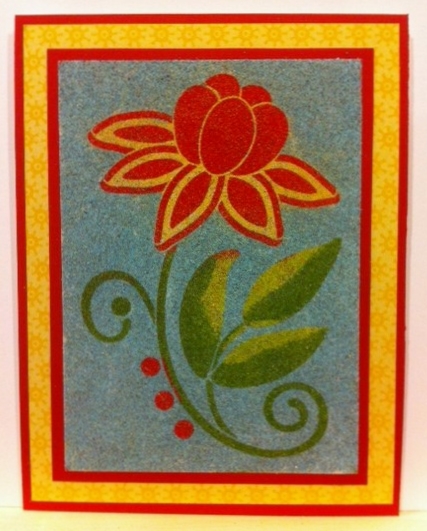
  9. Color the dry Crackle paste with  Chameleon Pens, use a 1/2" stencil brush to rouge some color around the edges, then stamp with the background stamp from the Wired set, ticket punch the corners and mount on a black mat, then the card front.
  10. Create a fall colored background using the Creative Palette, acrylic paints and a brayer. The Zen Flower stencil was used too to add a pretty pattern to the background.

These designers are falling all over themselves with great ideas to share with you!


Louise Healy


Happy Creating,
Louise

Wednesday, August 13, 2014

August Christmas in August Day 4!


Yes! It's that time of year again! The time when we inspire crafters on both sides of the "pond" with a mix of bothDreamweaver and Woodware UK* products for the holidays! Six days, SIX, of beautiful, elegant, merry, cute, artsy, and craftsy projects to have you heading out to your local stores or internet sites to buy these goodies immediately!


Of course, there will be prizes as well. Three prize packages will be given to three commenters during this week's posts on the team's blogs, including five stencils and one nested die set. You can have an opportunity to win these goodies by leaving some holiday sweetness for each team member posting each day, to be one of the three winners for the week. Here are the team members that are inspiring you today:


Thursday is our normal posting day for the weekly Dreamweaver challenge, so I combined our "August as an Adjective" challenge with this week's "Christmas in August" theme for my card today. Here's my creation: 

LG731 Holly flourish and LL3005 Holly and swirls stencils
plus the new matching die DL3005 Holly and swirls!

LL3005 and DL3005 used to create the crackled holly leaves
This beautiful card has a few steps, but no one takes very long, and the results are worth it! 

  • Paste emboss the Holly and swirls (LL3005) stencil with Glossy Blue (or black if you don't have blue) Embossing Paste, remove and clean stencil and let paste dry
  • Place the clean stencil back over the dry paste and add a coat of Crackle Embossing Paste, remove & clean stencil, let paste dry
  • In the meantime, place the Holly flourish stencil (LG731) on a piece of white cardstock and tape in place with removable tape
  • Place a drop or two of Wendy Vecchi's Archival Re-inker Red Geranium on a craft sheet or palette and pick it up with a 1/4" stencil brush, be sure to work the ink up into your bristles before stenciling with it
  • Use the Picasso tool (LL332) and place one of the small holes over each berry area to stencil on ink with the brush you loaded, wipe off the Picasso with a soft cloth before continuing to the next color
  • Place several drops of Wendy Vecchi's Archival Re-inker Fern Green on a craft mat and load a different stencil brush with this, stencil the leaves and swirls with the Fern Green using the Picasso tool as a shield around the berries
  • Remove and clean the stencil
  • Use a 3/4" brush to pick up some of the Fern Green and brush a light coat around the edges of the entire piece
  • Use a heat tool to set the inks
  • Place the clean, dry Holly stencil back over the dry Crackle paste and use the Fern Green ink and brush to color the holly leaves
  • Gently heat set the ink
  • Place the matching Holly die over the crackled image and run through your die cut maching
  • Cut the leaves away from the rest of the image and brush a little more green ink along the edges
  • Mount everything into an august card embellished with a beautiful ribbon from May Arts

*For a stockist near you contact Woodware Craft Collection in the UK and Notions Marketing in the USA.

Happy Creating,

Thursday, June 5, 2014

Old, New, Borrowed, Blue

At Dreamweaver Stencils, we love to make our monthly challenges something for everyone, and not so strict that no one wants to play along. This month our challenge is, "Old, New, Borrowed, Blue", with the obvious thought being a wedding theme...but not necessarily. Add an old embellishment or picture. Use a new stencil design or technique. Borrow, or CASE (copy and say everything) another designers project, and obviously, blue...is blue. Where will YOUR creative process take you for this month? We'd love to see! And remember, linking your creations with the Inklinkz tool at the end of the team posts, provides you with the opportunity to win the stencil of your choice!
For this first week of our new challenge, I have gone with the Old/New theme.  Ever since the Stylized Dahlia stencil (LG743) was released in 2012, it has been one of my favorite stencils (I know, I say that about all of them!). It is so versatile and looks wonderful in a large variety of techniques. Here are some samples of a class I taught in June of 2012 with this fabulous stencil (for the "Old" part of the challenge):
LG743 - Red Glossy Embossing Paste with Crackle Paste over, let dry, then
stencil with Brilliance inks from Tsukineko
LG743 - Double Glitter Technique, but with Ranger Distress Embossing Powders
instead of glitter (heat set after powders are all in place)
LG743 - Molten Magic Technique, Pearlescent Embossing Paste with
Metallic F/X powders sprinkled over wet paste, heat until bubbly
When Dreamweaver announced last month that one of the four new die cuts being released in June was the matching die for this wonderful stencil, I was thrilled! For the "New" part of the challenge here's what I created:
DG743 - Stylized Dahlia die, cut out of plain white cardstock and the negative image mounted over
patterned cardstock. Notice how you can leave the "petals" loose for more dimension (save the
other pieces for another card)
LG743 - Pasted embossed with Glossy Red Embossing Paste, let dry
DG743 - place double sided mounting paper on the back of some pink and green papers,
die cut images and peel off release paper to stick the pieces where you want them
*Note* - While Glossy Red Embossing Paste is no longer available, it is easy to make your own using Translucent Embossing Paste (about 1 Tbsp), and red acrylic paint (tube not bottle) mixed in (start with about 1/4 tsp, then adjust)

Next week the Dream Team will be doing a collaborative Blog Hop with Imagine Crafts. Each day various team members will be posting ideas using Dreamweaver stencils and various products from Imagine Crafts. The fun starts Monday, and the grand finale will be Friday. Be sure to stop by each day, I'm sure there will be prizes involved!

Here's what our "A" team has been working on this week:

Louise Healy

Happy Creating,
Louise


Friday, April 25, 2014

Dreamweaver-Stampendous Blog Hop Grande Finale!

Wow, what a fun week filled with so many creative ideas from the Dreamweaver Stencils and Stampendous design teams. Wonderful work everyone! Thank you for all of the comments our "viewers" have left us, I can't tell you how inspiring they are to me! Who knew a theme of "Faces of art" could be so much fun!
So for the Grand Finale, I wanted to create something really unusual. Then I realized, I'd done that on Wednesday, with my canvas project (well, it was unusual for me anyway!). So what to do, what to do...some days it is more challenging than others to come up with ideas. Here's what I came up with for today:
Bald. Bold. Beautiful.
I told you it would be unusual! I created this in honor of my little 8 year old great-niece who has Alopecia Areata. She is one of the bravest and most beautiful people I know! They recently had a walk in MN to help raise research money and awareness. It's not life threatening, and she leads the normal life of an 8 year old, just a bald 8 year old. Their theme was "Bald. Bold. Beautiful." Here she is with the walk organizer.


This year in second grade, she went around to the other classrooms with the school nurse to explain why she is sometimes allowed to wear a hat in school (on the days she doesn't feel like wearing a wig). She told her Mom that it was OK, she could do it herself and didn't need her to come to school! The nurse said she did a great job explaining it and answering all the questions the kids had! We are so very proud of her. So to all the people with Alopecia Areata  and those who have gone bald due to cancer or other reasons, this one's for YOU!

To learn more about Alopecia Areata go to www.naaf.org

  • The Stampendous Blossom Beauty stamp  face was stamped with Memento Tuxedo Black ink, the head template was placed over it and I lightly traced the top of the head with pencil, cut the whole thing out, colored it with COPIC markers.
  • The Open butterfly stencil (LG740) was pasted embossed with glossy red embossing paste (you can make red by putting red tube acrylic paint into the Translucent Embossing Paste). Let the red dry.
  • Place the clean, dry stencil back over the dry red paste and paste emboss with Crackle Embossing Paste, let dry.
  • The crackle paste dries with a slick white surface, great for coloring on top of with COPICs.
  • Cut out the butterfly, edge with a dark marker and mount everything into a great card.
I think I will be sending this to my great-niece to congratulate her on a successful walk!


We hope you've enjoyed your week of inspiration as much as we have! It's a big list today, so hang on tight for a BIG HOP!


Happy Creating,
Louise

Thursday, June 20, 2013

Inspired by a Pin!

This month the design team at Dreamweaver Stencils has been given a fun challenge, we are to base our creations on something we've been inspired by on Pinterest. You can search for virtually anything on Pinterest and it will bring back hundreds (or more!) of ideas and images. One of my favorite flowers is the Bird of Paradise, so I decided to see what was out out there. Oh my! There was everything from garden ideas to shoes, fabric, tattoos, botanical prints, photos, watercolors, quilling, and LOTS more. I found some incredible vintage prints, and this amazing quilt in my search. So while no one image was my inspiration this week, I definitely was inspired to create a card using Dreamweaver's beautiful Long bird o'paradise stencil (LL454) and the Jungle leaves (LJ825) stencil for the background. Here's how it came out:

LL454 Long bird o'paradise
Glossy Green Embossing Paste under Crackle Embossing Paste
LJ825 Jungle leaves
Dry embossed with the Strié technique applied

I love the combination of bold color (orange) and soft (green) background, and the Crackle Embossing Paste was the perfect touch to give it a lot more texture. Here are the steps:

  • Tape your stencil to smooth cream cardstock with removable tape
  • Use a palette knife and paste spreader to apply a coat of Glossy Green Embossing Paste
  • Remove and clean the stencil, let the paste dry completely (about 50 minutes)
  • Tape the stencil back over the dry paste and apply a coat of Crackle Embossing Paste
  • Remove and clean the stencil, let the paste dry completely
  • In the meantime, dry emboss the Jungle leaves stencil on white cardstock with a die cut machine and rubber embossing mat
  • Remove the stencil, place the leaves raised side up on a piece of copy paper and use a 1/2" or 3/4" in brush to sweep color in from the edge towards the center all along one side, turn the image and do the next side, repeat until all four sides have been colored. I used Distress Inks Peeled Paint and Forest Moss.
  • Mount the leaves on orange cardstock
  • Add two small strips of orange near the bottom
  • To color the flower, place your clean stencil back over the dry crackle paste and use 1/4" stencil brushes to add color. Use a Picasso (LL332) stencil to help shield areas from other colors.
  • On the flowers I used Distress Inks Mustard Seed, Spiced Marmalade, Fired Brick, Faded Jeans and Dusty Concord. Yes, I really did! One the leaves I used Peeled Paint and Forest Moss.
  • Use the larger green brush from the background leaves to add color around the edge of the flowers
  • Mount the flower on a blue or purple mat to pick up the little part of the flower with blue on it
  • Use foam tape to add the flower to the front of the card
For more Pinterest inspired creations, hop on over to the rest of the team blogs. Don't forget, you are always welcome to join our challenge. Just link your creation on the DREAM it UP! blog, or send Lynell a photo and description and she will post it for you. Of course, the possibility of winning a new stencil is always good motivation, so get creating!


Happy Creating,
Louise

Tuesday, June 12, 2012

UPCOMING CLASS

Here are the three cards we'll be creating in my upcoming class on June 19 at Memories and Beyond in Downers Grove, IL.  There are still a couple of spots left, so give them call to reserve yours! We'll use the beautiful new Stylized Dahlia stencil (LG743) from Dreamweaver Stencils and learn three techniques, the stencil is yours to take home.

LG743 - Crackle Paste technique

LG743 - Distress Powder technique

LG743 - Molten Lava technique

Hope to see you there.
Happy Creating,
Louise

Thursday, May 10, 2012

Dreamweaver May Challenge

Our Dreamweaver Stencils May challenge is to create either black and white cards with a POP of color, or graduation themed cards. We always love it when you play along with us, so please join our challenge for the chance to win some great stencils! Post your creation on the DREAM it UP! blog through the Mr. Linky tool or email a picture of it to Lynell at lynell@dreamweaverstencils.com.
It's just like the lottery, you have to play to win!
This week I want to share a sneak peek of one our new designs that will be released this month to our stores. Some people may not think this is a graduation card, but it COULD be, for that special, music-loving graduate you know!

Electric Guitar - LL3028

This card features the new Electric Guitar (LL3028) stencil with Crackle Paste. Here's how you do it:
  • Tape the stencil to white cardstock with removable tape
  • Apply a layer of Matte Yellow Embossing Paste (DMYP) over the stencil using the Paste Spreader (LM2010)
  • Remove and clean the stencil, let the paste dry
  • Reposition the clean and dry stencil over the dry yellow paste and tape in place with removable tape
  • Apply a layer of Crackle Embossing Paste (CEP) over the stencil with the paste spreader
  • Remove and clean the stencil, let the paste dry
  • Reposition the stencil over the dry paste layers and use small stencil brushes to apply color to the design
  • Remove the stencil and use the left over ink in the brushes to add some color to the background
  • Mount into a great card by adding some "strings" to one side of the card before attaching the guitar to the other side (notice there are 6 strings because most electric guitars have 6 strings!)
  • This one won't get lost in the pile of "regular old graduation cards!"
No graduations coming up? This would also make a great birthday card or even a Father's Day card for that hip dad who still loves his music (or is that a dad that needs a hip....hmmmm!).
There are 12 new designs that will be released this month, so be sure to check with your local stamp store for the other great designs.
I'll be featuring another one of the new designs in my upcoming class at Stampology Chicago on May 19th. We'll be using the beautiful new Stylized Dahlia (LG743) in three different techniques. Here's a peak at one of the cards we'll be doing that day.


Check out the creations from the rest of the team too, just click on their names below.

Happy Creating,
Louise