Showing posts with label Art Glitter. Show all posts

Thursday, August 7, 2014

August as an Adjective!

As we are heading towards back-to-school again, it is only appropriate that we break out our dictionary for this month's Dreamweaver challenge..."AUGUST as an ADJECTIVE"! 
Merriam-Webster defines august as, "marked by majestic dignity or grandeur", with synonyms such as, "dignified, distinguished, imposing, portly, solemn, staid, and stately". Now, I don't know just how dignified and stately the Dream Team can become for an entire month, but we are all going to give it a try! How about trying along with us, and linking YOUR creations to the inlinkz tool below for a chance to win the wildest stencil design your little heart is screaming for. 

Here's my creation for this week:
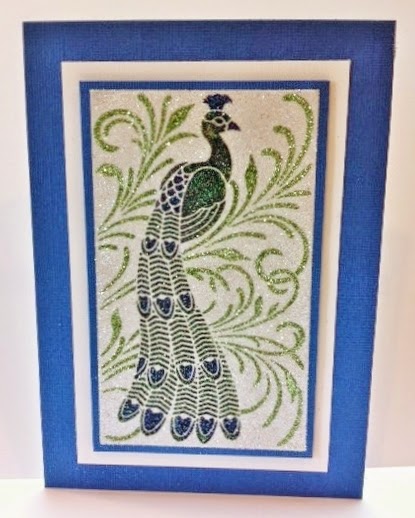
LG730 Peacock - double glitter technique


It's always difficult to photograph this technique and capture the real beauty of it. The Peacock (LG730) itself fits the definition of august, and the glitter makes it especially so! Here are the steps for creating this simple, but elegant card:

  • Use Dreamweaver Handmade Hawaiian Soap to apply a coat of soap on the back of the stencil
  • Use a large brush to sweep away any excess soap flake in the openings
  • Apply  a piece of Mounting Paper Double-sided to a deep blue piece of cardstock that is 1/4" larger than the mounting paper each direction
  • Remove the release paper from the mounting paper and place the stencil on the sticky surface, soap side down. (use the release paper to pat the stencil in place)
  • Use a cut straw or small spoon to apply glitter to each area
  • Rub the glitter gently into the openings with your finger
  • Carefully brush away any excess glitters using the larger stencil brush
  • Place the stencil face down on the table and carefully peel off the glittered image, making sure to keep your stencil flat
  • Sprinkle the exposed sticky background with clear glitter
  • Mount into a wonderful card

Just a note, I like to use opaque glitters for the main image and transparent glitter for the background. I thought about adding a beautiful ribbon from May Arts, but I decided that this beautiful peacock was august enough to stand on its own!

Put on a straight face for the "A" team this week:


Happy Creating,
Louise
An InLinkz Link-up

Thursday, October 17, 2013

Mysterious and Magical Week 3!

OK, am I the only one that feels like time has sped up! I truly don't know how it got to be the middle of October already! I haven't even worked on my Halloween cards yet, much less Thanksgiving and Christmas! Mysteriously it all seems to get done eventually...maybe that's the Magical!
Are you ready to be spooked, mystified and magically transported to the land of Halloween and holidays? Hop on board the Dream Team train as we journey through all things Mysterious and Magical through the month of October. Our guest "engineer" is Miss Eerie herself, Alison Heikkila. October promises to be a very bumpy ride...
I really love witches' hats at Halloween, I always answer my door on Halloween night dressed all in black and wearing  a tall black witch hat. Alas, Dreamweaver Stencils does not have a witch hat stencil (I've talked to Lynell about that!) so I have gotten creative once more to make the perfect little hat for our wonderful Retro Standing Cat stencil (LL3021), my own version of "Cat in the Hat" so to speak! (If you missed my first hat creation, click here to see it) Here he is:


LL3021- Retro Standing Cat  - Glossy Black Embossing Paste
Black glitter from Art Glitter, and Green linen ribbon from May Arts
 Now, to create that cute little hat that is just the right size, I've combined parts of two other stencils, LM173 Birdbath, and  LM183 Ice Cream cones,  Paste with Glossy Black Embossing Paste, cut them out, layer them, add a little glitter pen to hide where they meet and create the look of a band around the hat, add it to the cat with foam mounting tape.

LM173 - Birdbath tape off just the bowl portion
LM183 Ice cream cones tape off the cone portion


Hope you like my Cat in the Hat, and will come up with some creative ways to use parts of your stencils to create magical designs!
Here are other team member links so you can look at their wonderful creations too!

Happy Creating,
Louise

Thursday, September 26, 2013

Awesome in Autumn!


This has been a busy month for the Dreamweaver Stencils design team! We have been featuring the beautiful glitter from Art Glitter in our Awesome in Autumn creations and spent a week creating fall designs combining our stencils with the fabulous stamps from Quietfire Design.

Follow the trail of bling on the Art Glitter blog, and the Dream It Up! blog. Play along with the monthly challenge of "Awesome in Autumn" and link your creations to the linkytool on the Dream It Up! Thursday posts for a chance to win some stupendous stencils and glamorous glitter! As if that wasn't cool enough, Art Glitter is offering a 20% discount this month if you use the code DW20 and...
Stencil with Style is also offering a 20% discount this month if you use the code SWS20!
Today I am sharing two sparkly goodies that I created a while ago, but I just love them and they show two techniques for you!

First is the beautiful Maple branch (LJ906) stencil that you may have seen on some of the other blogs this month.  This was done in the double glitter technique using Art Glitter Rock Moss Microfine glitter in all the stencil openings, then while the stencil was still in place, I used stencil brushes and ink pads to color the image. The microfine glitter is pretty easy to stencil over. The background was covered with Crystal Ultrafine glitter.
LJ906 - Maple branch in the Double Glitter Technique
The second card was created by first paste embossing the  Rooster stencil (LG732) with Metallic Gold Embossing Paste on black cardstock, removing the stencil (place in water for cleaning later), and sprinkling the whole image with True Red Ultrafine Opaque glitter, tap off the excess glitter and let the image dry thoroughly. When dry, use an x-acto knife to scrape away the glitter in some of the areas to expose the gold paste again. Cut out the rooster and mount him on decorative papers.

LG732 - Rooster in gold paste with True Red glitter, then scraped
I hope you have enjoyed our month of Awesome in Autumn and will consider joining our fun! Now head on over to the other team member blogs to check out their creations!

Kristi Parker  (our guest designer this month!)


Happy Creating,
Louise

Tuesday, September 17, 2013

Dreamweaver & Quietfire Awesome in Autumn Day 1!


Get ready for an amazing week of Awesome in Autumn! This week we are playing with the Quietfire Design team, and are so excited to play with their amazing images and sentiments. In their beautiful calligraphic style, their quotes and thoughts are the perfect addition to our Dreamweaver designs. Follow along with us, and leave your comments for an opportunity to win one of two wonderful prize packages:


Here's what I've created for today's post:

This is a very easy card. Here are the simple steps:

  • Tear the edge of a piece of text weight paper into a "wavy" pattern
  • Lay it over a piece of cream cardstock so only about 1/2" of the cardstock shows
  • Use Cut 'n' Dry foam to apply ink in a sweeping motion from the text paper onto the exposed cardstock all the way across the cardstock
  • Move the text paper down about 1/2" and ink again
  • Keep moving the paper down 1/2" at a time until you color all your cardstock
  • I did about 4 rows of Distress Ink wild honey, then 4 spiced marmalade, and 2 rusty hinge, finishing the bottom area with 4 rows of forest moss and frayed burlap at the very bottom and around the whole piece
  • Mount on a dark brown mat
  • Die cut the Dreamweaver Leafless tree (DX7020) out of a rust color cardstock and adhere it over the colored background, trim off any branches that hang over the edge
  • Stamp the Quietfire Design Friendship Quote Marks (6222) saying on cream cardstock with Archival Coffee Ink, tear the edges and ink with the same colors used for the background, edge with walnut stain
  • Mount the saying to the card with foam mounting tape
  • Use the Designer Dries Clear glue from Art Glitter along with their Ultrafine Metal Tip to apply adhesive to the tree and sprinkle the wet adhesive with glitter (I used a mixture of black, fool's gold, and fauna)

 Don't forget that Stencil with Style (SWS20) and Art Glitter (DW20) are both offering a 20% discount this month when you use the discount codes at check out.

Check out this week's awesomeness which includes...
Louise Healy (you are here)

Happy Creating,
Louise

Thursday, September 12, 2013

Awesome in Autumn Week 2!


Ready to be sparkly? This month is the annual collaboration between Dreamweaver Stencils and Art Glitter, and it promises to have double the glitter and double the fun! Follow the trail of bling all of this month on the Art Glitter blog, and the Dream It Up! blog. Play along with the monthly challenge of "Awesome in Autumn" and link your creations to the linkytool on the Dream It Up! Thursday posts for a chance to win some stupendous stencils and glamorous glitter! As if that wasn't cool enough, Art Glitter is offering a 20% discount this month if you use the code DW20 and...

Stencil with Style is also offering a 20% discount this month if you use the code SWS20!

It's hard to get in the Autumn mood during these 95 degree days we are having right now, but it is my favorite time of year, so that makes it easier. Here's what I created this week:
LG754 - Lg Oak Leaves

Art Glitter - Black, Pumpkin, True Red, Fool's Gold, Orange Crush , Fauna, & Crystal
LG754 - Lg Oak Leaves
I used the double glitter technique with several beautiful Art Glitter colors. I didn't have a dark brown for the stem and acorn tops, so I mixed a little Fool's Gold and Black on a coffee filer and put that in the areas I wanted. For the bottom of the acorn, I added a little Fauna (very pale gold) to the gold/black mix to lighten it up just a little. The leaves were sprinkled randomly with True Red, Pumpkin, Fools' Gold, Orange Crush and the rest of the gold/black mixture. Use your finger to rub the glitter around to blend the colors a little, tap off the extra glitter (i save that mix for another day!), turn it over and peel off the paper, sprinkle the background with Crystal glitter. Mount into a beautiful fall card. The beautiful ribbon I used is one of my favorites from May Arts, it is a gold black weave perfect for my design.

Check out this week's awesomeness which includes our super sparkly guest designer and previous Dream Team member...


Thursday, September 5, 2013

Awesome Autumn!

September should be bringing shorter days and cooler nights, which we need to get that spectacular fall color that I just love! Ready to be sparkly? This month is our annual collaboration between Dreamweaver Stencils and Art Glitter, and we promise double the glitter and double the fun! Follow the trail of bling all of this month on the Art Glitter blog, and the Dream It Up! blog. Play along with the monthly challenge of "Awesome in Autumn" and link your creations to the linkytool on the Dream It Up! Thursday posts for a chance to win some stupendous stencils and glamorous glitter! As if that wasn't cool enough,Art Glitter is offering a 20% discount this month if you use the code DW20Stencil With Style website offers online shopping and is offering a 20% off orders of Dreamweaver products with the code SWS20.


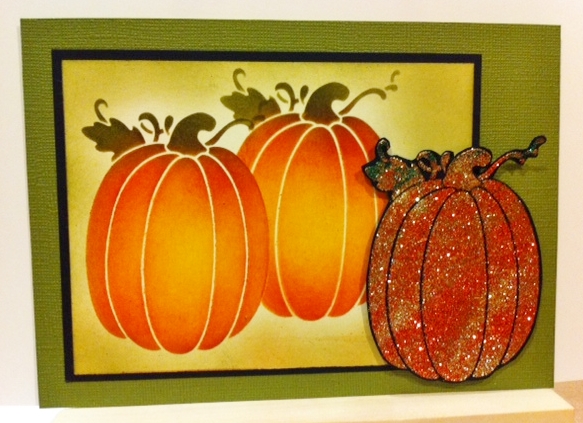
My first post for this wonderful theme is with a brand new stencil that we JUST got in, it will be in stores very soon. It is a beautiful pumpkin stencil, appropriately named "the great pumpkin", LL3036. This will be a tutorial on Paper Craft Planet as well.
In stamping, we often create masks of stamps so that we can create a collage or scene without destroying each image. We can do the same thing with stencils, here's how it's done:


Lay the stencil on a post-it note, be sure to have part of it on the sticky part,
use a pen or pencil to trace the outside openings, you don't need the leaf or tendrils
Remove the stencil and this is what you will see
Cut out the pumpkin right on the line you traced


Place the stencil in the lower left corner of a piece of cream cardstock cut 4" x 5 1/4"

Use removable tape to hold the stencil in place

Use a large stencil brush to apply color lightest to darkest

Brush on the Distress Ink wild honey first, using a rouging motion with your brush

Then spiced marmalade, keeping this more towards the outside, leaving the very center a lighter color

Add a little fired brick to deepen the edges and along the "ribs"

Use the Picasso (LL332) tool to shield the pumpkin as you add the green

Use forest moss for the stem and tendrils, it's OK if a little goes on the top of the pumpkin as a highlight

Remove the stencil and wipe it off with a soft cloth on both sides

Place your mask over the colored pumpkin, a little color should show

Place the stencil back on the cardstock, moving it over to the right and up a little
so it overlaps the first pumpkin just a little

Stencil on the wild honey ink

Then the spiced marmalade

Highlight with the fired brick

Forest moss for the stem and tendrils

Remove the stencil and place in water for cleaning

Remove the mask to reveal your first image

Rouge some of the forest moss around the edges

I left a little halo around the pumpkins to set them off a little more

Tape your clean, dry stencil to a piece of black cardstock with removable tape

Use a palette knife and paste spreader (LM2010) to apply a coat of Metallic Copper Embossing Paste

Remove the side and bottom tape first, use the top piece as a hinge to remove your stencil
Place the stencil in water for cleaning

Here's how it will look

Here comes the sparkly part!

Use a cut straw to apply Art Glitter Pumpkin glitter (mine had some glass glitter Amber shards in it from a previous project, which worked out fine, it just gave it more texture)

Keep sprinkling other colors, Fool's Gold, Orange Crush and Vine


Tap off the excess glitter over a trash can or filter, let the paste dry
When the paste is dry, the copper will really shine behind the glitter. Cut out the pumpkin, leaving a small black edge all the way around the image

Mount the colored pumpkins on a black mat and then on a 5" x 7" green card
Use foam mounting tape to add the glittered pumpkin to the lower right corner

 As always the Dreamweaver Stencils Where to Buy  link will give you a list of stores near you or the Stencil With Style website offers online shopping and is offering a 20% off orders with the code SWS20. Don't forget we will be featuring the beautiful Art Glitter products in all our creations this month.Over at the Art Glitter website, they are offering a sale of  20% off retail all month with the code DW20 at checkout!
Check out this week's awesomeness which includes our super sparkly guest designer and previous Dream Team member...


Happy Creating,
Louise