See the links below for the DW/Stampendous/Woodware hop!
Ready for fresh air, sunshine, new leaves, and flowers blooming? Well, the Dream Team is right there with you! Our challenge for the month of March is...coincidentally...Marching into Spring. Per usual, we'd love to have you play along with us, and link your own creations to theInlinkz tool on the Dream It Up! blog, or at the bottom of this post. Play as many times as you'd like. Those of you who work Dreamweaver and/or Stampendous products into your projects receive bonus points, but everyone has an opportunity to be the winner who receives the stencil of their choice.
Ready for fresh air, sunshine, new leaves, and flowers blooming? Well, the Dream Team is right there with you! Our challenge for the month of March is...coincidentally...Marching into Spring. Per usual, we'd love to have you play along with us, and link your own creations to theInlinkz tool on the Dream It Up! blog, or at the bottom of this post. Play as many times as you'd like. Those of you who work Dreamweaver and/or Stampendous products into your projects receive bonus points, but everyone has an opportunity to be the winner who receives the stencil of their choice.
A sure sign of Spring is Easter, and with Easter only a week away, I decided that a fun Easter card was the perfect way to end this month's challenge.
Here's my hint of Spring, Easter style:
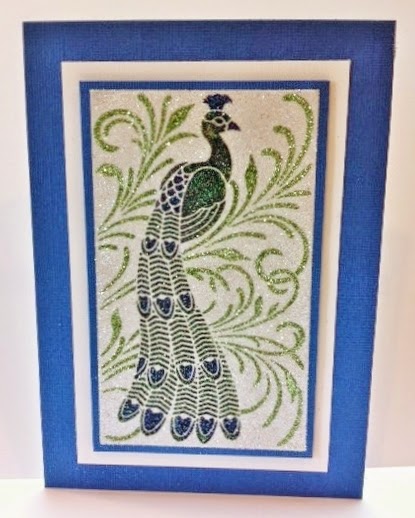
You can't make an Easter card without glitter! The Dreamweaver Easter egg stencil (LG685) is perfect for the beautiful Double-glitter Technique. The stencil is actually egg-shaped, so you get a nice "frame" of glitter too. Here's how you do it:
 |
| Easter egg stencil - LG685 Double-glitter technique |
- Cut a piece of Dreamweaver Double-sided mounting paper (MPDS) a little larger than the stencil
- Cut a piece of colorful cardstock an 1/8" each direction larger than the MPDS
- Remove the release paper from one side of the MPDS and center it on the cardstock
- Place the stencil face down on a paper towel and gently rub the back with Dreamweaver Handmade Hawaiian Soap (DHHS) making sure to go over all the back
- Use a large stencil brush to brush away any flakes of soap from the openings
- Remove the top piece of release paper from the MPDS and place the stencil, soap side down, on the sticky surface
- Use a piece of release paper to press the stencil firmly on the sticky paper
- I used Stampendous fran-tage micro glitters (Lavender, Orange, Pink and Teal) to "color" my egg
- To remove the stencil, turn the glittered image face down on a clean surface and gently peel the paper off the stencil, making sure to keep the stencil flat on the surface
- Sprinkle the exposed sticky paper with Crystal micro glitter to finish off the design
- Mount on a cute paper, add a pretty bow, and you've got a great Easter card!
When I first finished the card it didn't have the bow and looked like this:

Pretty, but I felt like it needed a little something, hence, the bow. Which do you like? Also, after I finished glittering, I decided to add a second layer to the flowers because I had gotten a little Teal glitter in the pink flowers. I like the dimension the additional layer gives. Here's a close up:

The links for DW/Stampendous/Woodware
Stampendous Blog
Pam Hornschu
Kristine Reynolds
Lea Kimmel
Woodware Craft Collection Blog
Debs Frost
Dreamweaver Stencils Blog
Lyn Bernatovich
Gill Wilson
Louise Healy
Laura Drahozal
Lynn Mercurio
Happy Creating,
Louise


.JPG)


