Showing posts with label Metallic Copper Embossing Paste. Show all posts

Thursday, April 16, 2015

Showers of Showers! Week 3

Ever use the expression, "When it rains, it pours"? This does not have to be a bad thing, does it? For the month of April, the Dream Team are featuring "Showers of Showers" as our theme. Our designers have so many choices with this theme, baby, wedding, rain...You'll definitely want to see what we come up with each week of April!

As usual, we'd love for you to play along. Just link your creation on the Dream It Up! blog for a chance to win the stencil of your choice...bonus chances for incorporating Dreamweaver and/or Stampendous in your design. Here's what I'm showering you with this week...

"Wishing you a ton of happiness!"
I just love this Dreamweaver  Sm Elephant stencil (LL3042). It makes a wonderful Baby Shower card and can be done in any color palette. I'm going to a Baby Shower this weekend and they know they are having a boy, so this was perfect timing for me! 

I've been preparing some class samples for a workshop I'm going to be doing for Door County Rubber Stamps in June and it just so happened that I had some left over paste that was perfect for the "Sludge technique" Elephant. Whenever you have left over paste that you have colored, save it to an empty paste jar (or any container that seals well). It will keep quite a while in the right container. Anyway...I had some left over blue (Regular Paste with Metallic FX Navajo Sky added), and matte copper (Regular Paste and Copper Paste mixed in equal amounts). Add alternating dollops of paste along the edge of your paste spreader (LM2010), swirl them together a little with the tip of a palette knife, then paste your image. Do I even have to tell you to save the left over! They turn out different each time. This one is a little more "stripey" than "marbley", but it worked great with the striped paper I chose. I can never throw left over paste away, so Sludge pasting is the perfect solution. Beautiful papers also help tie everything together, as does the fabulous ribbon from May Arts.

Our "A" wants to "shower" you with lots more ideas, so be sure to stop over and leave them a "shower" of comments!
Louise Healy

Happy Creating,
Louise

Thursday, October 2, 2014

Happy HallowThanksMas!

Can you tell that sometimes Dream Team's "Fearless Leader", Pam Hornschu, has a hard time deciding on monthly challenges? Since the team will be taking turns all month with the Smeared and Smudged 31 Days of Halloween (see the DREAM it UP! blog for details), and we are doing a Christmas collaboration with Stampendous and Core'dinations the 13th - 17th, the confusion should be understandable. Therefore...happy HallowThanksMas! As usual, we'd love for you to play along with the challenge and link your creations to the Inlinkz tool on the Dream It Up! blog. Just in case you are wondering...NO, YOU DO NOT NEED TO POST SOMETHING WITH ALL THREE HOLIDAYS ON IT! However, you get bonus points for actually using Dreamweaver stencils and product on your creations! And bonus points might actually earn you an extra stencil as our monthly winner...just sayin'!

Here's my creation for today:

LL3043 Oak leaf done in the Molten Magic Technique
DX7020 Leafless tree die
I just love the new oak and maple leaf stencils that were just released! They are perfect for a variety of techniques and make fabulous fall cards. To recreate this, follow these simple steps:

  • Tape the oak leaf stencil (LL3043) to cream colored cardstock with removable tape
  • Use a palette knife and paste spreader to apply a coat of Metallic Copper Embossing Paste
  • Remove the stencil and place in water for later cleaning
  • Sprinkle a variety of Metallic F/X Powders over the wet paste
  • Tap off excess powder and heat the image with a heat tool until the paste is bubbly all over
  • Let image cool before using a Swiffer cloth to buff off excess powders
  • Rouge the edges with Distress Inks in fall colors
  • Rouge the edges of a 5 1/2" x 5 1/2" card front with the same colors
  • Mount a piece of wood grain paper on the card front
  • Die cut some branches out of black cardstock using DX7020 Leafless tree die
  • Arrange them coming out from the left side of the card front and adhere in place leaving most of the branches loose
  • Use foam mounting tape to add the Oak Leaf image over the branches
  • Add a little jute string bow (May Arts) as a finishing touch
A great card for an Autumn birthday, anniversary, really, any occasion, or Thanksgiving! 


I hope you've enjoyed my creation today. Remember to visit the rest of the team, as confusion takes rein...could be interesting!

Louise Healy


Happy Creating,
Louise

Thursday, June 19, 2014

Old, New, Borrowed, Blue!

WOW! We had a great time last week playing with all the wonderful products from IMAGINE Crafts and Dreamweaver Stencils. Thanks for all the comments, they make it much more fun! Congratulations to our winners (see the DREAM it UP! blog to see if you were one of the lucky three!).
This week we are back to our June challenge of "Old, New, Borrowed, Blue" theme. I created this card as part of an upcoming class(July 9th) at Memories and Beyond in Downers Grove, IL.
LG757 Heron stencil - Sludge Pasting Technique

This is a technique called Sludge Pasting. It's when you take a couple of different colors of paste, gently swirl them together on your paste spreader, then paste your image. It's a very cool look. We will be mixing some colors for one of the other cards, then use our left overs to create this card. "Waste not, want not!"
Here's all three cards we will be creating in class:


The "A" team is creating for you today:

Happy Creating,
Louise

Thursday, September 5, 2013

Awesome Autumn!

September should be bringing shorter days and cooler nights, which we need to get that spectacular fall color that I just love! Ready to be sparkly? This month is our annual collaboration between Dreamweaver Stencils and Art Glitter, and we promise double the glitter and double the fun! Follow the trail of bling all of this month on the Art Glitter blog, and the Dream It Up! blog. Play along with the monthly challenge of "Awesome in Autumn" and link your creations to the linkytool on the Dream It Up! Thursday posts for a chance to win some stupendous stencils and glamorous glitter! As if that wasn't cool enough,Art Glitter is offering a 20% discount this month if you use the code DW20Stencil With Style website offers online shopping and is offering a 20% off orders of Dreamweaver products with the code SWS20.
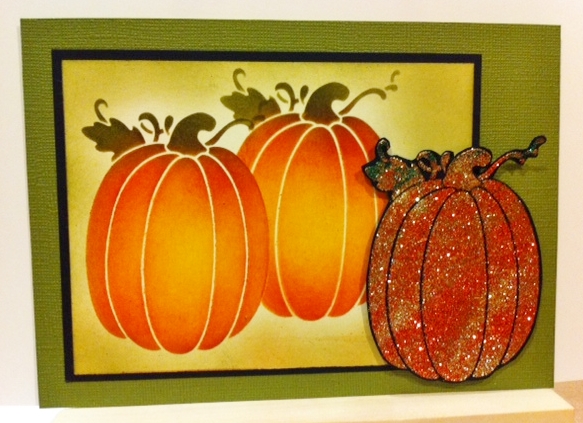


My first post for this wonderful theme is with a brand new stencil that we JUST got in, it will be in stores very soon. It is a beautiful pumpkin stencil, appropriately named "the great pumpkin", LL3036. This will be a tutorial on Paper Craft Planet as well.
In stamping, we often create masks of stamps so that we can create a collage or scene without destroying each image. We can do the same thing with stencils, here's how it's done:


Lay the stencil on a post-it note, be sure to have part of it on the sticky part,
use a pen or pencil to trace the outside openings, you don't need the leaf or tendrils
Remove the stencil and this is what you will see
Cut out the pumpkin right on the line you traced


Place the stencil in the lower left corner of a piece of cream cardstock cut 4" x 5 1/4"

Use removable tape to hold the stencil in place

Use a large stencil brush to apply color lightest to darkest

Brush on the Distress Ink wild honey first, using a rouging motion with your brush

Then spiced marmalade, keeping this more towards the outside, leaving the very center a lighter color

Add a little fired brick to deepen the edges and along the "ribs"

Use the Picasso (LL332) tool to shield the pumpkin as you add the green

Use forest moss for the stem and tendrils, it's OK if a little goes on the top of the pumpkin as a highlight

Remove the stencil and wipe it off with a soft cloth on both sides

Place your mask over the colored pumpkin, a little color should show

Place the stencil back on the cardstock, moving it over to the right and up a little
so it overlaps the first pumpkin just a little

Stencil on the wild honey ink

Then the spiced marmalade

Highlight with the fired brick

Forest moss for the stem and tendrils

Remove the stencil and place in water for cleaning

Remove the mask to reveal your first image

Rouge some of the forest moss around the edges

I left a little halo around the pumpkins to set them off a little more

Tape your clean, dry stencil to a piece of black cardstock with removable tape

Use a palette knife and paste spreader (LM2010) to apply a coat of Metallic Copper Embossing Paste

Remove the side and bottom tape first, use the top piece as a hinge to remove your stencil
Place the stencil in water for cleaning

Here's how it will look

Here comes the sparkly part!

Use a cut straw to apply Art Glitter Pumpkin glitter (mine had some glass glitter Amber shards in it from a previous project, which worked out fine, it just gave it more texture)

Keep sprinkling other colors, Fool's Gold, Orange Crush and Vine


Tap off the excess glitter over a trash can or filter, let the paste dry
When the paste is dry, the copper will really shine behind the glitter. Cut out the pumpkin, leaving a small black edge all the way around the image

Mount the colored pumpkins on a black mat and then on a 5" x 7" green card
Use foam mounting tape to add the glittered pumpkin to the lower right corner

 As always the Dreamweaver Stencils Where to Buy  link will give you a list of stores near you or the Stencil With Style website offers online shopping and is offering a 20% off orders with the code SWS20. Don't forget we will be featuring the beautiful Art Glitter products in all our creations this month.Over at the Art Glitter website, they are offering a sale of  20% off retail all month with the code DW20 at checkout!
Check out this week's awesomeness which includes our super sparkly guest designer and previous Dream Team member...


Happy Creating,
Louise