Showing posts with label Color Solution Alcohol Inks. Show all posts

Thursday, July 10, 2014

JULY...a month to DIE for!

Welcome to week two of our Dreamweaver Stencils July Challenge! Hope everyone had a wonderful 4th of July weekend, I know I did!
All of this month the Dream Team are featuring our newest toys...our DIES! You'd be surprised at how many we have, and what fun things you can do with them...especially when used in conjunction with many of their matching stencils. They are such a simple way to create an effective card.
Here's an example of a quick, yet beautiful card for when you just don't have the time to be too "creative"!

LL516 - Bearded Iris and DD004 Long Nesting Ovals
The steps to this are easy:

  • Lay a piece of natural colored cardstock in your spray box
  • Lay the Bearded Iris stencil (LL516) face up on the cardstock (you can see Lynell's name when it is face up)
  • Use Memories Mist  Plum Sake and Lavender Tea in the flower and but areas, you can use a second piece of paper to help shield the leaves if you want
  • Use Memories Mist Wheatgrass and Liquid Pine in the leaves and stem
  • Carefully remove the stencil and place in water for cleaning
  • Spray a light coat of Pale Ale and Iridescent Memories Mist in the background of the iris
  • Remove Iris from the spray box and let it dry
  • Take the largest oval from the Long Nesting Ovals (DD004) die set and place it cutting edge down over the Iris image
  • Tape in place with removable tape and run through your die cut machine
  • Edge the oval with Distress Ink vintage photo
  • The background is a piece of vellum with Dreamweaver Color Solutions pounced around the whole piece (Citron, Mojito Green, & Gold Star), let dry
  • I used a permanent glue stick over the entire piece of vellum and stuck it to the front of an A2 natural, top fold card, tied a piece of May Arts ribbon around the whole front and made a bow off to the right
  • Add the oval iris with foam mounting tape for added dimension
  • The A2 card was then adhered to a piece of lavender cardstock to really bring out the purple in the iris
The "B" team has more great creations for you on their blogs too! And don't miss our July Guest Designer, Terri Sproul.


Happy Creating,
Louise

Wednesday, April 23, 2014

Dreamweaver-Stampendous Blog Hop Day 3!

Welcome to Day 3 of the Dreamweaver Stencils and Stampendous Faces of Art blog hop! The Dream Team always loves incorporating the great products from Stampendous into our creations.


We were challenged to create using Dreamweaver and Stampendous products, and based on the name of the hop, "Faces of Art".   Here's what I created for you today:


 Today's creation has a more modern feel, I think so anyway. It's almost minimalist in that there are only three images used (plus the ric rak), but I really like how it turned out. From a distance, when it's hanging on a wall, it looks like a vase of flowers on a ledge and a couple of flowers have fallen. 


Up close, you see the detail of the Stampendous Blossom Beauty stamp shine through the acetate flowers.  I was going to add a flourish on the edges, but the more I looked at her, the more I liked her just like this!
Here's how I did it:

  • Stamp the Blossom Beauty face with black ink on white cardstock
  • Color her lips and eyes
  • Place the open plastic template the comes with the stamp set over the stamped face and tape down with removable tape
  • Use a 3/4" stencil brush and light green ink to stencil a little color over the whole face
  • Lay the Fan pattern stencil (LJ813) over the face and tape in place with removable tape
  • Use a 3/4" stencil brush to add more of the same color through the Fan stencil, repeat with a slightly darker shade of green
  • Remove the fan stencil and wipe off the ink with a soft cloth
  • Return the fan stencil over the green then shift it up so the openings are now between the first openings
  • Use a clean 3/4" stencil brush to add a pink ink through the stencil
  • Remove and clean the stencil and the plastic mask
  • Stamp the Blossom image on acetate with Black StazOn ink six times
  • Use the three different size dies to cut two flowers of each size
  • Use Dreamweaver Color Solutions inks on the back of the acetate ( I used Lemoncello, Paprika Red, and Cosmo Pink), you can use an applicator to apply the ink or I just dropped some color around and let it spread, let them dry well
  • Coat a 10" x 10" canvas with white Gesso, let dry
  • Ink edges with stencil brush and the same light green ink from the face
  • Draw a black line 2" up from the bottom edge of the canvas
  • Stencil the fan pattern below the line with the light green color, you will have to move your stencil over, but this is an easy design to line back up
  • Add a little of the pink color above the line
  • Stencil the fan pattern on a piece of white cardstock that is slightly larger than the face, edge with a black marker
  • Layer the face on a black mat, then on the larger stenciled piece and glue to the center of the canvas, lining it up along the black line
  • Glue down the flowers (I use a liquid glue that dries clear and brush it all over the acetate, it does not show that way
  • Add black ric rak around the edge
NOTE: when cutting the acetate flowers, I put the acetate flower on a piece of cardstock and die cut it, otherwise the acetate is too thin and doesn't cut cleanly. (but that could be my acetate, so you should experiment with yours first)


Be sure to hop over to the other designer's Faces of Art postings:


Happy Creating,
Louise

Tuesday, August 21, 2012

Day 2 Christmas in August Blog Hop!

All of this week, the Dream Team and the Woodware UK teams are celebrating the release of the new holiday designs from Dreamweaver Stencils. Of course, no celebration is complete without prizes...and there are some fabulous ones for those commenting on both sides of the "pond".
Each team will be providing the opportunity to win four prize packages of stencil designs, perfect for the holidays. Just leave your comments each day on each players' post as well as the Dream It Up! and Woodware UK blogs, and the Dreamweaver and Woodware Facebook pages. Two random commentors will be chosen from the batch of weekday posts, one each from the DW and WW Facebook pages, and from the big hop on Saturday...from each side of the pond!* That's a total of eight prize packages up for grabs! Here's what you could win:

For Day 2 of the hop I'm sharing one of my favorite new stencils, Heart Ornaments (LJ921). Of course, I love all the new stencils, but this one has really captured my heart (I know, corny pun!). Laura's beautiful metal work always inspires me to dig my metal out again, and I have to say, I was pretty pleased with how this turned out!
LJ921 on Red metal
with LJ922 in background
For this card, I ran red metal thru my Vagabond with the stencil flat against the platform, metal red side down, rubber embossing mat, and two clear cutting plates (never been cut on). After removing the metal from the stencil, I placed it red side up over the new Christmas borders stencil (LJ922) and used a paper stump to rub the design into the background (this design is de-bossed). Sand the whole thing, use the stump to flatten the background back down, use a teflon tip stylus to sharpen the hearts and branch from both the front and back. At that point I turned it to the back and filled the hearts with MercArt backing paste and let it dry. Turn the design back over and apply Color Solutions Pine Bough on the branch and background with an applicator and felt. The hearts were first brushed with Gold Star, then Winter Red was dropped on them and brushed around. Just a little Darkest Brown brushed on the branch for contrast.
Don't forget to leave me some holiday cheer as you move on to the other players for today, Tuesday, August 21st:

Remember to follow along with the challenges on the Dream It Up! and Woodware UK blogs for more prize opportunities, and more crafty inspiration, as well as "liking" DW and WW on Facebook.
 *Winners selected must be from USA/Canada/UK only.
Happy Creating,
Louise

Monday, August 20, 2012

Christmas in August Hop!

All of this week, the Dream Team and the Woodware UK teams are celebrating the release of the new holiday designs from Dreamweaver Stencils. Of course, no celebration is complete without prizes...and there are some fabulous ones for those commenting on both sides of the "pond".
 Each team will be providing the opportunity to win four prize packages of stencil designs, perfect for the holidays. Just leave your comments each day on each players' post as well as the Dream It Up! and Woodware UK blogs, and the Dreamweaver and Woodware Facebook pages. Two random commentors will be chosen from the batch of weekday posts, one each from the DW and WW Facebook pages, and from the big hop on Saturday...from each side of the pond!* That's a total of eight prize packages up for grabs! Here's what you could win:

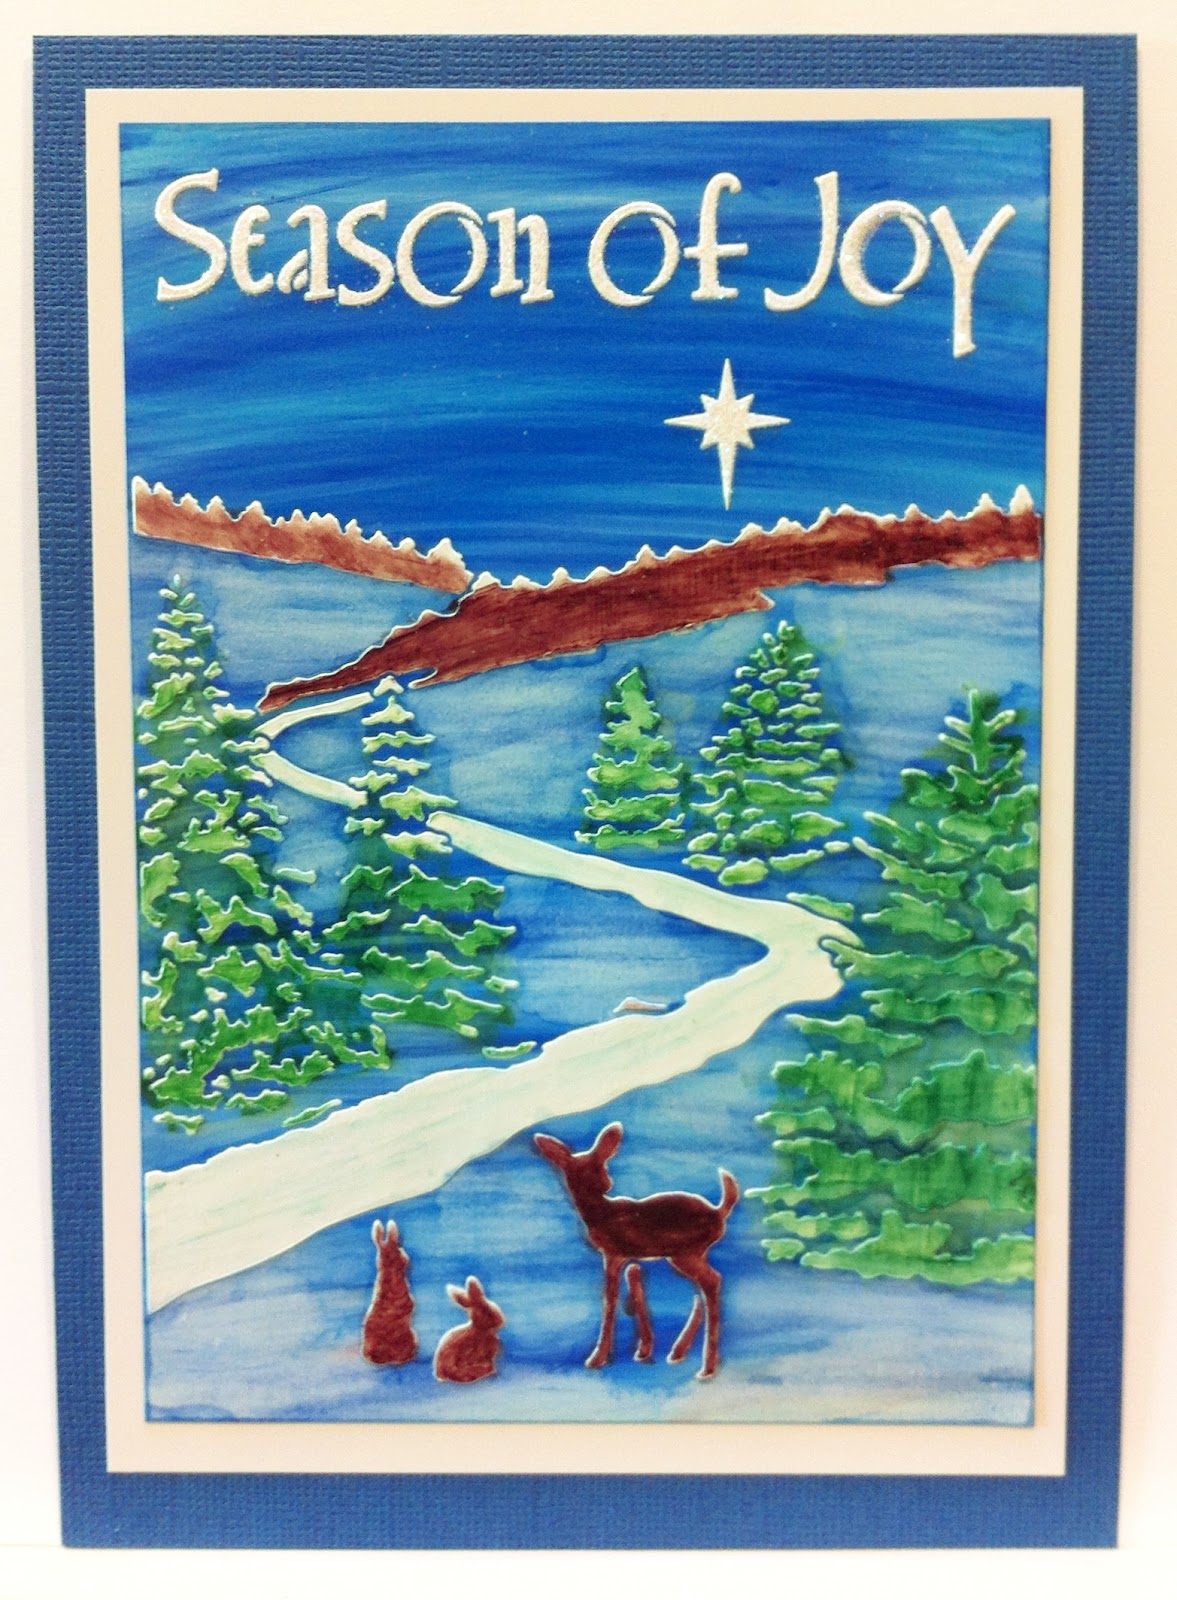
For my first post this week I chose the new Season of Joy stencil (LX7016). It has such a peaceful feel to it, the perfect message for the holidays!
This was created by first swiping Color Solutions Iceberg and Blue Velvet on glossy cardstock. Let that dry a little while then paste emboss the stencil with Glossy White Embossing Paste. When the paste is dry, use a clean qtip and some of the Thinner to soften the color in the "snow" area. Let that dry a minute or two, then use a paint brush or felt nibs to apply Color Solutions Noble Fir and Pine Bough on the trees,  and Darkest Brown (toned down with Thinner) on the animals and mountains. A touch of glue on the star sprinkled with Crystal glitter was the finishing touch.
Don't forget to leave me some holiday cheer as you move on to the other players for today, Monday, August 20th:
Remember to follow along with the challenges on the Dream It Up! and Woodware UK blogs for more prize opportunities, and more crafty inspiration, as well as "liking" DW and WW on Facebook.
*Winners selected must be from USA/Canada/UK only.

Happy Creating,
Louise

Thursday, February 16, 2012

Dream Scheme Thursday

Welcome to the  third week of Dreamweaver Stencils February challenge. This month's challenge is anything GREEN (as in the color), "green" (as in reduce, reuse, recycle), or St. Patrick's Day themed. You are encouraged to play along with us throughout the month for the chance to win a wonderful prize from Dreamweaver. Just create something gorgeous (no pressure!), post it on your blog or whatever public forum you use, then go to the DREAM it UP! blog to add a link to your creation using the Mr. Linky tool. If you don't have a blog or a way to link your design, just email it to Lynell at lynell@dreamweaverstencils.com and she will post it on her blog for you. We would love to see what you have created this month!
Today I am using two of the new stencils released last month at CHA. The Open Butterfly (LG740) and Mushrooms (LL3025). I took a little liberty with the green theme, but as you can see there's still a lot of green!

To create the background
  • place the Mushroom stencil in the lower left corner of a piece of white cardstock (3 1/2" x 4 1/2")
  • Use painters tape or removable tape to mask off the large mushroom
  • Apply Brilliance Thyme ink with a 1/2" stencil brush all over the grass and small mushroom in the left corner only
  • Apply a little Brilliance Ivy ink with another 1/2" stencil brush just on the grass (use a Picasso LL332 to shield the small mushroom from the ivy color)
  • Use a 1/4" stencil brush to apply Brilliance Coffee Bean ink on the small mushroom cap and stem, but leave a little of the light green showing in the center of the cap
  • Move the stencil to the lower right corner of the piece and repeat the steps for the other small mushroom
  • Move the stencil back over so the mushroom from the right corner is next to the other mushroom in the left corner that you did first, and add  a third small mushroom as shown
  • Remove the stencil and tape, clean and dry the stencil
  • Use the 1/2" brush and Thyme ink to sweep some green ink near the bottom of the stenciled mushrooms
  • Use another 1/2" brush and Memento Bahama Blue to sweep some color at the top to create the sky
  • Adhere to a solid green mat (3 3/4" x 4 3/4") then to the front of a green gingham check card (finished card size is 4 3/4" x 6")
To create the Crackled Butterfly:
  • Tape the Open butterfly stencil (LG740) to a piece of green cardstock (I used the same color as my green mat for the background) using removable tape of gentle painters tape
  • Apply a layer of Glossy Green Embossing Paste using the Paste spreader tool (LM2010)
  • Remove stencil, place in water to clean, making sure to keep your stencil flat while gently brushing with a small fingernail brush
  • Place the clean stencil on a piece of soft cloth (I use old t-shirts) and dry thoroughly
  • Let the green paste dry naturally (about 40-50 minutes) or place the pasted design on a warming tray set to the low setting (about 20 minutes)
  • When the green paste is dry, place the clean, dry stencil back over the green paste and tape all around the design again
  • Use the paste spreader to apply a coat of Crackle Embossing Paste over the green layer. You don't want to scrape too hard, or your crackle layer will be too thin
  • Remove and clean the stencil
  • Set the Crackled image aside to dry. The cracks will begin to appear within 10 minutes, but drying time is about the same as for the green
  • When the Crackle paste is dry, return the stencil to the design again and tape all around
  • Place a piece of felt on the Color Solutions applicator and apply a variety of colors to the felt (I used Iceberg, Citron, Sugar Plum and Creme Brulee) making sure to keep the drops a little separated from each other
  • Use  a pouncing motion to apply the colors over the crackled image
  • Reapply more drops as needed trying to keep the colors in their original spot
  • Put a drop of Creme Brulee on a craft mat and use a brush pen nib to pick up the ink and apply it to the body of the butterfly
  • Remove the stencil (don't clean it yet, I have more to tell you!)
  • Let the inks dry for just a minute or two, then cut out the butterfly and adhere just at the body to the mushroom layer (so the wings flap free)
Now what about all that beautiful Color Solutions ink still on the stencil?  Well, I can't stand wasting it so here's what I do:

  • Place the butterfly stencil on a clean paper towel (ink side up)
  • Use a mini mister or any fine mister bottle to spray the ink with alcohol (not the thinner or blending solution, you are not supposed to spray those!) until it is wet again
  • Place a clean piece of white cardstock over the wet inks and use a gentle rubbing motion across the image to transfer the wet ink to the cardstock
  • Cut around the image with a deckle scissors
  • Use the 1/2" brush and Memento Bahama Blue ink to sweep some color around all the edges
  • Mount into another beautiful card!
I know this has been a lot of steps, but none of them really take very long, and the results are definitely worth it. I hope you've enjoyed today's creations and will spend a little more time checking out what the rest of the team has created for you today.
Happy Creating,
Louise

Thursday, December 15, 2011

Vintage Christmas

Welcome to this week's Dream Scheme Thursday sponsored by Dreamweaver Stencils. This week we were given the challenge of using a specific sketch with a Vintage Christmas theme. Sounded easy enough right? Ha, there's a reason they call them challenges! Although I had several ideas for Vintage Christmas, they did not fit the sketch challenge very well. But I have to say, I'm pretty happy with what I finally designed.
The sketch looked like this:

Here's my version of Vintage Christmas using the sketch (well, all the elements of the sketch anyway!):

I started by taping the vertical ornament stencil (LL468) to white cardstock and applying Glossy Red Embossing Paste. After removing the stencil I sprinkled Crystal glitter on three ornaments, and Metallic FX Kimono Red on three, then set those aside to dry.
The Long Merry Christmas (LL557) stencil was paste embossed using Metallic Gold Embossing Paste and set aside to dry.
I wanted to have some small holly leaves at the tops of the ornaments so I used the new Color Solution Alcohol Inks (Pine Bough, Citron, Gold Star) on a piece of felt along with a few drops of cleaning solution and pounced it over vellum. It dries pretty fast so I was able to keep creating by laying the 3 Xmas icons stencil (LL469) on the now green vellum and use an Extra Fine Black Sharpie to trace the small holly leaves several times. Cut them all apart, but put them in a little container until you're ready for them or they magically disappear!
By this point my pasted images were dry and ready to assemble. Buff the ornaments that had the FX powder on them to get the excess off, then cut the ornaments out to get three sets. I used a gold Krylon pen on the edges and the "caps" of the ornaments. The gold stripe paper behind the ornaments was left over from a previous project using Memories Mist Gold on the Plaid maker stencil (LX 7002).
To assemble, cut three pieces of striped paper and three black mats for behind them. Attach two ornaments to each striped piece using foam mounting tape behind the ornaments. Place another piece of foam mounting tape at the top and apply a group of holly leaves in a cluster (you may need to use some additional adhesive once the foam is covered. Attach a small red bow to each as a finishing touch. Mount the three sets of ornaments toward the left side of the card (5" x 7") staggering them slightly. Cut apart the Merry Christmas leaving the holly attached to each piece. Use a COPIC marker to color the holly and berries. Mount the words on black cardstock with foam mounting tape, and trim around the image leaving a small black border all the way around. Add additional holly leaves between the words to cover the black. Use red stickles for berries. Adhere it on the right side of the card. There you have it -- Vintage Christmas.
I hope you have time to check out all the team blogs for more beautiful samples of Vintage Christmas using Dreamweaver Stencils great products. Be sure to check out the DREAM it UP! blog too, and play along with the fun if you can.
Happy Creating,
Louise