Showing posts with label Distress Embossing Powders. Show all posts

Thursday, July 25, 2013

Summertime, Sparklers, S'more!

Hello everyone. Today I am on my way up to northern Minnesota to celebrate Christmas in July with my husband's family. We have been doing this for many years now and it is absolutely wonderful! No hassles or guilt at the holidays themselves, and no snow! We have traditional Thanksgiving and Christmas food, presents, games, bonfires, boating, fishing, it's four days of family fun!
But I wouldn't leave you high and dry with no Thursday inspiration. Thank goodness for technology, it gives us a lot of freedom to share ideas no matter where we are, or aren't! This months Dreamweaver Stencils theme is Summertime, Sparklers, S'more and this week I am sharing another re-released stencil with you. This one I saved especially for this week because it reminds me of the cattails around the lakes in northern MN and it's sparkly!
LL3035 - Cattails Scene
LL517 - Cattails
Steps:
  • Cut a piece of Dreamweaver double sided mounting paper the same size as the stencil
  • Cut a light brown mat 1/4" inch larger in each direction than the stencil
  • Remove the release paper from one side of the mounting paper and center it on the mat
  • Use Dreamweaver's Handmade Hawaiian soap to apply a light layer of soap to the back of the stencil
  • Use a large stencil brush to remove any crumbs of soap from the openings of surface of the stencil
  • Remove the top piece of release paper from the mounting paper and center the stencil, soap side down, over the sticky surface
  • Use the release paper to press all the bridges of the stencil down to the sticky paper
  • Use a cut straw to apply Ranger Distress Embossing Powders to each opening 
  • I used a combination of Mustard Seed, Spiced Marmalade and Fired Brick for the sun, Weathered Wood and Broken China in the water, Walnut Stain in the cattails and birds, and Frayed Burlap, Shabby Shutters and Peeled Paint in the leaves
  • Press the powders down with your finger or a piece of release paper
  • Use a stencil brush to gently brush away any extra powder
  • Turn the image face down on a paper towel and carefully peel the paper off the stencil, being sure to use your other hand to keep your stencil flat on the table
  • Use a heat gun to heat set the powders
  • Sprinkle the background with Crystal glitter (the "Sparkler" part of the challenge!)
  • Mount on a darker brown mat
  • Use kraft cardstock as a cardbase
  • Tape the Cattails stencil (LL517) toward the left edge and use a 1/2" stencil brush and Memento Rich Cocoa ink to stencil color through the openings, repeat a couple times across the card ( I moved the stencil down a little to extend the stems to the bottom of the card before I move to the next grouping)
  • Mount the Cattails Scene in the lower right corner with foam tape
  • A GREAT guy card, especially if they are the "outdoorsy type"!
Check out the other team member's creations this week. 


Next week we will be having a blog hop with the team over at Stampendous.

It's fun in the sun time again with another collaboration between Stampendous and Dreamweaver Stencils! We'll be playing together all of next week, with a fabulous hop on Friday, August 2nd, featuring a slew of amazing talent from both teams, and of course...prizes!!!

Two prize packages will be given away for the comments left on posts Monday-Thursday, July 29th - August 1st, and one prize will be given away for comments left on the hop day, Friday, August 2nd. Winners will be selected randomly and announced Thursday, August 8th. (Note: USA addresses only, please, due to shipping costs.) Here's what you could win:


Stampendous Surfer and Sandcastle Kiddos • Dreamweaver Hot Air Balloon, Ice Cream Cones, Summer, Mosaic Swirls, Bird Words, and Sandcastle stencils


Happy Creating,
Louise

Thursday, July 11, 2013

Summertime, Sparklers and S'More!

*correction to instructions add 6:00 pm, sorry!

Welcome back to the Dreamweaver Stencils July challenge. The rain has finally stopped here in northern Illinois and it is now our normal hot and muggy summertime, which fits our challenge perfectly! Congratulations to our winners from the Dreamweaver/Ranger blog hop! Don't forget to contact Lynell for your prize.
I'm continuing my beach theme this week with a card that just screams "hot summer day at the beach!". Of course, a hot summer day at the beach is fine with me, I wish we were there!

LR502-Sun and LL3033-Sandcastle

This is the same technique I used on my home decor piece on June 13th, if you missed it click here to check it out. It's a fun technique that shows a lot of dimension.

  • Tape the Sun (LR502) stencil to yellow cardstock with removable tape onto a piece of copy paper
  • Use a palette knife and paste spreader to apply Matte Black Embossing Paste over the Sun
  • With the stencil still in place, carefully sprinkle some Distress Embossing Powder in Mustard Seed and Spiced marmalade over the wet paste, tap it gently in place
  • Lift the whole copy paper and turn it over to tap off any extra powder (be careful!)
  • Gently remove the stencil from the image trying not to let any move powder fall through the openings (the goal is to keep the edges black)
  • Place the stencil in water for cleaning
  • Heat set the emossing powder, set aside to let the paste dry completely
  • Repeat the process with the Sandcastle (LL3033) stencil but using blue cardstock, and a mixture of Distress Embossing Powders Antique Linen, Peeled Paint, and Fired brick
  • Heat set the embossing powders and let it dry thoroughly
  • Cut out the Sun leaving a small yellow edge all the way around
  • Use the Picasso (LL332) stencil to put some clouds in the sky above the sandcastle. When you do this on blue paper, you first use a 3/4" stencil brush and white ink to make some areas white (I like Brilliance Moonlight White), then use the edge of the Picasso and a 1/2" brush with a light blue ink to create the "cloud" at the edge of the white areas
  • Use a 1/2" brush to add some brown ink at the bottom of the sandcastle
  • Use foam tape to apply the sun to the sky
I hope you are enjoying your summer and the summertime creations the team has been showing. Be sure to check out what they've created this week for you!


Happy Creating,
Louise

Thursday, June 13, 2013

Pintrest Inspiration

Welcome back to week two of our Dreamweaver Stencils June challenge. This month we are creating projects based on things that inspire us on Pinterest. There are so many wonderful ideas that people are willing to share, it is easy to spend hours looking at all the pretty pictures and forget to actually create something yourself! This week I was inspired by a beautiful creation I found by Lynette Carroll Designs. Unfortunately, her website is not functioning right now, but you can still enjoy this link to the picture
http://pinterest.com/pin/166492517447323672/

I just loved the muted tones and how everything went together so beautifully. Mine is not shabby chic like hers, but it uses the same principles of soft tones, and each image following a theme. This project will also act as my "final design" for the Dreamweaver Stencils Teacher Certification class that I took last month from Lynell. This technique was one of my favorite that week. It is very easy, but very stunning I think.  I'm hoping to get it in a black frame and photograph it again before this posts, but there is a huge storm passing over our area right now, so I'm not sure that is going to happen! If not, you can still enjoy this much of it!
"At the shore"


LM181 - Seahorse

LM106 - Scallop

LM209 - Starfish

LM104 - Nautilus

LM290 - Par escargot

LM179 - Sea turtle

LL3033 - Sand castle

LM267 - Lg conch
It's hard to tell from the photo, but the finished size is 12" x 12". Each of the images is done with the same way:
  • Place the paper to be pasted on a craft mat or scrap piece of paper and tape the stencil in place using removable tape
  • Use a palette knife and paste spreader to apply Dreamweaver Matte Black Embossing Paste
  • With the stencil still on, sprinkle the whole image with Ranger Distress Embossing Powder, I used a combination of Antique Linen (2+ parts), Fired Brick (1 part), and Peeled Paint (1 part) to create a "sandy" color
  • Lift the whole craft sheet or scrap paper up to tap off excess powder while the stencil is still on the paste
  • Set it back down and carefully remove three sides of the tape, leaving your hinge tape in place
  • Gently lift the stencil off the paste trying not to let any more powder fall through the openings
  • Heat set the embossing powder
  • I used Coordinations Iced Cocoa paper to paste and as the background, and matted each image with a cream colored cardstock
  • Stencils used: LL3033, LM104, LM106, LM209, LM181, LM179, LM267, LM290, the seahorse was pasted first one direction, cleaned and then pasted the other direction
  • I also lightly sanded the paper to give it a more weathered look
Here's the finished project on my fireplace. It fits in perfect with my shell filled lanterns and our conch shells.


Don't forget to click over to the other team members blogs to see what they've been inspired by this week over at Pinterest! We are so happy to have Jennifer Dove joining our challenge this month as a guest designer.


Happy Creating,
Louise

Thursday, January 17, 2013

A Fresh Start Week 3

CHA is over and fresh ideas are swarming around in my head! It is always so inspirational to walk the aisles and see new products and ideas everywhere. Exhausting, but exhilarating at the same time. We met a lot of new contacts to work with this next year to bring you "fresh"  ways to use your Dreamweaver Stencils with other great products on the market! Here are a few pictures from the show.
Louise & Pam, Pam & Georgia
Rebekka, Jennifer
One piece I did for CHA was using the beautiful canvas pieces from Canvas Corp LLC. Here's what I came up with using Dreamweaver's fabulous new Leafless tree stencil (LX7020) and canvases from Canvas Corp. They worked perfectly together.

LX7020 - Matte Black Embossing Paste
with Distress Embossing Powders

Here's how to do it:
  • Use a foam brush to apply a coat of claudine hellmuth Studio gesso from Ranger to the 10" x 10" canvas
  • Let dry
  • Tape the Tree stencil to the upper left corner of the canvas with removable tape
  • Use a large stencil brush to apply brown ink over the image
  • Use a smaller stencil brush to apply some black ink over the brown
  • Move the stencil to the lower right corner and repeat the inking steps
  • Rouge the edges of the canvas with the ink remaining in the brown brush, you may need to add more ink
  • Set aside to dry
  • Apply Ranger Adirondack Acrylic Paint Dabber Pebble to a 6" x 6" canvas, not completely covering the surface
  • Dry gently with a heat gun or let air dry
  • Tape the Leafless Tree stencil (LX7020) to the painted canvas with removable tape
  • Use a palette knife and paste spreader (LM2010) to apply Dreamweaver Matte Black Embossing Paste (DMBP) across the stencil
  • Remove the stencil and lightly sprinkle the wet paste with a mix of Distress Embossing Powders Vintage Photo and Walnut Stain
  • Heat gently to set the powder, then let dry completely
  • Wrap black twine from May Arts at angles around the larger canvas attaching in the back
  • Attach the tree canvas to the larger canvas with Tacky Glue
Please take some time to enjoy more fresh ideas from our other team members.
Happy Creating,
Louise

Thursday, November 8, 2012

Dreamweaver and Distress Fun Grand Finale!


We've now had four weeks of festively distressed fun playing with the Ranger/Tim Holtz Distress Powders along with our wonderful line of Dreamweaver Stencils and products. Huge thanks to Tim Holtz and the fab people at Ranger for sharing these four collaborative weeks with us, and providing the yummy shades of Distress Powders for us to create with. We've been inspired by the process, and we hope you have, too!
 
If you haven't won one of the prize packages yet, you still have one more opportunity this week as the set below is up for grabs to a random commenter on one of the Dream Team blogs.

If you've been following along each week, you've seen some gorgeous creations with these stencils and powders, so you should be all fired up to get distressed! If you've missed the first three weeks, check them out once you've made the rounds today:


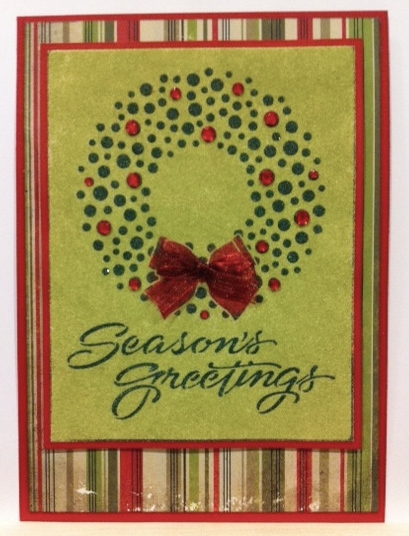
My festively distressed project for this week is this:


A very easy card with only three colors of powders, a small bow, and a few gems. Very Clean And Simple! Mount it on some great papers and it's fast too!
The stencil is LJ897 Rhinestone wreath, here's how I did it:
  • Place a piece of Double sided mounting paper on a mat of red cardstock
  • Soap the back of the stencil with Dreamweaver Handmade Hawaiian Soap
  • Use a large stencil brush to remove any flakes from the openings and front or back
  • Remove the top piece of release paper from the double sided mounting paper and place the stencil soap side down on the sticky surface
  • Use the handle of your brush to tap the stencil securely on to the sticky surface
  • Use a small cut straw to carefully apply Pine needles Distress Embossing powder on the wreath and greeting areas, tapping off the extra in different directions so it does not get on the bow area, rub it down gently with your finger
  • Apply Fired brick Distress Embossing powder to the bow area and rub down
  • Turn the image face down on a clean surface and carefully peel the paper off the stencil, making sure to keep your stencil flat against the table
  • Sprinkle the exposed sticky background with Shabby shutters Distress Embossing powder and rub in gently
  • Brush of any extra powder gently
  • Heat set with a heat gun, let cool
  • Mount to the card front with foam mounting tape
  • Add a small red bow to the bow area for extra dimension
  • Add some red crystal gems here and there around the wreath
  • Send it off to someone you know to brighten their holidays!
Don't forget to leave me some love before hopping to the rest of the Dream Team blogs:

Dream It Up!
Louise Healy (you're here!)

Please remember to continue to follow the team through the Dream It Up! blog as we bravely go where no stenciler has gone before, to like us on our Facebook page, and to learn from our fabulous weekly Thursday Tutorials on Paper Craft Planet as well.

I hope you've enjoyed the techniques we've been sharing with you using Dreamweaver Stencils and Tim Holtz's Distress Embossing Powders and that you will give it a try yourself!
Happy Creating,
Louise

Thursday, October 25, 2012

Festively Distressed Fall Week 2!


Welcome back to week two of our amazing collaboration between Ranger's Tim Holtz line of Distress Powders, and our beautiful Dreamweaver Stencils & Products! If you missed last week's event, start HERE.

Last week, we were totally blown away by the awesome response we received from those of you who hopped over from Tim Holtz's blog and the Ranger blog to check us out! We've been doing the "happy dance" ever since! Hopefully, you will continue to check us out, especially over the next few weeks as we continue our play-time in Tim's sandbox. (It is rather an appropriate metaphor considering the cool texture of his Distress Powders.)

Apparently, Tim and the wonderful people at Ranger were also excited by the response, and they've decided to "up the ante" in the form of an additional prize package(s) which will include TWELVE Distress Powders each, and a handful of Dreamweaver Stencils to go with! Wow! Just one teeny-tiny detail...to win one of these packages from their blog, you need to create something with Tim Holtz's Distress Powders and Dreamweaver Stencils and attach it to the inlinkz on the Ranger blog. Winners will be selected randomly. For more details, head over to the Ranger blog.

Once again, this week we are offering another fall prize package as shown here. Just leave us all some love as you visit, for an opportunity to be the one random winner we select. Curious as to who won from last week? It could be YOU! Visit the Dream It Up! blog for the announcement of the lucky commenter.

 
Here is what I had fun creating this week:

Use the Dreamweaver Hawaiian soap to soap the back of
LM295 Autumn stencil, use a large stencil brush to brush
away any flakes from the openings or surface of the stencil


Cut a piece of Dreamweaver's double-sided mounting paper
the size of the stencil and attach it to a mat of dark brown cardstock


Remove the top piece of release paper and place the stencil,
soap side down, on the sticky surface. Use the end of the large stencil brush
to tap the stencil firmly onto the sticky surface 

Choose some Distress Embossing powders, I used
fired brick, spiced marmalade, scattered straw, peeled paint, and
a leftover combination of vintage photo and walnut stain from a previous project

Use an angled straw to start layering your rainbow of colors

Here's what it will look like

Gently rub the embossing powders into the sticky paper with your finger

Brush off as much extra powder as you can

Turn the image face down on the table and carefully
peel the paper off the stencil, making sure your stencil stays flat

This now exposes the sticky paper in the background

Sprinkle Distress Embossing powder frayed burlap over the image

Gently rub it in and remove any excess powder

Heat set

Repeat the soaping process on the back of
LJ874 Fall borders stencil

Place the stencil on a piece of double sided mounting paper that was
attached to a brown mat and use a straw to start adding powders where you want them

The straw lets you keep your powders just where you want them

Don't forget to rub the powders down a little each time

I first put two shades of brown on the acorns (walnut stain in the caps
and the mix in the acorn) then sprinkled the leaves with a leftover mix
of fired brick, spiced marmalade and scattered straw that I had from a
class I taught last week (I can never just throw it away, it's still fine!)

Turn it face down on the table

Peel the paper off the stencil

Sprinkle the background with frayed burlap, and heat set

I wanted a little more detail, so I put the stencil back over the image and used
a small stencil brush and Distress Ink walnut stain to add a little shading here and there

Then I used my Micron pen to do a little outlining and add some
veins in the leaves, not a dark solid line, more of a hint of an outline, it really
gave it a lot more dimension

Mount the Fall borders layer on a piece of Rusty Hinge, then use
foam tape to pop the Autumn in the center, and add a small
bow made of twine to complete the Festively Fall look!
Pictures never do justice to our creations. I wish you could see and feel this in person, the frayed burlap in the background is just the perfect color to compliment the other fall colors on the cards. Oh well, you'll have to take my word for it!

Aren't you excited to see what's next? Check out the Dream Team players for today:
 

You already know where to find Ranger's/Tim Holtz' products, but if you are having difficulty finding Dreamweaver, encourage your local stamp/paper-craft store to carry the line of fabulous stencil designs, pastes, and other products to mix with all of your stash of Tim's crafty goodness. You can also purchase our products on-line at Stencil with Style.

We'd love to see you come back regularly and play along with our monthly challenges (and more opportunities to win stencils) by linking your creations to the mr. linky on the Dream It Up! blog, or emailing pics of your creations to lynell@dreamweaverstencils.com. Since you're on the computer already, head on over and like us on Facebook as well. Just another location for dreamy and distressed inspiration!
 
Happy Creating,
Louise

Thursday, October 18, 2012

Festively Distressed Fall!


The Dream Team designers are so excited to have the opportunity to play along with some unique Ranger Products in the Tim Holtz line...specifically, the Distressed Embossing Powders! Our own Louise Healy demonstrated how fabulous these are with the Dreamweaver Stencils when she created this card for a fun class at CHA Summer 2012:


Apparently, Tim Holtz agreed with all of us on this unique use of his product, so he very generously had Ranger (thanks, Patti!) send the team some samples to play and blog with. So...here we go!

Here's my post for today:
Start with a natural finish wood mirror, I used
an Ikea 10" square mirror

Use the Ranger Adirondack Snow Cap Dabber to
put a white washed look over the whole mirror.
Let it dry, or use a heat tool.


Apply Distress Stains to create sky and ground areas,
wiping gently between colors with a soft cloth or paper towel.

Dry with a heat tool to make sure the stains are
completely dry before continuing.

Tape LG687 - Geese stencil to the upper right corner.
Use a small stencil brush to apply Distress Ink black soot over the design.

Use foam to apply a layer of Distress embossing Ink over the geese.

Sprinkle with Distress embossing powder black soot,
tap off excess and heat thoroughly. Brush gently with
hand when cool to remove the distress crystals.

Place LL517 - Cattails stencil in lower right corner and
use a small stencil brush to apply Distress Inks vintage photo.

Apply a layer of Distress embossing Ink.
Sprinkle the pods with vintage photo Distress powder, and the
leaves with frayed burlap Distress powder. Tap off excess and heat set.

Repeat the cattails two more times in the left corner.
Add additional inks to create more depth (I added evergreen bough and
broken china to the "water" area using a small stencil brush. I also
added some spice marmalade behind the cattails using Cut 'n Dry foam
then finished the edge with walnut stain Distress Ink on a foam applicator)

Finish it off with some garden twine and a charm, plus a few
of the leaves I had left over from last weeks project! 
If you missed last week's post on how to create pasted embellishments with your stencils, click here.
See that little mirror in the mirror, that is from a CHA class that I took with Tim Holtz one year. It was the first time I had worked with his Distress Embossing Powders and I have been hooked ever since! You really need to give them a try, they give such texture to your projects!

For the next four weeks, on our regular Thursday posts, we will be featuring the wonderful things that you can do with Tim's Distress Powders and Dreamweaver Stencils. Leave comments on each of the team blog posts for opportunities to win one prize package for each of the four weeks:


Don't forget to play along with the Dream Team's monthly challenges for more opportunities to win some great stencil designs! October's challenge is Festively Fall, and November is CAS (clean and simple) Christmas! Link your creations on the Dream It Up! blog, or email pics to lynell@dreamweaverstencils.com. Join us on Facebook as well! Lots of inspiration, and lots of fun!

I didn't even know this was the prize stencil when I created my project this week!
Here are a couple of other cards I have created with the Double-glitter technique substituting Ranger's Distress Embossing Powders for the glitter and then heat setting when finished.
LG745 - Tree line

LG743 - Stylized dahlia

LL379 - Tall palm trees


Happy Creating,
Louise