Showing posts with label Crystal Glitter. Show all posts

Friday, December 16, 2016

Season's Greetings!

One more simple idea for last minute cards. Maybe even choose someone from your Naughty list!


Supplies:

Stampendous:
FMS4042 Snowflake Cascade Metal Stencil
GL220U Crystal Glitter

Dreamweaver:
DWLL453 Season's Greetings Stencil
DWDGWP Glossy White Embossing Paste
DWDPK Dreamweaver Palette Knife
DWLM2010 Paste Spreader

Plus:
My Color Cardstock - Sky
White Cardstock
Removable Tape
Foam Tape

Instructions:
Step 1:  Fold a 7" x 10" piece of Sky cardstock in half to form an A7 card
Step 2: Cut a 2 1/2" x 3 3/4" piece of Sky cardstock, tape the Season's Greetings stencil on it with removable tape
Step 3:  Tape the Snowflake Cascade stencil to the left side of the card front with removable tape
Step 4:  Use a palette knife and paste spreader to apply Glossy White Embossing Paste over the designs, remove stencils and place in water for cleaning later
Step 5:  Sprinkle the wet paste with Crystal Glitter, tap off extra, let paste dry
Step 6: Mount the dry Season's Greetings on a 2 3/4" x 4" mat of white cardstock
Step 7:  Use foam tape to apply the saying to the card front

See the Stampendous Blog for more ideas!

Happy Creating,
Louise

Friday, December 2, 2016

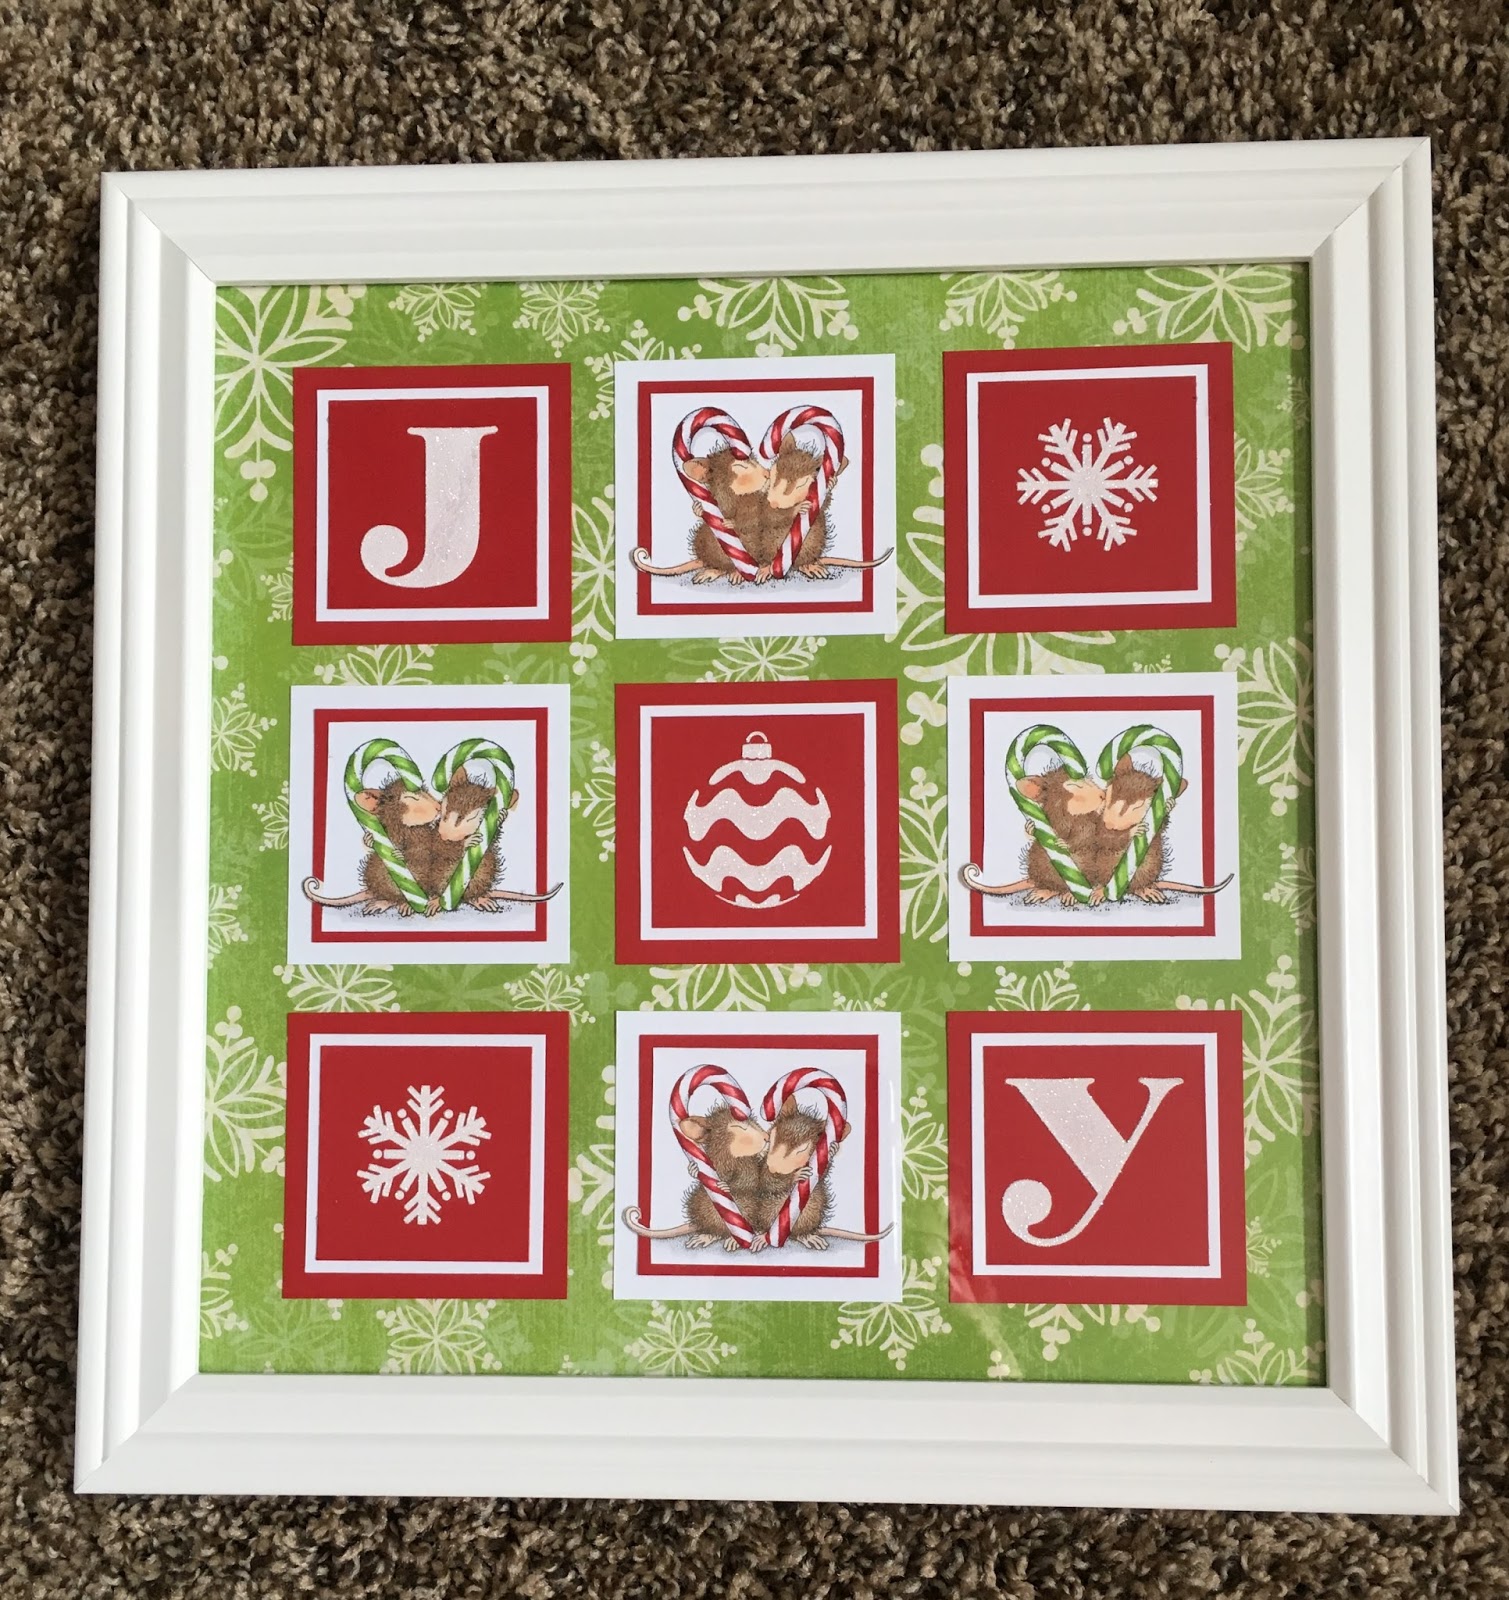
JOY!

Merry Preparations is this week's theme for the Stampendous Design Team. Most of our creations are featuring the helpful little friends for the House Mouse collection. This wall decoration can be used year after year in your home, or make two, one for you and one for a friend!

"JOY!"

Stampendous:HMCM14 Cling Candy Cane Kiss Stamp
Acrylic Handle
GL220U Crystal Glitter Multi Ultra Fine
MPW811 Mixed Media White Paper
MEM01 Memento™ Tuxedo Black Ink by Tsukineko®

Dreamweaver:
DWLL510 Joy Ornament Stencil
DWLS26 Snowflake Stencil
DWDGWP Glossy White Embossing Paste
DWDPK Dreamweaver Palette Knife
DWLM2010 Paste Spreader

Plus:
Red Cardstock
Graphic 45 HoHoHo 4500988 
Copic Markers - R30, R27, R39, YG01, YG03, YG05, YG17, E51, E95, E31, E33, C1, B60
Removable tape
Grid Ruler
Pencil
Scissors

Instructions:
Step 1:  Red Cardstock - 5 pieces 3" x 3", 4 pieces 2 1/2" x 2 1/2", 5 pieces 2 1/4" x 2 1/4"
Step 2: White cardstock 4 pieces 3" x 3", 5 pieces 2 1/2" x 2 1/2", 4 pieces 2 1/4" x 3"
Step 3:  Use removable tape to tape off the "O" and "Y" on the Joy Ornament stencil, tape the "J" to the center of one of the 2 1/4" x 2 1/4" pieces of red cardstock
Step 4:  Use a palette knife and paste spreader to apply a coat of Glossy White Embossing Paste over the image, remove stencil and place in water for cleaning, sprinkle wet paste with Crystal glitter, tap off extra, let paste dry
Step 5:  Repeat steps 3 and 4 for the "O" and "Y" taping off the other letters
Step 6:  Use removable tape to tape the Snowflake Stencil to one of the 2 1/4" x 2 1/4" pieces of red cardstock
Step 7:  Use a palette knife and paste spreader to apply a coat of Glossy White Embossing Paste over the image, remove stencil and place in water for cleaning, sprinkle wet paste with Crystal glitter, tap off extra, let paste dry
Step 8:  Repeat steps 6 and 7 for the second snowflake
Step 9: Use Memento Tuxedo Black to stamp the Candy Cane Kiss image 4 times on 2 1/4" x 2 1/4" pieces of white, color with Copic Markers
Step 10:  Use a centering ruler across each image to mark 1 1/8" to each side of center, trim each side for a finished size of 2 1/4" x 2 1/4" trimming around the tails
Step 11:  Layer the "JOY" letters and the 2 snowflakes onto white mats 2 1/2" x 2 1/2", then on to the 3" x 3" red
Step 12: Layer the Candy Cane Kiss images onto red 2 1/2" x 2 1/2" mats, then on the 3" x 3" white
Step 13: Use a grid ruler to help line up and adhere the squares 1" in from the top and sides and 1/2" between each letter on a 12" x 12" piece of HoHoHo cardstock, leave a 1/2" between the rows
Step 14:  Frame in a white 12" x 12" frame

Hope your holiday preparations are going well! Stop over at the Stampendous Blog to see more creations!

Happy Creating,
Louise

Thursday, June 12, 2014

Dreamweaver and Imagine Crafts Day 4!

 The fun continues in our first ever collaboration week with Imagine Crafts/Tsukineko! We've shared all of our toys on both sides, so be prepared for Endless Possibilities! Three prize packages are available, each containing one set of each of these inks and stencils/dies. Just leave comments on each post of each day this week (June 9th - June 13th) for a chance to win! Winners will be announced on Tuesday, June 17th!
Imagine Crafts New StazOn Pads from Tsukineko
Stencils and Dies Prize Package

Thursdays are the Dream Teams normal day for posting ideas based on our monthly challenge, so today I chose to incorporate the hop and our challenge of "Old, New, Borrowed, Blue" in my creation. Here it is:
Fairy flower circle - Glossy Blue Embossing Paste with Crystal glitter
Fan pattern and Petals background - VersaFine Majestic Blue Letterpress Technique
This card fits all the themes. Old = LJ813 Fan Pattern is from 2001, New = LM2012 Fairy flower circle was released in 2012 (newish counts), Borrowed = the card layout is from some cards I saw on Pinterest, and Blue = well, I think the card speaks for itself on this one! The background stencil is LJ899 Petals background. The ink is VersaFine Majestic Blue from IMAGINE Crafts, and the flower is done with Glossy Blue Embossing Paste. The ribbon is from May Arts, it wasn't quite the color I wanted, so I swiped the Majestic Blue ink pad over it to darken it so it would match better.

Letterpress technique used on Petals and Fan pattern:

  • Tap the VersaFine Majestic Blue ink pad all over the back of the stencil
  • Carefully place it on a clean paper towel on the large platform of a die cut machine
  • Place white cardstock over the ink and hold in place while covering it with the rubber embossing mat
  • Add two cutting plates (I use ones with no cuts when I emboss) and run through your machine
  • Remove the embossed image and place it face up on the table
  • Use a 3/4" stencil brush to brush a light coat of the Majestic Blue over the embossed areas
  • Trim to fit, mount on white cardstock that has been edged with the blue ink
Paste embossing:
  • Tape the Fairy flower stencil to white cardstock with removable tape
  • Use a palette knife and paste spreader to apply a coat of Glossy Blue Embossing Paste over the stencil
  • Remove the stencil and place in water for cleaning
  • Immediately sprinkle the wet paste with Crystal glitter, let dry
  • Edge a slightly larger square of white cardstock with the blue ink
  • Mount the Fairy flower to the edged square and then onto the card


Happy Creating,
Louise


Wednesday, June 11, 2014

Dreamweaver and Imagine Crafts Day 3!

The Dreamweaver Stencils design team is pairing up with Imagine Crafts to bring you a week filled with creative ideas, you won't want to miss a moment of it!
 Welcome to our first ever collaboration week with IMAGINE Crafts/Tsukineko! We've shared all of our toys on both sides, so be prepared for Endless Possibilities! Three prize packages are available, each containing one set of each of these inks and stencils/dies. Just leave comments on each post of each day this week (June 9th - June 13th) for a chance to win! Winners will be announced on Tuesday, June 17th!
Imagine Crafts New StazOn Pads from Tsukineko
Stencils and Dies Prize Package
Today I am featuring the beautiful Floral w/dots stencil (LJ927) and VersaFine inks from IMAGINE Crafts. I just love the rich color you get from these quick drying pigment inks.


This couldn't be easier, simply:

  • Tape the stencil to white cardstock with removable tape
  • Use 1/4" stencil brushes to add color to the design, be sure to have your Picasso (LL332) handy to cover small areas or to work as a shield ( I used Crimson Red & Imperial Purple on the big flower, Habenero & Satin Red on the small flowers (with Memento Dandelion in the centers), and Spanish Moss & Olympia Green on the leaves) 
  • Here's what it will look like at that point
I did two at a time to try two different embossing pastes over them
  • Clean of the stencil with a soft cloth to get some of the ink off (I left mine in place while I did this)
  • Use a palette knife and paste spreader to apply a coat of Regular Embossing Paste to one image
  • Remove the stencil and immediately sprinkle the wet paste with Crystal glitter, tap off extra, and let paste dry
  • Use a palette knife and paste spreader to apply a coat of Translucent Embossing Paste over the other image
  • Remove the stencil and immediately sprinkle the wet paste with Crystal glitter, tap off extra, and let paste dry
  • Here's how they look when dry
Regular Embossing Paste on left, Translucent Embossing Paste on right
Both are beautiful, the Translucent just lets the bold color come through, the Regular leaves it with a more muted look. I could now go back to the one with Regular Paste and add more color if I choose, or use it in the muted form (yes, I am able to stencil right over the glitter, your brush gets a little sparkly, but it washes out). 
My finishing touch was to take a small piece of velvet ribbon from May Arts and tape off one "Thank You" from the Thank yous stencil (LG691), place the stencil on the ribbon and apply Glossy White Embossing Paste over the words. Let dry thoroughly.

Just Imagine the possibilities of what everyone else has created!

Happy Creating,
Louise


Thursday, February 13, 2014

February Flutters!

The Dreamweaver challenge for the month of February  is in full swing. It will be a short month of posts for the Dream Team, but we're pretty excited to share with you our versions of"February Flutters", meaning anything that flutters. Heart flutters, wings that flutter, breezes, sails, etc. So, come along for the ride and link your own "flutterings" to the Dream It Up! blog for a chance to win the stencil of your choice. 
Meanwhile, here's my "fluttering" for the week featuring the new Zen Butterfly (LL3037) stencil.

LL3037 - Zen Butterfly
Close up of Green and Blue Embossing Paste with Crystal glitter
To create this project, just follow these simple steps:
  • Tape the stencil to white cardstock with removable tape
  • Use a palette knife to apply two dollops of Glossy Blue Embossing Paste to a paste spreader and one of Glossy Green Embossing Paste
  • Use the palette knife to gently swirl the two pastes together, be careful not to mix them too much
  • Apply the blended paste across the stencil
  • Save left over paste in a small container
  • Remove the stencil and place in water for cleaning
  • Sprinkle the wet paste with Crystal glitter, tap off extra and let paste dry
  • While the paste dries, use a 3/4" stencil brush and the clean, dry butterfly stencil to stencil some butterflies in the background of a piece of light blue-green cardstock
  • Layer into a beautiful card, embellish with a small bow
Fly on over to the other team member blogs for their fluttering creations!


Happy Creating,
Louise


Thursday, August 29, 2013

Christmas in August!

HAPPY BIRTHDAY ELLIE! Today my family is celebrating our darling granddaughter, Ellie's first birthday! It is hard to believe that a whole year has passed by already! We love you!

It's also hard to believe that this is our last Christmas in August challenge for Dreamweaver Stencils. Every month seems to fly by faster and faster. We hope you have been inspired to create your holiday cards and that we have made it a little easier! We would love for you to join our challenges, just link your creation over at the DREAM it UP! blog or send a photo to lynell@dreamweaverstencils.com and she will post it for you.

This week I was inspired by a technique that we used recently in a card club exchange group I belong to. It is a processes where you cut three layers of matching cardstock( each layer is about 1" smaller each direction) and lightly tack the layers together before stamping a large background image or a smaller image several times. Then you mat each layer in a coordinating color and line them back up. It is a very cool look. Here is the card I created for that club using a couple of stamps from Stampers Anonymous Tim Holtz collection:

And here is the card I created using the same process but with  Dreamweaver Stencils products:
LJ922 Christmas borders and LL469 Xmas icons
Glossy Red Embossing Paste and Crystal glitter from Art Glitter
The steps:
  • Cut one piece of white cardstock 4 1/4" x 5 1/2"
  • Cut one piece of white cardstock 3 1/4" x 4 1/2"
  • Cut one piece of white cardstock 2 1/4" x 3 1/2"
  • I used a little dot roller in each corner to adhere the three layers one on top of the other
  • Place the Christmas borders stencil (LJ922) on the stack and tape in place with removable tape
  • Use a palette knife and paste spreader to apply a coat of Glossy Red Embossing Paste over the image
  • Remove the stencil and place in water for cleaning later
  • Immediately sprinkle the wet paste with Crystal glitter, carefully tapping off the extra paste
  • Set the layered piece aside to dry
  • Tape the Xmas icons stencil (LL469) to a small square of white cardstock, positioning the poinsettia portion over the paper and taping off the other sections with removable tape
  • Apply Glossy Red Embossing Paste over the poinsettia area
  • Remove stencil and place in water for cleaning later
  • Sprinkle the wet paste with Crystal glitter
  • Set aside to dry
  • Cut one piece of dark green cardstock (I used a shimmer cardstock) 4 1/4" x 5 1/2" (yes, that's right)
  • Cut one piece of dark green cardstock  3 1/2" x 4 3/4"
  • Cut one piece of dark green cardstock  2 1/2" x 3 3/4"
  • Cut one piece of dark green cardstock 1 7/8" x 1 7/8"
  • Cut a strip of dark green cardstock 3/4" x 4 1/4"
  • When the paste is dry, carefully separate the three layers, I ran the edge of my palette knife under the edges to help get them apart
  • Trim the edges of the largest layer right to the edge of the paste
  • Mount each pasted layer on its matching dark green layer and then on top of each other
  • Adhere the strip of dark green across the three layers
  • Trim around the poinsettia image leaving just a small white edge all the way around
  • Mount it on the small dark green square and then on the card front
  • Cut a base card from white cardstock either 5 1/2" x 8 1/2" (scored at 4 1/4" for a side fold card) or  4 1/4" x 11" (scored at 5 1/2" for a top fold card)
  • Adhere the card front to the base card
Before you head over to the other team member blogs, I just want to let you know that next month we will be doing a collaboration all month long with the team from Art Glitter! We are very excited and look forward to having our own Kristi Parker Van Doren back as a guest designer for the month! You won't want to miss any of it! 

This week's designer links:

Happy Creating,
Louise

Thursday, August 22, 2013

Christmas in August!

Welcome back to our Dreamweaver Stencils August challenge of "Christmas in August". We had an incredible week last week with the team from Woodware Crafts, filled with wonderful ideas for the upcoming holidays. If you missed it, look back through some of our older posts for those beautiful projects. Winners of the prizes will be announce on the DREAM it UP! blog!
This week I have used our fabulous new Leafless tree die cut. Yes, I said die cut! Dreamweaver has released three new die cuts to match three of our stencils, with more to come! Here's what I came up with:
LJ878 - Snow splatter in Glossy White Embossing Paste
DX7020 - Leafless tree die cut from shimmery white cardstock
LM139 - Happy Holidays traced with a Memento marker in Paris Dusk
This is a very easy card:

  • Cut a piece of dark blue cardstock 5" x 7"
  • Tape the Snow splatters (LJ878)  stencil across the card with removable tape
  • Use a palette knife and paste spreader to apply Glossy White Embossing Paste
  • Remove the stencil and place in water for cleaning
  • Sprinkle the wet paste with Crystal glitter
  • Let paste dry (it won't take long because they are very small dots of paste)
  • Repeat the process underneath the first snow to fill the background
  • Use white shimmer paper to die cut the Leafless tree (DX7020) die
  • Use scraps of the white paper to create your torn "snow mounds"
  • Tape the Happy Holiday (LM139) stencil to the lower mounds and use a dark blue marker to outline the saying (be careful not to put too much pressure on the tip of the marker or you will get ink bleeding under the edge)
  • You could use a stencil brush and ink pad to stencil the saying instead of a marker
  • Assemble the card as shown, I taped the bottom of the tree directly to the "ground", but used some foam mounting tape cut in narrow strips a little further up the trunk
  • Use a glue pen and more Crystal glitter to add some sparkle along the top of the snow and on the branches
I know you will love our new dies as much as we do! This tree can be changed to match any season!
Hop on over to these design team blogs for more Christmas in August ideas.


Happy Creating,
Louise

Wednesday, August 14, 2013

Dreamweaver and Woodware Day 3!

Dreamweaver Stencils and Woodware Day 3
If you missed day 1 click here to check it out
If you missed day 2 click here to be inspired.

Welcome to the annual Dreamweaver and Woodware Christmas in August extravaganza week! Monday through Saturday we will be knocking your Christmas stockings off with fun and inspirational ideas for the upcoming holidays. All that you need to do is hop back and forth across the "pond" on each day, oohing and aaahhhing as you go, and leaving us plenty of holiday love. In return, you'll be entered to randomly win one prize package for a UK commenter, and a second prize package for a US commenter, featuring products distributed in the UK by Woodware...including Dreamweaver and Stampendous!

Prize includes four stencils, one die, and two stamps, selection may vary.

Here's what I've created for today:

Monica & Friend from Stampendous
LS91 Season's Greetings from Dreamweaver Stencils

When opened, you can see the string of Christmas lights
LM280 Xmas lights border from Dreamweaver Stencils

This sweet combination of Dreamweaver Stencils and a Stampendous House Mouse design go so well together. Plus it was easy to do!

  • Stamp the Monica & Friend House Mouse design with Memento Tuxedo Black on cardstock
  • Color with COPIC markers, or the markers you like to use
  • Paint glue on the light bulb and sprinkle with Stickles Dry Glitter Christmas Red
  • Use a small paint brush to stipple "snow" around the ground with Glossy White Embossing Paste from Dreamweaver
  • Sprinkle the wet paste with Crystal glitter or Stickles Dry Glitter Distress Rock Candy
  • Set aside to dry
  • Tape the Xmas lights border stencil to white cardstock with removable tape
  • Use a palette knife and paste spreader to apply Glossy Green Embossing Paste
  • Remove stencil and place in water for cleaning later
  • Use a cut straw or small spoon to sprinkle the lights with glitter (I used Stickles Dry Fine Glitter True Blue, Christmas Red, and Eucalyptus) carefully taping off after each color, try to avoid the cord
  • Let dry
  • Paste the Season's Greetings with the Glossy Green Embossing Paste also
  • Remove the stencil and place in water for cleaning later
  • Use a cut straw or small spoon to apply Christmas Red glitter to the S and G only
  • Let dry
  • Assemble as shown
Remember, the products featured here can be purchased in the UK from stores listed on the Woodware UK site

Now's the time for you to leave a comment and move on to the next designer for today:

Happy Creating,
Louise