Thursday, August 14, 2014

Christmas in August Day 5!


Wow! It's been a great week so far! The teams on both sides of the "pond" have been creating wonderful things to inspire you for the upcoming holidays with a mix of both Dreamweaver and Woodware UK* products! Six days, SIX, of beautiful, elegant, merry, cute, artsy, and craftsy projects to have you heading out to your local stores or internet sites to buy these goodies immediately!


Of course, there will be prizes as well. Three prize packages will be given to three commenters during this week's posts on the team's blogs, including five stencils and one nested die set. You can have an opportunity to win these goodies by leaving some holiday sweetness for each team member posting each day, to be one of the three winners for the week. Here are the team members that are inspiring you today:


Here's my creation: 
LG674  Oval Ornament and the new LL3045 Sm Oval Ornament
PLUS the new matching die set DG674 Nested Ornaments Dies

  •  To start, I taped each ornament stencil to some decorative holly cardstock (Graphic45) with removable tape
  • Place a large dollop of Pearlescent Embossing Paste on your craft mat or on a piece of freezer paper, add ONE drop of Wendy Vecchi's Archival Fern Green re-inker to the paste and mix well, it will be a very pale green
  • Use a paste spreader (LM2010) to apply the colored paste over each stencil
  • Remove the stencils and place in water for cleaning
  • Let paste dry thoroughly
  • When the paste is dry, lay the matching die over each ornament and cut them out
  • Lay LJ891 Holly swirls stencil over one ornament and use 1/4" stencil brushes and Fern Green and Red Geranium re-inkers to stencil the design
  • Brush the edges of each ornament with the Fern Green
  • Mount on some beautiful Hanko cardstock and add a bow and fiber from May Arts, clean and elegant
  • I love how the background paper shows through the paste too!

Close up, notice the bird that was on the paper looks like he's eating one of the berries

The left over negatives that I will certainly be using for another project

*For a stockist near you contact Woodware Craft Collection in the UK and Notions Marketing in the USA.

Happy Creating,
Louise

Wednesday, August 13, 2014

August Christmas in August Day 4!


Yes! It's that time of year again! The time when we inspire crafters on both sides of the "pond" with a mix of bothDreamweaver and Woodware UK* products for the holidays! Six days, SIX, of beautiful, elegant, merry, cute, artsy, and craftsy projects to have you heading out to your local stores or internet sites to buy these goodies immediately!


Of course, there will be prizes as well. Three prize packages will be given to three commenters during this week's posts on the team's blogs, including five stencils and one nested die set. You can have an opportunity to win these goodies by leaving some holiday sweetness for each team member posting each day, to be one of the three winners for the week. Here are the team members that are inspiring you today:


Thursday is our normal posting day for the weekly Dreamweaver challenge, so I combined our "August as an Adjective" challenge with this week's "Christmas in August" theme for my card today. Here's my creation: 

LG731 Holly flourish and LL3005 Holly and swirls stencils
plus the new matching die DL3005 Holly and swirls!

LL3005 and DL3005 used to create the crackled holly leaves
This beautiful card has a few steps, but no one takes very long, and the results are worth it! 

  • Paste emboss the Holly and swirls (LL3005) stencil with Glossy Blue (or black if you don't have blue) Embossing Paste, remove and clean stencil and let paste dry
  • Place the clean stencil back over the dry paste and add a coat of Crackle Embossing Paste, remove & clean stencil, let paste dry
  • In the meantime, place the Holly flourish stencil (LG731) on a piece of white cardstock and tape in place with removable tape
  • Place a drop or two of Wendy Vecchi's Archival Re-inker Red Geranium on a craft sheet or palette and pick it up with a 1/4" stencil brush, be sure to work the ink up into your bristles before stenciling with it
  • Use the Picasso tool (LL332) and place one of the small holes over each berry area to stencil on ink with the brush you loaded, wipe off the Picasso with a soft cloth before continuing to the next color
  • Place several drops of Wendy Vecchi's Archival Re-inker Fern Green on a craft mat and load a different stencil brush with this, stencil the leaves and swirls with the Fern Green using the Picasso tool as a shield around the berries
  • Remove and clean the stencil
  • Use a 3/4" brush to pick up some of the Fern Green and brush a light coat around the edges of the entire piece
  • Use a heat tool to set the inks
  • Place the clean, dry Holly stencil back over the dry Crackle paste and use the Fern Green ink and brush to color the holly leaves
  • Gently heat set the ink
  • Place the matching Holly die over the crackled image and run through your die cut maching
  • Cut the leaves away from the rest of the image and brush a little more green ink along the edges
  • Mount everything into an august card embellished with a beautiful ribbon from May Arts

*For a stockist near you contact Woodware Craft Collection in the UK and Notions Marketing in the USA.

Happy Creating,

Tuesday, August 12, 2014

Christmas in August Day 3!


Yes! It's that time of year again! The time when we inspire crafters on both sides of the "pond" with a mix of bothDreamweaver and Woodware UK* products for the holidays! Six days, SIX, of beautiful, elegant, merry, cute, artsy, and craftsy projects to have you heading out to your local stores or internet sites to buy these goodies immediately!


Of course, there will be prizes as well. Three prize packages will be given to three commenters during this week's posts on the team's blogs, including five stencils and one nested die set. You can have an opportunity to win these goodies by leaving some holiday sweetness for each team member posting each day, to be one of the three winners for the week. Here are the team members that are inspiring you today:


Here's my creation: 
LM270 Single Candle (US)  LM270 Single Candle (UK)
"JOY" from Dreamweaver's new alphabet die set
Very simple, silver embossing paste, clear glitter sprinkled on the wet paste, layered on beautiful shimmer papers.

*For a stockist near you contact Woodware Craft Collection in the UK and Notions Marketing in the USA.

Happy Creating,
Louise

Monday, August 11, 2014

Christmas in August Day 2!


Yes! It's that time of year again! The time when we inspire crafters on both sides of the "pond" with a mix of bothDreamweaver and Woodware UK* products for the holidays! Six days, SIX, of beautiful, elegant, merry, cute, artsy, and craftsy projects to have you heading out to your local stores or internet sites to buy these goodies immediately!


Of course, there will be prizes as well. Three prize packages will be given to three commenters during this week's posts on the team's blogs, including five stencils and one nested die set. You can have an opportunity to win these goodies by leaving some holiday sweetness for each team member posting each day, to be one of the three winners for the week. Here are the team members that are inspiring you today:

Here's my creation: 

FRS163 Patch Frosty
and the new alphabet dies from Dreamweaver!


Happy Creating,
Louise

Sunday, August 10, 2014

Christmas in August!


Yes! It's that time of year again! The time when we inspire crafters on both sides of the "pond" with a mix of bothDreamweaver and Woodware UK* products for the holidays! Six days, SIX, of beautiful, elegant, merry, cute, artsy, and craftsy projects to have you heading out to your local stores or internet sites to buy these goodies immediately!


Of course, there will be prizes as well. Three prize packages will be given to three commenters during this week's posts on the team's blogs, including five stencils and one nested die set. You can have an opportunity to win these goodies by leaving some holiday sweetness for each team member posting each day, to be one of the three winners for the week. Here are the team members that are inspiring you today:

Here's my creation: 

*For a stockist near you contact Woodware Craft Collection in the UK and Notions Marketing in the USA.

Happy Creating,
Louise

Thursday, August 7, 2014

August as an Adjective!

As we are heading towards back-to-school again, it is only appropriate that we break out our dictionary for this month's Dreamweaver challenge..."AUGUST as an ADJECTIVE"! 
Merriam-Webster defines august as, "marked by majestic dignity or grandeur", with synonyms such as, "dignified, distinguished, imposing, portly, solemn, staid, and stately". Now, I don't know just how dignified and stately the Dream Team can become for an entire month, but we are all going to give it a try! How about trying along with us, and linking YOUR creations to the inlinkz tool below for a chance to win the wildest stencil design your little heart is screaming for. 

Here's my creation for this week:
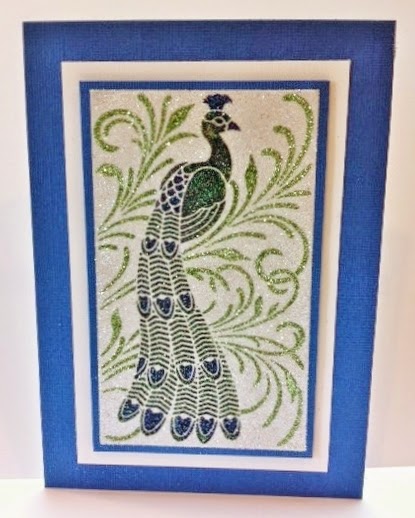
LG730 Peacock - double glitter technique


It's always difficult to photograph this technique and capture the real beauty of it. The Peacock (LG730) itself fits the definition of august, and the glitter makes it especially so! Here are the steps for creating this simple, but elegant card:

  • Use Dreamweaver Handmade Hawaiian Soap to apply a coat of soap on the back of the stencil
  • Use a large brush to sweep away any excess soap flake in the openings
  • Apply  a piece of Mounting Paper Double-sided to a deep blue piece of cardstock that is 1/4" larger than the mounting paper each direction
  • Remove the release paper from the mounting paper and place the stencil on the sticky surface, soap side down. (use the release paper to pat the stencil in place)
  • Use a cut straw or small spoon to apply glitter to each area
  • Rub the glitter gently into the openings with your finger
  • Carefully brush away any excess glitters using the larger stencil brush
  • Place the stencil face down on the table and carefully peel off the glittered image, making sure to keep your stencil flat
  • Sprinkle the exposed sticky background with clear glitter
  • Mount into a wonderful card

Just a note, I like to use opaque glitters for the main image and transparent glitter for the background. I thought about adding a beautiful ribbon from May Arts, but I decided that this beautiful peacock was august enough to stand on its own!

Put on a straight face for the "A" team this week:


Happy Creating,
Louise
An InLinkz Link-up