Monday, August 11, 2014

Christmas in August Day 2!


Yes! It's that time of year again! The time when we inspire crafters on both sides of the "pond" with a mix of bothDreamweaver and Woodware UK* products for the holidays! Six days, SIX, of beautiful, elegant, merry, cute, artsy, and craftsy projects to have you heading out to your local stores or internet sites to buy these goodies immediately!


Of course, there will be prizes as well. Three prize packages will be given to three commenters during this week's posts on the team's blogs, including five stencils and one nested die set. You can have an opportunity to win these goodies by leaving some holiday sweetness for each team member posting each day, to be one of the three winners for the week. Here are the team members that are inspiring you today:

Here's my creation: 

FRS163 Patch Frosty
and the new alphabet dies from Dreamweaver!


Happy Creating,
Louise

Sunday, August 10, 2014

Christmas in August!


Yes! It's that time of year again! The time when we inspire crafters on both sides of the "pond" with a mix of bothDreamweaver and Woodware UK* products for the holidays! Six days, SIX, of beautiful, elegant, merry, cute, artsy, and craftsy projects to have you heading out to your local stores or internet sites to buy these goodies immediately!


Of course, there will be prizes as well. Three prize packages will be given to three commenters during this week's posts on the team's blogs, including five stencils and one nested die set. You can have an opportunity to win these goodies by leaving some holiday sweetness for each team member posting each day, to be one of the three winners for the week. Here are the team members that are inspiring you today:

Here's my creation: 

*For a stockist near you contact Woodware Craft Collection in the UK and Notions Marketing in the USA.

Happy Creating,
Louise

Thursday, August 7, 2014

August as an Adjective!

As we are heading towards back-to-school again, it is only appropriate that we break out our dictionary for this month's Dreamweaver challenge..."AUGUST as an ADJECTIVE"! 
Merriam-Webster defines august as, "marked by majestic dignity or grandeur", with synonyms such as, "dignified, distinguished, imposing, portly, solemn, staid, and stately". Now, I don't know just how dignified and stately the Dream Team can become for an entire month, but we are all going to give it a try! How about trying along with us, and linking YOUR creations to the inlinkz tool below for a chance to win the wildest stencil design your little heart is screaming for. 

Here's my creation for this week:
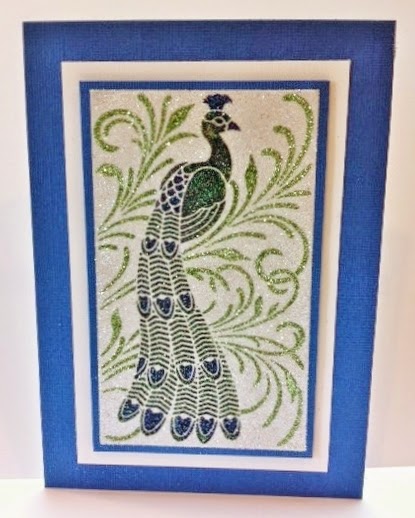
LG730 Peacock - double glitter technique


It's always difficult to photograph this technique and capture the real beauty of it. The Peacock (LG730) itself fits the definition of august, and the glitter makes it especially so! Here are the steps for creating this simple, but elegant card:

  • Use Dreamweaver Handmade Hawaiian Soap to apply a coat of soap on the back of the stencil
  • Use a large brush to sweep away any excess soap flake in the openings
  • Apply  a piece of Mounting Paper Double-sided to a deep blue piece of cardstock that is 1/4" larger than the mounting paper each direction
  • Remove the release paper from the mounting paper and place the stencil on the sticky surface, soap side down. (use the release paper to pat the stencil in place)
  • Use a cut straw or small spoon to apply glitter to each area
  • Rub the glitter gently into the openings with your finger
  • Carefully brush away any excess glitters using the larger stencil brush
  • Place the stencil face down on the table and carefully peel off the glittered image, making sure to keep your stencil flat
  • Sprinkle the exposed sticky background with clear glitter
  • Mount into a wonderful card

Just a note, I like to use opaque glitters for the main image and transparent glitter for the background. I thought about adding a beautiful ribbon from May Arts, but I decided that this beautiful peacock was august enough to stand on its own!

Put on a straight face for the "A" team this week:


Happy Creating,
Louise
An InLinkz Link-up

Thursday, July 31, 2014

JULY...a month to Die for Week 5!

Welcome to week five of our Dreamweaver Stencils July Challenge! Yes, July has five Thursdays, so you get one more week "to DIE for"!  All of this month the Dream Team are featuring our newest toys...our DIES! You'd be surprised at how many we have, and what fun things you can do with them...especially when used in conjunction with many of their matching stencils. They are such a simple way to create an effective card.
I just love all our dies, and can hardly wait for the new ones to arrive, but don't forget that most of our designs are easy to paper piece too. This week I'm sharing two paper pieced images and one of our more detailed dies to show you what I mean.


LG671 Hats - paper pieced

LL493 and LD493 Teacups Vertical - stencil and matching die
LG737 Umbrella - Paper pieced
Hope you have a wonderful last day of July and are looking forward to our new August challenge that starts next Thursday!

Here's the list of designers for today:

Happy Creating,
Louise 

An InLinkz Link-up

Thursday, July 24, 2014

July...a month to DIE for Week 4!

Welcome to week four of our Dreamweaver Stencils July Challenge!  All of this month the Dream Team are featuring our newest toys...our DIES! You'd be surprised at how many we have, and what fun things you can do with them...especially when used in conjunction with many of their matching stencils. They are such a simple way to create an effective card.

I'm in beautiful northern Wisconsin today, heading over to Minnesota for "Christmas in July" with my husband's family. On the way, I thought I would visit some stores in WI that sell Dreamweaver Stencils products. Yesterday I taught this fun class at Stampin' N Scrapin' Fun in Marshfield, WI:
Open Owl, Nesting Owls die, and Leafless tree die

I have taught Zentangle with this Open Owl stencil (LG751) in the past, but now it is really fun because after you finish tangling it you can cut out the shape with the matching die from our Nesting Owls die set (DG751)!  This size just cuts the outline of the owl and cuts it just a little larger so it leaves an nice mat all the way around. I cut another one out of black paper to create a shadow. The branches under his claws are from the Leafless tree die (DX7020), I just cut off some branches and taped them under the owl. Easy and fun!

I'm sure that our "B" team is just DIE-ing to show you their creations, as well as our Guest Designer for the month of July...


Happy Creating,
Louise
An InLinkz Link-up

Thursday, July 17, 2014

JULY...a month to DIE for Week 3!

Welcome to week three of our Dreamweaver Stencils July Challenge!  All of this month the Dream Team are featuring our newest toys...our DIES! You'd be surprised at how many we have, and what fun things you can do with them...especially when used in conjunction with many of their matching stencils. They are such a simple way to create an effective card.

This week my creation incorporates three of our dies and three stencils. Yes, it's a little more work than last week's card, but it is so cute! Here it is...


Dog Days of Summer!
See, it is totally worth it! 
The background was created using 3/4" stencil brushes and Distress Inks (Salty Ocean, Peeled Paint, and Vintage photo). I used the Picasso (LL332) to create some clouds (I told you there were three stencils!).

So what are the three dies? They are DX7020 - Leafless tree, DD003 - Leafy Branch, and DL3029 - Dog. The decorative papers for the Leafy Branch and the Dog had Double-sided mounting paper put on the back before cutting. I did not do that to the tree because I wanted the branches to be flexible. I just used a dot roller on the back of the trunk and some lower branches to adhere the tree. The Leafy branch was cut apart so I could stick the leaves all over the tree limbs.

LL3029 - Dog stencil was paste embossed on light green paper with Matte Black Embossing Paste and set aside to dry. The cut pieces were edged with black marker and stuck on him. This allowed me to keep his eyeball, nose, collar and back spot black for more contrast. I added a little glue and glitter to his collar. 

The Sun stencil (LR502) was paste embossed with Matte Black Embossing Paste, then, before removing the stencil, a combination of Distress Embossing Powders were sprinkled over the wet paste (spiced marmalade, mustard seed, fired brick), the stencil carefully removed, heat set the powders being careful not to let the paste bubble.

I'm sure that our "A" team is just DIE-ing to show you their creations, as well as our Guest Designer for the month of July...

Happy Creating,
Louise

Thursday, July 10, 2014

JULY...a month to DIE for!

Welcome to week two of our Dreamweaver Stencils July Challenge! Hope everyone had a wonderful 4th of July weekend, I know I did!
All of this month the Dream Team are featuring our newest toys...our DIES! You'd be surprised at how many we have, and what fun things you can do with them...especially when used in conjunction with many of their matching stencils. They are such a simple way to create an effective card.
Here's an example of a quick, yet beautiful card for when you just don't have the time to be too "creative"!

LL516 - Bearded Iris and DD004 Long Nesting Ovals
The steps to this are easy:

  • Lay a piece of natural colored cardstock in your spray box
  • Lay the Bearded Iris stencil (LL516) face up on the cardstock (you can see Lynell's name when it is face up)
  • Use Memories Mist  Plum Sake and Lavender Tea in the flower and but areas, you can use a second piece of paper to help shield the leaves if you want
  • Use Memories Mist Wheatgrass and Liquid Pine in the leaves and stem
  • Carefully remove the stencil and place in water for cleaning
  • Spray a light coat of Pale Ale and Iridescent Memories Mist in the background of the iris
  • Remove Iris from the spray box and let it dry
  • Take the largest oval from the Long Nesting Ovals (DD004) die set and place it cutting edge down over the Iris image
  • Tape in place with removable tape and run through your die cut machine
  • Edge the oval with Distress Ink vintage photo
  • The background is a piece of vellum with Dreamweaver Color Solutions pounced around the whole piece (Citron, Mojito Green, & Gold Star), let dry
  • I used a permanent glue stick over the entire piece of vellum and stuck it to the front of an A2 natural, top fold card, tied a piece of May Arts ribbon around the whole front and made a bow off to the right
  • Add the oval iris with foam mounting tape for added dimension
  • The A2 card was then adhered to a piece of lavender cardstock to really bring out the purple in the iris
The "B" team has more great creations for you on their blogs too! And don't miss our July Guest Designer, Terri Sproul.


Happy Creating,
Louise