Thursday, August 29, 2013

Christmas in August!

HAPPY BIRTHDAY ELLIE! Today my family is celebrating our darling granddaughter, Ellie's first birthday! It is hard to believe that a whole year has passed by already! We love you!

It's also hard to believe that this is our last Christmas in August challenge for Dreamweaver Stencils. Every month seems to fly by faster and faster. We hope you have been inspired to create your holiday cards and that we have made it a little easier! We would love for you to join our challenges, just link your creation over at the DREAM it UP! blog or send a photo to lynell@dreamweaverstencils.com and she will post it for you.

This week I was inspired by a technique that we used recently in a card club exchange group I belong to. It is a processes where you cut three layers of matching cardstock( each layer is about 1" smaller each direction) and lightly tack the layers together before stamping a large background image or a smaller image several times. Then you mat each layer in a coordinating color and line them back up. It is a very cool look. Here is the card I created for that club using a couple of stamps from Stampers Anonymous Tim Holtz collection:

And here is the card I created using the same process but with  Dreamweaver Stencils products:
LJ922 Christmas borders and LL469 Xmas icons
Glossy Red Embossing Paste and Crystal glitter from Art Glitter
The steps:
  • Cut one piece of white cardstock 4 1/4" x 5 1/2"
  • Cut one piece of white cardstock 3 1/4" x 4 1/2"
  • Cut one piece of white cardstock 2 1/4" x 3 1/2"
  • I used a little dot roller in each corner to adhere the three layers one on top of the other
  • Place the Christmas borders stencil (LJ922) on the stack and tape in place with removable tape
  • Use a palette knife and paste spreader to apply a coat of Glossy Red Embossing Paste over the image
  • Remove the stencil and place in water for cleaning later
  • Immediately sprinkle the wet paste with Crystal glitter, carefully tapping off the extra paste
  • Set the layered piece aside to dry
  • Tape the Xmas icons stencil (LL469) to a small square of white cardstock, positioning the poinsettia portion over the paper and taping off the other sections with removable tape
  • Apply Glossy Red Embossing Paste over the poinsettia area
  • Remove stencil and place in water for cleaning later
  • Sprinkle the wet paste with Crystal glitter
  • Set aside to dry
  • Cut one piece of dark green cardstock (I used a shimmer cardstock) 4 1/4" x 5 1/2" (yes, that's right)
  • Cut one piece of dark green cardstock  3 1/2" x 4 3/4"
  • Cut one piece of dark green cardstock  2 1/2" x 3 3/4"
  • Cut one piece of dark green cardstock 1 7/8" x 1 7/8"
  • Cut a strip of dark green cardstock 3/4" x 4 1/4"
  • When the paste is dry, carefully separate the three layers, I ran the edge of my palette knife under the edges to help get them apart
  • Trim the edges of the largest layer right to the edge of the paste
  • Mount each pasted layer on its matching dark green layer and then on top of each other
  • Adhere the strip of dark green across the three layers
  • Trim around the poinsettia image leaving just a small white edge all the way around
  • Mount it on the small dark green square and then on the card front
  • Cut a base card from white cardstock either 5 1/2" x 8 1/2" (scored at 4 1/4" for a side fold card) or  4 1/4" x 11" (scored at 5 1/2" for a top fold card)
  • Adhere the card front to the base card
Before you head over to the other team member blogs, I just want to let you know that next month we will be doing a collaboration all month long with the team from Art Glitter! We are very excited and look forward to having our own Kristi Parker Van Doren back as a guest designer for the month! You won't want to miss any of it! 

This week's designer links:

Happy Creating,
Louise

Thursday, August 22, 2013

Christmas in August!

Welcome back to our Dreamweaver Stencils August challenge of "Christmas in August". We had an incredible week last week with the team from Woodware Crafts, filled with wonderful ideas for the upcoming holidays. If you missed it, look back through some of our older posts for those beautiful projects. Winners of the prizes will be announce on the DREAM it UP! blog!
This week I have used our fabulous new Leafless tree die cut. Yes, I said die cut! Dreamweaver has released three new die cuts to match three of our stencils, with more to come! Here's what I came up with:
LJ878 - Snow splatter in Glossy White Embossing Paste
DX7020 - Leafless tree die cut from shimmery white cardstock
LM139 - Happy Holidays traced with a Memento marker in Paris Dusk
This is a very easy card:

  • Cut a piece of dark blue cardstock 5" x 7"
  • Tape the Snow splatters (LJ878)  stencil across the card with removable tape
  • Use a palette knife and paste spreader to apply Glossy White Embossing Paste
  • Remove the stencil and place in water for cleaning
  • Sprinkle the wet paste with Crystal glitter
  • Let paste dry (it won't take long because they are very small dots of paste)
  • Repeat the process underneath the first snow to fill the background
  • Use white shimmer paper to die cut the Leafless tree (DX7020) die
  • Use scraps of the white paper to create your torn "snow mounds"
  • Tape the Happy Holiday (LM139) stencil to the lower mounds and use a dark blue marker to outline the saying (be careful not to put too much pressure on the tip of the marker or you will get ink bleeding under the edge)
  • You could use a stencil brush and ink pad to stencil the saying instead of a marker
  • Assemble the card as shown, I taped the bottom of the tree directly to the "ground", but used some foam mounting tape cut in narrow strips a little further up the trunk
  • Use a glue pen and more Crystal glitter to add some sparkle along the top of the snow and on the branches
I know you will love our new dies as much as we do! This tree can be changed to match any season!
Hop on over to these design team blogs for more Christmas in August ideas.


Happy Creating,
Louise

Saturday, August 17, 2013

Dreamweaver and Woodware Day 6!

WOW! What a great week filled with so many beautiful ideas for the upcoming holidays! We hope you've all enjoyed the week as much as we have!
If you missed day 1 click here to check it out
If you missed day 2 click here to be inspired.
If you missed day 3 Click here to see it
If you missed day 4 click here for more great ideas
If you missed day 5 click here for even more!

The annual Dreamweaver and Woodware Christmas in August extravaganza week is wrapping up! We have had a Monday through Saturday of knock your Christmas stockings off  fun and inspirational ideas for the upcoming holidays. All that you need to do is hop back and forth across the "pond" on each day, oohing and aaahhhing as you go, and leaving us plenty of holiday love. In return, you'll be entered to randomly win one prize package for a UK commenter, and a second prize package for a US commenter, featuring products distributed in the UK by Woodware...including Dreamweaver and Stampendous!

Prize includes four stencils, one die, and two stamps, selection may vary.

For my grand finale I have chosen the beautiful Pine cones (LG675) stencil from Dreamweaver Stencils. I'm sure you will agree that it is a fabulous stencil. Today I am showing you the same technique on two different papers to demonstrate how you can change the look of the image dramatically depending on the paper you choose. Here they are:

LG675 - Pine cones on smooth cream cardstock
Metallic Gold Embossing Paste and
Metallic F/X powders - Kiwi, Forestry, Cocoa and Amber Glow

LG675 - Pine cones on black linen cardstock
Metallic Gold Embossing Paste and
Metallic F/X powders - Kiwi, Forestry, Cocoa and Amber Glow
They were both done in the Molten Magic technique (can you tell I LOVE this technique!) using the exact same products following these simple steps:

  • Tape the stencil to cardstock with removable tape
  • Use a palette knife and paste spreader to apply Metallic Gold Embossing Paste over the design
  • Remove stencil and place in water for cleaning later
  • Use a soft paint brush to sprinkle the F/X powders over the design (remember, it will look messy)
  • Lift the paper and tap from underneath to further spread the powders
  • Tap off extra powders into a trash can
  • Heat with a embossing gun until the whole design is bubbly
  • Let cool completely
  • Use a Swiffer cloth to gently wipe off any excess powders from the paper and paste
  • Mount into a beautiful card, adding some fabulous May Arts ribbon and a 3" embellishment pin from Dreamweaver Stencils (I used white pins and colored them with a gold Krylon pen)
Here are the close ups of the pine cones:


The extra dimension this technique gives the design is amazing! The gold paste shines through anywhere there was no powder, adding a beautiful metallic shine!

I hope you've enjoyed all the beautiful cards you seen this week and will contemplate joining our monthly Dreamweaver challenges. We love to see what you create too!

Remember, the products featured here can be purchased in the UK from stores listed on the Woodware UK site!

Now it's time for you to leave a comment and move on to the next designer for today:

Friday, August 16, 2013

Dreamweaver and Woodware Day 5!

If you missed day 1 click here to check it out
If you missed day 2 click here to be inspired.
If you missed day 3 Click here to see it
If you missed day 4 click here for more great ideas

Welcome to the annual Dreamweaver and Woodware Christmas in August extravaganza week! Monday through Saturday we will be knocking your Christmas stockings off with fun and inspirational ideas for the upcoming holidays. All that you need to do is hop back and forth across the "pond" on each day, oohing and aaahhhing as you go, and leaving us plenty of holiday love. In return, you'll be entered to randomly win one prize package for a UK commenter, and a second prize package for a US commenter, featuring products distributed in the UK by Woodware...including Dreamweaver and Stampendous!

Prize includes four stencils, one die, and two stamps, selection may vary.

I teach at several stores in the Illinois and Wisconsin area and today  I am sharing three cards that I designed last fall for classes. The beautiful Heart Ornaments stencil - LJ921 had just been released and, needless to say, it was a big hit. When I teach a class, I like to use one stencil and teach 3 different techniques to use with that stencil (or any stencil really!). Here they are:

LJ921 - Heart Ornaments
Metallic Gold Embossing Paste with green glitter on the needles while the paste is still wet,
and gold leafing (red leafing) added to the hearts after the paste was dry

LJ921 - Heart Ornaments
Molten Magic technique with Pearlescent Embossing Paste
and Metallic F/X powders sprinkled on wet paste then heated until bubbly

LJ910 - Rolling Hills dry embossed for the background
LJ921 - Heart Ornaments pasted on acetate with Regular Embossing Paste,
colored with stencil brushes and inks when the paste is dry,
dries white glue for the drips on the hearts,
Regular Embossing Paste sculpted onto the branches and sprinkled with Crystal glitter while wet
This card was inspired by one our very talented team leader, Pam Hornshu, had created for CHA that summer.
So there you have it! Three very different cards with the same stencil. I hope you've been inspired this week to start your holiday cards! Don't miss our grand finale tomorrow when all the designers will be playing along. It's going to be fabulous I know!

Remember, the products featured here can be purchased in the UK from stores listed on the Woodware UK site
Now its time for you to leave a comment and move on to the next designer for today:
Louise Healy (you are here)

Happy Creating,
Louise

Thursday, August 15, 2013

Dreamweaver and Woodware Day 4!

If you missed day 1 click here to check it out
If you missed day 2 click here to be inspired.
If you missed day 3 Click here to see it


Welcome to the annual Dreamweaver and Woodware Christmas in August extravaganza week! Monday through Saturday we will be knocking your Christmas stockings off with fun and inspirational ideas for the upcoming holidays. All that you need to do is hop back and forth across the "pond" on each day, oohing and aaahhhing as you go, and leaving us plenty of holiday love. In return, you'll be entered to randomly win one prize package for a UK commenter, and a second prize package for a US commenter, featuring products distributed in the UK by Woodware...including Dreamweaver and Stampendous!

Prize includes four stencils, one die, and two stamps, selection may vary.

Here's what I've created for today:
LL319 - Covered Bridge and
LJ811 - Lg tile
This was done using the Faux Tile technique. Here are the steps:

  • Dry emboss the Lg tile stencil on white cardstock with either a light box and stylus or through a die cut machine with a rubber embossing mat
  • Leave the tile stencil in place and add the Covered bridge stencil, lining it up with the right edge of the paper
  • Tape stencils in place with removable tape
  • Use stencil brushes and ink pads to color the design
  • Remove the Covered bridge stencil and add  more color in the background. I used a Picasso (LL332) to add some clouds in the sky
  • Remove the tile stencil and wipe clean with a soft cloth
  • Replace the tile stencil over the design and pat the whole surface with VersaMark clear embossing ink
  • Remove the tile stencil and sprinkle with Clear Embossing Powder
  • Heat set and cool
  • Return the tile stencil and pat another coat of VersaMark over the entire surface again
  • Sprinkle with Clear Embossing Powder
  • Heat set, go a little slower this time to give the two layers time to heat together and get smoother
  • Stencil Happy Holidays or Season's Greetings on the inside
Remember, the products featured here can be purchased in the UK from stores listed on the Woodware UK site
Now's the time for you to leave a comment and move on to the next designer for today:
Happy Creating,
Louise

Wednesday, August 14, 2013

Dreamweaver and Woodware Day 3!

Dreamweaver Stencils and Woodware Day 3
If you missed day 1 click here to check it out
If you missed day 2 click here to be inspired.

Welcome to the annual Dreamweaver and Woodware Christmas in August extravaganza week! Monday through Saturday we will be knocking your Christmas stockings off with fun and inspirational ideas for the upcoming holidays. All that you need to do is hop back and forth across the "pond" on each day, oohing and aaahhhing as you go, and leaving us plenty of holiday love. In return, you'll be entered to randomly win one prize package for a UK commenter, and a second prize package for a US commenter, featuring products distributed in the UK by Woodware...including Dreamweaver and Stampendous!

Prize includes four stencils, one die, and two stamps, selection may vary.

Here's what I've created for today:

Monica & Friend from Stampendous
LS91 Season's Greetings from Dreamweaver Stencils

When opened, you can see the string of Christmas lights
LM280 Xmas lights border from Dreamweaver Stencils

This sweet combination of Dreamweaver Stencils and a Stampendous House Mouse design go so well together. Plus it was easy to do!

  • Stamp the Monica & Friend House Mouse design with Memento Tuxedo Black on cardstock
  • Color with COPIC markers, or the markers you like to use
  • Paint glue on the light bulb and sprinkle with Stickles Dry Glitter Christmas Red
  • Use a small paint brush to stipple "snow" around the ground with Glossy White Embossing Paste from Dreamweaver
  • Sprinkle the wet paste with Crystal glitter or Stickles Dry Glitter Distress Rock Candy
  • Set aside to dry
  • Tape the Xmas lights border stencil to white cardstock with removable tape
  • Use a palette knife and paste spreader to apply Glossy Green Embossing Paste
  • Remove stencil and place in water for cleaning later
  • Use a cut straw or small spoon to sprinkle the lights with glitter (I used Stickles Dry Fine Glitter True Blue, Christmas Red, and Eucalyptus) carefully taping off after each color, try to avoid the cord
  • Let dry
  • Paste the Season's Greetings with the Glossy Green Embossing Paste also
  • Remove the stencil and place in water for cleaning later
  • Use a cut straw or small spoon to apply Christmas Red glitter to the S and G only
  • Let dry
  • Assemble as shown
Remember, the products featured here can be purchased in the UK from stores listed on the Woodware UK site

Now's the time for you to leave a comment and move on to the next designer for today:

Happy Creating,
Louise

Tuesday, August 13, 2013

Dreamweaver and Woodware Day 2!

If you missed day 1 click here to check it out

Welcome to the annual Dreamweaver and Woodware Christmas in August extravaganza week! Monday through Saturday we will be knocking your Christmas stockings off with fun and inspirational ideas for the upcoming holidays. All that you need to do is hop back and forth across the "pond" on each day, oohing and aaahhhing as you go, and leaving us plenty of holiday love. In return, you'll be entered to randomly win one prize package for a UK commenter, and a second prize package for a US commenter, featuring products distributed in the UK by Woodware...including Dreamweaver and Stampendous!

Prize includes four stencils, one die, and two stamps, selection may vary.

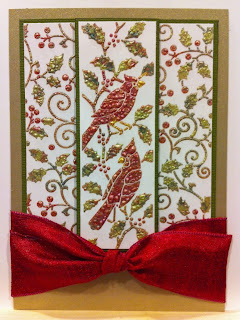
Today I am featuring the Molten Magic technique with two beautiful Dreamweaver stencils. 
LJ891 - Holly swirls
LL572 - Cardinals n holly
 This technique is very easy:
  • Tape your stencil to cardstock using removable tape
  • Use a palette knife and paste spreader to apply Pearlescent Embossing Paste (any of the glossy pastes will work, your colors will just change a little depending on the paste you use)
  • Remove the stencil and place in water for cleaning later
  • Use a soft paint brush to sprinkle Metallic F/X powders over the design, it's really not that hard to keep the colors pretty much where you want them, you do not have to cover all the paste, colors I used were Kiwi, Forestry, Cocoa, Goldfinch, Kimono Red and Rose Berry
  • After you have on the powders, carefully lift the cardstock and tap it from underneath to "jump" the powders around, it's ok if they get mixed up, that's part of the technique
  • It will look very messy at this point but don't panic!
  • Knock off some of the extra powders by holding the image upside down over a trash can and giving it a couple of flicks on the back
  • Place it on a heat resistent surface and heat until bubbly all over
  • Let it cool, then wipe the excess powders off the paper and image with a Swiffer cloth (you know, the ones you are supposed to use to dust your floors)
  • Trim and layer into a beautiful card finished with fabulous ribbon from May Arts

Close up of the bubbling you'll see when you heat it
This technique works on virtually any stencil design, and is so impressive. I spent last weekend at the big Stampaway 2013 convention in Cincinnati OH and demonstrated this technique all day. Everyone loved it!

Remember, the products featured here can be purchased in the UK from stores listed on the Woodware UK site
Now's the time for you to leave a comment and move on to the next designer for today:
Louise Healy (you are here)

Happy Creating,
Louise

Monday, August 12, 2013

Dreamweaver Stencils and Woodware Day1


Welcome to the annual Dreamweaver and Woodware Christmas in August extravaganza week! Monday through Saturday we will be knocking your Christmas stockings off with fun and inspirational ideas for the upcoming holidays. All that you need to do is hop back and forth across the "pond" on each day, oohing and aaahhhing as you go, and leaving us plenty of holiday love. In return, you'll be entered to randomly win one prize package for a UK commenter, and a second prize package for a US commenter, featuring products distributed in the UK by Woodware...including Dreamweaver and Stampendous!
Prize includes four stencils, one die, and two stamps, selection may vary.

For this first day, I have used the newly released LL387 Mistletoe stencil (in the UK click here) and the shadow technique.


Here's how it was done:
(products are available through Woodware Crafts in the UK)
  • Tape the stencil to cream colored paper with removable tape
  • Use a 1/2" Stencil Brush and Distress Inks forest moss to stencil color over the entire design
  • Remove the stencil and wipe it off with a soft rag
  • Lay the stencil back over the colored image then shift the stencil up and to the right about 1/16"
  • Tape in place
  • Use a palette knife and paste spreader to apply a coat of Glossy White Embossing Paste over the stencil
  • Remove the stencil and place in water for cleaning later
  • Use a cut straw to apply Stickles Dry Fine Glitter Christmas Red to the bow, tap off excess carefully
  • Apply Art Glitter Rock Moss Microfine Transparent glitter to the leaves and stems, try to avoid the berries
  • Tap off excess glitter and let dry thoroughly
  • Layer into a beautiful square card, I used Distress cardstock in Old Paper and Peeled Paint, I don't like the white edge you get when you cut paper so I used Distress Markers in Old Paper and Forest Moss to go around the edges of the paper to "finish" them
Now's the time for you to leave a comment and move on to the next designer for today:
Louise Healy (you are here)

Be sure to stop back tomorrow and the rest of the week for more great holiday ideas!

Happy Creating,
Louise